Ultimate PrePro2 Gauntlet Build

Fettacini

Hunter
Hello all, back with a new build of some gauntlets. This will be my ultimate set of Prepro2 gauntlets

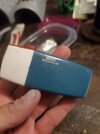
What started this? Glad you asked. I finally snagged a real Eveready minilight. Well, sort of. I grabbed an Eveready handy light( slightly bigger than the minilight but it fits very well actually) manufactured under Eveready's English brand, Berec. This particular one has been shown in some other threads as its the BOAC airlines branded light.

First off, big shout out to Hawk01 who helped me track it down and also supplied me with some fat dental files for this build.

We will start with the right gauntlet and make out way over to a new yellow left one eventually.

Starting off. Short list of supplies, gauntlets are RKD brand, mostly because they were inexpensive and I could buy just the shells. I 3d printed the hose connector and little protrusion piece above the darts. I had a spare resin whipcord launcher.
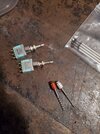
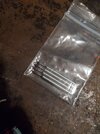
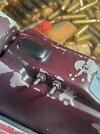
I used Quest Designs darts and I found some alco switches on ebay. Easy peasy.

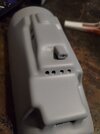
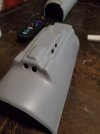
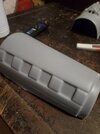
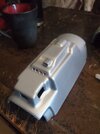
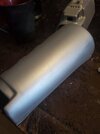
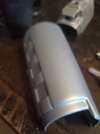
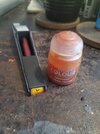
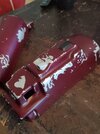
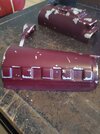
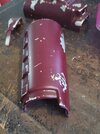
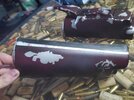
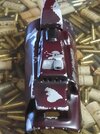
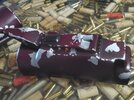
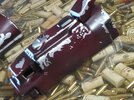
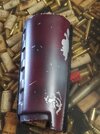
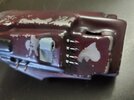
I set about cutting the holes for the light and then sanded the housings and primed them with Gunze Sanyo Mr. Surfacer primer. I plan on using Duplicolor silver to base the gauntlets and will use humbrol maskol to mask all the damage.

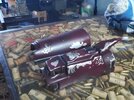
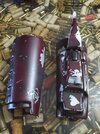
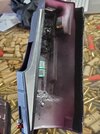
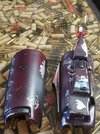
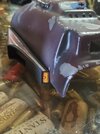
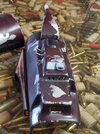
In this series of pictures you can see the primed gauntlets, the accessories and the whip cord launcher already in progress.

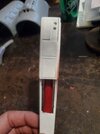
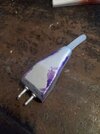
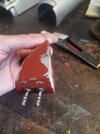
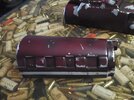
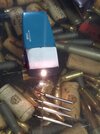
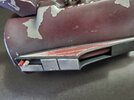
The whip cord launcher was based in white and then masked and sprayed with Tamiya dull red to simulated the overspray and Tamiya gray spray to simulate the gray overspray on the other panels.

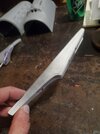
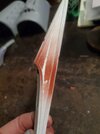
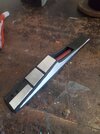
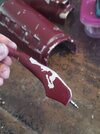
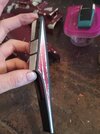
You can see my fat dental files, one in bare silver and one I coated on Tamiya clear red brush paint to simulate the anodized red.

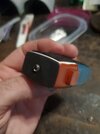
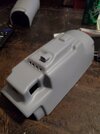
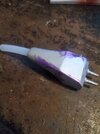
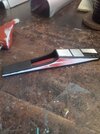
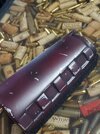
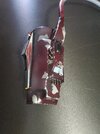
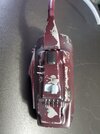
The hose attachment was sprayed Duplicolor silver and masked with humbrol maskol as you can see. I used 3.5mm jacks from amazon for the attachment..

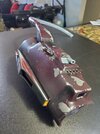
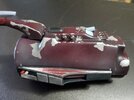
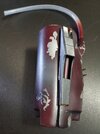
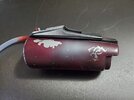
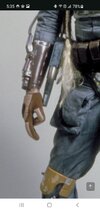
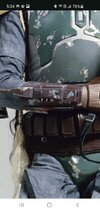
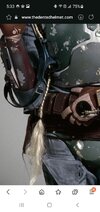
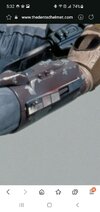
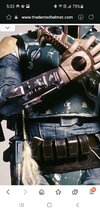
First up some pictures from the reference photos so you can see what I'm going for.
 

Attachments

  • Screenshot_20220203-053543_Samsung Internet.jpg
    Screenshot_20220203-053543_Samsung Internet.jpg
    944.3 KB · Views: 175
  • Screenshot_20220203-053406_Samsung Internet.jpg
    Screenshot_20220203-053406_Samsung Internet.jpg
    1.3 MB · Views: 170
  • Screenshot_20220203-053335_Samsung Internet.jpg
    Screenshot_20220203-053335_Samsung Internet.jpg
    1.1 MB · Views: 168
  • Screenshot_20220203-053233_Samsung Internet.jpg
    Screenshot_20220203-053233_Samsung Internet.jpg
    602.8 KB · Views: 167
  • Screenshot_20220203-053311_Samsung Internet.jpg
    Screenshot_20220203-053311_Samsung Internet.jpg
    1.4 MB · Views: 168
Now here are the photos of my based housing and the parts I'm working on so far. You can also see how I have masked off the light and sprayed it to match the housing in parts.
I have velcro attached inside the housing so the light will be removable.

Bonus feature, it still works! I made sure I could activate the slide button through the housing, which I can. You can see in the reference photos that the button and side match the red of the gauntlet while the front was either painted black or had tape applied across. I like the neatness of painting it so that's what I did.
 

Attachments

  • 20220204_171925.jpg
    20220204_171925.jpg
    1.4 MB · Views: 169
  • 20220204_171948.jpg
    20220204_171948.jpg
    1.3 MB · Views: 160
  • 20220204_172009.jpg
    20220204_172009.jpg
    1.6 MB · Views: 168
  • 20220204_172001.jpg
    20220204_172001.jpg
    1.2 MB · Views: 164
  • 20220204_172032.jpg
    20220204_172032.jpg
    1.8 MB · Views: 175
  • 20220204_172035.jpg
    20220204_172035.jpg
    1.8 MB · Views: 164
  • 20220204_171919.jpg
    20220204_171919.jpg
    1.5 MB · Views: 165
  • 20220204_171921.jpg
    20220204_171921.jpg
    1.4 MB · Views: 158
  • 20220204_171842.jpg
    20220204_171842.jpg
    1.6 MB · Views: 162
  • 20220204_171847.jpg
    20220204_171847.jpg
    1.5 MB · Views: 153
  • 20220204_171853.jpg
    20220204_171853.jpg
    1.5 MB · Views: 161
  • 20220204_171859.jpg
    20220204_171859.jpg
    1.6 MB · Views: 169
  • 20220204_171908.jpg
    20220204_171908.jpg
    1.6 MB · Views: 158
  • 20220204_171912.jpg
    20220204_171912.jpg
    1.7 MB · Views: 168
So here is a bit more work.

The gauntlet housings have been based in Duplicolor silver and his with a matte clear coat. This matte clear coat helps the lowest viscosity humbrol maskol stay put better, it allows me to be more precise with it.

The whip cord launcher has been based in black around the white panels, you can see the gray misting and red misting with large scratch in it. The front of the whipcord housing has this wierd faded oranges yellow look to it. I replicated this by painting over the base white with Games workshop contrast color golden yellow. Which is sort of a tinting and shading wash.

The plug has been sprayed with Tamiya dull red and the masking removed. I tried to replicate the damage as exact as I could, im not the best on here but I got it pretty close.

The tube sticking out the back is a piece of irrigation hose that snugly fits inside the gauntlet tubing( the sink hose) which I use to secure the sink tubing.

I'll be drawing on the damage and then masking the upper shell shortly.
 

Attachments

  • 20220205_112847.jpg
    20220205_112847.jpg
    1.4 MB · Views: 156
  • 20220205_112842.jpg
    20220205_112842.jpg
    1.9 MB · Views: 140
  • 20220205_112851.jpg
    20220205_112851.jpg
    981.7 KB · Views: 126
  • 20220205_112854.jpg
    20220205_112854.jpg
    1.6 MB · Views: 126
  • 20220205_112837.jpg
    20220205_112837.jpg
    1.6 MB · Views: 137
  • 20220205_112827.jpg
    20220205_112827.jpg
    1.8 MB · Views: 136
  • 20220205_112821.jpg
    20220205_112821.jpg
    1.8 MB · Views: 125
  • 20220205_112815.jpg
    20220205_112815.jpg
    1.6 MB · Views: 136
  • 20220205_112808.jpg
    20220205_112808.jpg
    1.7 MB · Views: 149
So I was looking at my references a bit closer and came to the realization that even with some airbrush shading and misting, the red I chose was not dark enough. The gauntlet is quite a bit darker, more I the burgundy/maroon shade.

Looking at it and comparing it to the mandible color it becomes very apparent that the PrePro2 right gauntlet is a very deep red. Much darker than the mandibles of the helmet.

So a bit of cursing and reapplying a primer and silver basecoat. Remapping the damage and masking I chose to use Tamiya spray maroon. This is a very dark red and is slightly transparent so it took many light coats.

I generally tend to try to stay with Tamiya spray paints for basecoating due to the way they interact with the humbrol maskol. Tamiya sprays dry quickly and they release and tear easily and smoothly around the maskol allowing the shape to be more accurate.

So I re sprayed the gauntlet halves as well as cut a bit more off of them. The RKD gauntlets are a bit large and needed slimming down.

It's funny when you start really staring at references and focusing on certain angles and shapes you capick c up how difficult it could be for sculptors to get an accurate shape with only a few references to go from.

So these are the basic shells with the madkol removed. I will mist them with black and spray the large gray patch on the bottom shell and some gray misting on the top as seen in the references.

I also re sprayed the whipcord housing with a base mist of Tamiya dull red( since the maroon is transparent, over white it looks really pinkish, so a base spray of dull red gives it a nice look). Then a misting of maroon.
 

Attachments

  • 20220209_120154.jpg
    20220209_120154.jpg
    1.5 MB · Views: 119
  • 20220209_120214.jpg
    20220209_120214.jpg
    1.6 MB · Views: 122
  • 20220209_120218.jpg
    20220209_120218.jpg
    1.5 MB · Views: 131
  • 20220209_120226.jpg
    20220209_120226.jpg
    1.3 MB · Views: 114
  • 20220209_120236.jpg
    20220209_120236.jpg
    1.5 MB · Views: 117
Here are the gauntlets after misting with black acrylic ( Tamiya flat black) with the airbrush. I also replicated the faded gray misting that's in a heavy patch on the lower shell as well as the parts of the upper shell.

Now I'm going to go in with a brush and work certain areas ( the grayish silver protrusion above the dart area, the back upper black rectangle ect). I will attempt to stay restrained and subtle as these are pre production gauntlets so they don't have all the dirt and damage of the screen used versions.

After that I'll start adding all the fun greeblies( whipcord launcher, darts, switches, light, hose ect) and velcro to close them up
 

Attachments

  • 20220209_145426.jpg
    20220209_145426.jpg
    6.9 MB · Views: 135
  • 20220209_145419.jpg
    20220209_145419.jpg
    1.8 MB · Views: 140
  • 20220209_145406.jpg
    20220209_145406.jpg
    6.9 MB · Views: 141
  • 20220209_145402.jpg
    20220209_145402.jpg
    6.6 MB · Views: 148
  • 20220209_145349.jpg
    20220209_145349.jpg
    1.2 MB · Views: 131
  • 20220209_145356.jpg
    20220209_145356.jpg
    6.8 MB · Views: 171
  • 20220209_145342.jpg
    20220209_145342.jpg
    5.3 MB · Views: 144
Thank you sir! I finished misting and shading the gauntlets so ill be uploading some pictures soon! I'm starting to dig the color as well. I don't think I've ever seen anyone paint them with this color as it does look initially too dark. However after really looking at references and looking at them under some "studio" lighting( bright true color daylight bulbs) and sunlight, I can say that this is pretty dang close.
 
That's the trouble with replicating these colors especially items that weren't in the movies, have limited reference images and or been on tour.
 
You definitely have that right!

It's sort of up to us to find colors that look like the pictures or replicate the feel of what we think it appears to to. I personally choose to make it look like more of the feel of what it looks like in the pictures and memory. So when you see it in person it will hopefully look right.

Here are some pictures after misting and shading. I have also attached the velcro to close the gauntlets up.

The dental files came from Hawk01 and started life ad silver fat dental files. I left one untouched and then painted the other with Tamiya clear red with a brush, Tamiya clear colors do an excellent job of replicating anodized colors over mettalics so I just bought a handful of silver files and will paint them to be whatever I need.

I have attached the whipcord housing with 4 small screws from the inside and super glue. The housing overlaps the bottom shell by a bit and offers a secure way to mount it. You can see the launcher breech has been painted white and shaded with Games workshop contrast iyanden yellow.

Some believe this breech to be copper( I'm pretty sure on the esb gauntlets it is) but it really has a yellow glazed over white look to me in the photos. I rather like this small pop of color so that's what I went with.

The darts have been painted, the red being much brighter than the gauntlets as it appears in the references.

The misting and shading was done with Tamiya black and Tamiya neutral gray, the gray appears all over the top and in a large patch on the bottom shell.

In my next series of pictures you will see I tweaked this a bit more due to staring at a particular reference picture and determining that some gray overspray is much more apparent than I made it. I went through with a brush and mixed up some silver snd gray paint and added some chips that are darker than the base silver.

The grayish protrusion above the darts was painted with a light bluish gray( games workshop fenrisian gray) as it has a very light yet bluish appearance. It definitely is not silver like the basecoat, which is what I originally thought and have seen people paint it, its most definitely a light gray.

I also have touched up the scratched red overspray on the whipcord housing after these pictures where taken, my scratched were a bit too big so I sponged some red over them and re did them.i have basically painted everything on this thing at least twice lol

I also added the alco switches and started prepping the darts and minilight for installation.
 

Attachments

  • 20220210_105415.jpg
    20220210_105415.jpg
    1.1 MB · Views: 129
  • 20220210_105439.jpg
    20220210_105439.jpg
    1.5 MB · Views: 130
  • 20220210_105433.jpg
    20220210_105433.jpg
    1.1 MB · Views: 130
  • 20220210_105340.jpg
    20220210_105340.jpg
    1.4 MB · Views: 124
  • 20220210_105353.jpg
    20220210_105353.jpg
    1.4 MB · Views: 122
  • 20220210_105335.jpg
    20220210_105335.jpg
    1.3 MB · Views: 136
  • 20220210_105331.jpg
    20220210_105331.jpg
    1.6 MB · Views: 144
  • 20220210_105323.jpg
    20220210_105323.jpg
    5.3 MB · Views: 135
  • 20220210_105302.jpg
    20220210_105302.jpg
    1.3 MB · Views: 119
  • 20220210_105401.jpg
    20220210_105401.jpg
    1.5 MB · Views: 133
Alrighty, so got the darts in and my hose trimmed and sprayed with the red.
I used the Tamiya gray yo go back over the gauntlets again to replicate the more pronounced misting of gray in certain areas.

Now I'm just waiting on my cannon xlr itt plugs to come in and I can run the back wire with xlr plug through the hose. I also need to mount the light in the front upper shell. I have installed velcro with contact cement to allow removal of the minilight should I ever want to install it in another set of gauntlets.
 

Attachments

  • 20220210_142607.jpg
    20220210_142607.jpg
    1.6 MB · Views: 124
  • 20220210_142615.jpg
    20220210_142615.jpg
    8.1 MB · Views: 119
  • 20220210_142639.jpg
    20220210_142639.jpg
    2.3 MB · Views: 112
  • 20220210_142647.jpg
    20220210_142647.jpg
    3.2 MB · Views: 113
  • 20220210_142708.jpg
    20220210_142708.jpg
    3.1 MB · Views: 118
  • 20220210_142721.jpg
    20220210_142721.jpg
    3 MB · Views: 121
  • 20220210_142727.jpg
    20220210_142727.jpg
    2.2 MB · Views: 124
  • 20220210_142747.jpg
    20220210_142747.jpg
    2.1 MB · Views: 133
Some believe this breech to be copper( I'm pretty sure on the esb gauntlets it is) but it really has a yellow glazed over white look to me in the photos

Not only is it copper, it's actually the copper side of stripboard, specifically the larger 3.5 mm (0.15 in) pitch, and it's the same in ST, PP1, PP2, & ESB:

1644605290762.png


PP1:
1644605626176.png


supertrooper:
1644605647156.png


PP2:
Screen Shot 2022-02-11 at 10.57.12 AM.png
Screen Shot 2022-02-11 at 10.57.00 AM.png
 
Awsome info!!! Thank you so much! Wow, now I definitely have to go back and look, I had no idea it was the same one used in rotj se! Thanks guys!
 
Not only is it copper, it's actually the copper side of stripboard, specifically the larger 3.5 mm (0.15 in) pitch, and it's the same in ST, PP1, PP2, & ESB:

View attachment 220321

PP1:
View attachment 220322

supertrooper:
View attachment 220323

PP2:
View attachment 220324View attachment 220325
Can you enlighten me more as to what kind of strip board that is? Is it still available? I'd love to get my hands on it to put it on this. Thank you so much for the info, I've never seen this nailed down so well. We definitely need a new consolidated found parts thread from Art. With the recently found whipcord housing found part, no doubt any such thread could use updating!
 
This is what it's all about guys and girls. Thank you to everyone who came out and educated me, I've got some tweaking on the gauntlet to do now and this is why I posted this. I'm always open to learn more and this community is a wealth of information that I am so thankful for!
 
Oh dang, I’m wrong. I even have that book!
Don't worry Buda. I'm right there with you bro lol. With 7 different originals( if my memory serves me. . .not so sure anymore) and a few more mods( rotj se, anh se ect) it's super hard to keep everything straight.. .. . Thank God for the people of TDH.
 
This thread is more than 1 year old.

Your message may be considered spam for the following reasons:

  1. This thread hasn't been active in some time. A new post in this thread might not contribute constructively to this discussion after so long.
If you wish to reply despite these issues, check the box below before replying.
Be aware that malicious compliance may result in more severe penalties.
Back
Top