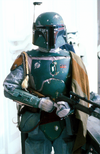
First and foremost I think your build looks awesome! It is no easy task to achieve what you have done which is the main focus here I think for all of us. Noone outside of this community would notice any of what I or others will mention, but I get it. I will also be putting my build up for critique/501st approval when it's complete. I tried not to read through what everyone else has said so if I repeat something I apologize. I also have several small details to sort to finish on my own Fett, so I have not arrived by any means so know that. Here is what I notice just from what I see and what I'm shooting for on my own Fett.
-Helmet looks awesome, love it!
-Armor is also very well done
-Right gauntlet minilight button should be red
-Right gauntlet hose "looks" painted grey/should be the clear hose "vinyl reinforced hose with a cross-hatch thread pattern."CRL I say looks, as we know looks can be deceiving. Just from the angles I saw.
-Collar spacing is a tough one. And it largely depends on your stance as literally everything shifts. To me, yours looks just fine!
-Weather the upper pouches/pockets a little more. (Note: lighting is a monster on this costume. I weathered mine good and in the pics it still looks like it needs more or isn't weather at all in spots which is nuts. I still need to weather more
-Flightsuit looks great to me. I personally wouldn't touch it. Looking back on the pictures of you at the mall/event I can clearly see the blue evident in several areas. If you're shooting for 501st and they say it's too dark then I'd wash it once and see how it looks. Worst case it comes out too light and you can re-dye it. Again, I think you did great. looks awesome man.
-Shin tool alignment/I think you mentioned you were on that already. I haven't even finished mine yet. Easy fix.
-Boots seemed to be painted black outside of the middle stripe. I believe it should only be painted black in the centermost stripe down the middle of the boot.
Overall, very minor adjustments/fixes in my eyes. You look like Boba Fett. And I love it. Let us know when you're approved bro. Looking forward to hearing your critiques on mine when I get everything corrected/in order.


")