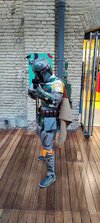
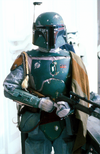
Lemorseaplumes ESB Fett build (WIP)

And the rest of today's work :

- Weathered shin tools

20221001_190257.jpg

- A bunch of ESB studs (got some spare, just in case...)
20221001_190800.jpg

- And a 100 % homemade jetpack harness.
This is a 20 $ solution, nothing fancy but it definitly does the job.
20221001_190934.jpg

The diver buckle is not accurate, but when you reverse the logo with the two stylised divers it may looks like a SW logo of some sort looking like >7°7°

20220922_123957_004.jpg
 
Thank you a lot, Fettacini ! Community is indeed a big motivation through the many examples one can find here : as a newcomer, I enjoy reading others' build thread and there is a lot of positive emulation. I like to sculpt and build stuff but I must say I have never been comfortable with painting... Repaint again and again is my creed :)
I hear ya, I’ve sanded down and repainted so many parts now. My biggest issue is that I tend to over weather, I go for a real world or comic book like look, I want to emulate what the prop looks like to the movie watcher, not necessarily what it looks like in real life as they (the 501st etc) want people to do on their replicas. This is because the actual movie props look rather sloppy and toylike. The lighting and film magic adds depth and character to it. A good example of this is the RoTJ gauntlets. It really appears the silver scratching is topical and rather sloppy. To emulate it exactly would look amateurish. That is why I still do layered painting of the gauntlets with the liquid masking and then post and pre shade them with the airbrush. This adds realism and blends the paint work. Makes it look like the screen caps but in real life. And I’m ok with that but if artistic interpretation. It’s sort of why I went from stylized to accurate on my PP2 build. I think I found a happy medium with an accurate paint job but one that looks ok in real life. I hope that makes sense lol
 
And the rest of today's work :

- Weathered shin tools

View attachment 230289
- A bunch of ESB studs (got some spare, just in case...)
View attachment 230290
- And a 100 % homemade jetpack harness.
This is a 20 $ solution, nothing fancy but it definitly does the job.
View attachment 230292
The diver buckle is not accurate, but when you reverse the logo with the two stylised divers it may looks like a SW logo of some sort looking like >7°7°

View attachment 230293
I actually love that belt buckle! Hell, if you took an angle grinder to it to smooth the logo off, that would look great too but I vote to keep that logo on there
 
I hear ya, I’ve sanded down and repainted so many parts now. My biggest issue is that I tend to over weather, I go for a real world or comic book like look, I want to emulate what the prop looks like to the movie watcher, not necessarily what it looks like in real life as they (the 501st etc) want people to do on their replicas. This is because the actual movie props look rather sloppy and toylike. The lighting and film magic adds depth and character to it. A good example of this is the RoTJ gauntlets. It really appears the silver scratching is topical and rather sloppy. To emulate it exactly would look amateurish. That is why I still do layered painting of the gauntlets with the liquid masking and then post and pre shade them with the airbrush. This adds realism and blends the paint work. Makes it look like the screen caps but in real life. And I’m ok with that but if artistic interpretation. It’s sort of why I went from stylized to accurate on my PP2 build. I think I found a happy medium with an accurate paint job but one that looks ok in real life. I hope that makes sense lol
Make a lot of sense. It is difficult to make your build looks like the prop because as you said the filming and the lighting on set ehance a lot of details and you may try to compensate by overcontrasting your paintjob.

Your armor looks great! Very nice! My biggest struggle was keeping the damage small, I tended to over size it. I found restraint is better, and make it smaller than your brain tells you to. Very nice work man!

Thank a lot bro', really appreciate it. One day i will try airbrush rather than handpainting...

I have the same issue regarding the damage. I always tend to do more unconsciously. In the helmet there is a damage detail every inch, so when some zone of the armor are too clean (ESB right chest plate for example) I feel like a lack of balance :D
 
I actually love that belt buckle! Hell, if you took an angle grinder to it to smooth the logo off, that would look great too but I vote to keep that logo on there
Me too. I don't mean to insult accuracy but this reverse logo has a more SW vibe than a US DIVERS CO... I will keep it for now (I have 3...) as it will be mostely hide by the ammo belt or the flak vest, but one day I will get a proper one...
 
After 9 month of building, I did my first trooping as Boba Fett this weekend with a local association of SW cosplayers (Legion Normande).
I wore the costume for 9 hours in a row, took a bunch of pictures... everything went well except for the jetpack harness which took some slack over time.

Any comment and criticism will be welcome to help me improve the build :

310983628_405767671722135_8097806340343078922_n.jpg
310745827_489973166477842_8329166807703256982_n.jpg
304686957_548792323718130_8435785507634439520_n.jpg

310751790_2307418496082416_2736311617561417807_n.jpg
311135818_8100295633375773_8387350688738636815_n.jpg
310700278_617998499783559_1773206780332000229_n.jpg

307261221_763688901387631_9160434216080422224_n.jpg
 

Attachments

  • 310745827_489973166477842_8329166807703256982_n.jpg
    310745827_489973166477842_8329166807703256982_n.jpg
    363.2 KB · Views: 174
I think you’ve done a really nice job. Congratulations on getting it all together! Here are a few comments:
  1. I think the vest could use some tailoring. It’s too big in the shoulders, which affects the placement of the shoulder armor, and it might be a bit too long in the front. The distance between your collar armor and your chest plates is a bit too much in my opinion.
  2. Your shin tools are in the wrong order. From your right to left it should be: survival knife, sonic beam weapon, anti-security blade, jetpack adjustment tool.
  3. The right knee and shoulder should be more orange compared to the left set, which should be a bit more yellow (in comparison).
  4. To my eye your flight suit is too gray and not blue enough. At least the top is more gray. This is very tough to gauge due to lighting so take this point with a grain of salt.
  5. Weather those knee straps and the thong a bit more!
 
Last edited:
Thank you jedisushi !
1 - Curious to have other opinion about tailoring the flak vest.
Too long in the front, you mean in the bely area ?
Did the shoulder armor have to be higher ? It is not my impression when I see ESB Fett, these pieces seem to have some loose (see below)
Yes collar armor is pulled by the back plate and the jetpack weight... Have to work on it.

1665559329404.png

2 - Shin tools order, easily corrected. I have put them randomly as I forget my instruction :/ This is pre-pro 2 placement I think.

3 - Definitly have to put more yellow on the left knee. I already did but it doesn't appear on the picture.

4 - Yes this blue/light gray balance is bothering me since I got the flightsuit from BobaMaker. Under some bright light it is kind of blue, but does appear grey on the picture. On the other hand the fabric I used for the side pouches and the ankle strap is bluer.
I am afraid to dye it and getting it ruined with a completely bright blue flighsuit.
Did someone ever tryed this dyeing ?

1665560123620.png

5 - Weathering the straps, deal.

Thanks again for your comments. Any other will be welcome.
 
I don’t think the space between the collar and the chest is due to pulling. That’s not to say that it isn’t being pulled back, but the fabric in the vest has plenty of room there. I think the vest just needs to be shortened by half an inch, but obviously I’m not there in person.

My comments on the shoulders are admittedly a preference. The vest fits differently in different scenes due to different actors, etc. Generally I just like to see the relationship between the collar, shoulders, and chest plates to be a bit tighter.

I dyed my flight suit to adjust the color using Dylon Vintage Blue, but mine was already light blue. I was just trying to go a shade darker. I’m not sure what would happen with a suit that’s more gray. Maybe try to do a test with some spare fabric? It’s pretty easy.
 

Attachments

  • 57169301-ABDF-4374-81F9-7017AD5639AF.png
    57169301-ABDF-4374-81F9-7017AD5639AF.png
    3.2 MB · Views: 143
Just a lill' pic to bumb this thread.
Curious to have more reaction about how it looks from the people how helped me this past few months.
BudaFett / Fettacini /Irongladiator / HawkFett

View attachment 232078
First and foremost I think your build looks awesome! It is no easy task to achieve what you have done which is the main focus here I think for all of us. Noone outside of this community would notice any of what I or others will mention, but I get it. I will also be putting my build up for critique/501st approval when it's complete. I tried not to read through what everyone else has said so if I repeat something I apologize. I also have several small details to sort to finish on my own Fett, so I have not arrived by any means so know that. Here is what I notice just from what I see and what I'm shooting for on my own Fett.

-Helmet looks awesome, love it!
-Armor is also very well done
-Right gauntlet minilight button should be red
-Right gauntlet hose "looks" painted grey/should be the clear hose "vinyl reinforced hose with a cross-hatch thread pattern."CRL I say looks, as we know looks can be deceiving. Just from the angles I saw.
-Collar spacing is a tough one. And it largely depends on your stance as literally everything shifts. To me, yours looks just fine!
-Weather the upper pouches/pockets a little more. (Note: lighting is a monster on this costume. I weathered mine good and in the pics it still looks like it needs more or isn't weather at all in spots which is nuts. I still need to weather more
-Flightsuit looks great to me. I personally wouldn't touch it. Looking back on the pictures of you at the mall/event I can clearly see the blue evident in several areas. If you're shooting for 501st and they say it's too dark then I'd wash it once and see how it looks. Worst case it comes out too light and you can re-dye it. Again, I think you did great. looks awesome man.
-Shin tool alignment/I think you mentioned you were on that already. I haven't even finished mine yet. Easy fix.
-Boots seemed to be painted black outside of the middle stripe. I believe it should only be painted black in the centermost stripe down the middle of the boot.

Overall, very minor adjustments/fixes in my eyes. You look like Boba Fett. And I love it. Let us know when you're approved bro. Looking forward to hearing your critiques on mine when I get everything corrected/in order. :cool:
 
Last edited:
First and foremost I think your build looks awesome! It is no easy task to achieve what you have done which is the main focus here I think for all of us. Noone outside of this community would notice any of what I or others will mention, but I get it. I will also be putting my build up for critique/501st approval when it's complete. I tried not to read through what everyone else has said so if I repeat something I apologize. I also have several small details to sort to finish on my own Fett, so I have not arrived by any means so know that. Here is what I notice just from what I see and what I'm shooting for on my own Fett.

-Helmet looks awesome, love it!
-Armor is also very well done
-Right gauntlet minilight button should be red
-Right gauntlet hose "looks" painted grey/should be the clear hose "vinyl reinforced hose with a cross-hatch thread pattern."CRL I say looks, as we know looks can be deceiving. Just from the angles I saw.
-Collar spacing is a tough one. And it largely depends on your stance as literally everything shifts. To me, yours looks just fine!
-Weather the upper pouches/pockets a little more. (Note: lighting is a monster on this costume. I weathered mine good and in the pics it still looks like it needs more or isn't weather at all in spots which is nuts. I still need to weather more
-Flightsuit looks great to me. I personally wouldn't touch it. Looking back on the pictures of you at the mall/event I can clearly see the blue evident in several areas. If you're shooting for 501st and they say it's too dark then I'd wash it once and see how it looks. Worst case it comes out too light and you can re-dye it. Again, I think you did great. looks awesome man.
-Shin tool alignment/I think you mentioned you were on that already. I haven't even finished mine yet. Easy fix.
-Boots seemed to be painted black outside of the middle stripe. I believe it should only be painted black in the centermost stripe down the middle of the boot.

Overall, very minor adjustments/fixes in my eyes. You look like Boba Fett. And I love it. Let us know when you're approved bro. Looking forward to hearing your critiques on mine when I get everything corrected/in order. :cool:
Thank you Fettacini and HawkFett for your comments !

- Right gauntlet minilight button red ? don't know how I missed that ! (Well, it is not so obvious, in the left pics it totally appear black but in the right one it does appears a little reddish. Any other intels are welcome.

1668195816926.png
1668195848807.png

- My hose is actually painted grey, you are right. It is a temporary solution as the accurate type of hose is hard to find in France ! But I managed to build some with a fellow Boba Fett making a ROTJ build (he will need plenty).

- Need to weather more. As I used coal and ashes, it have the tendencies to fade away as the day goes by. Will have to find a permanent solution.

- I have tried to re-dye the suit with a light blue color, but I don't have the impression it had any effect :/

Don't know if I am gonna to apply on the 501 one day, but thank you very much for your kind words and encouragment. Looking forward to see how your build goes as well !
 
Try to dye the jumpsuit, I'm not sure that made a big difference, as it appears bluer on the daylight.
I took the opportunity to redo the weathering... dirty Boba !

Next step : attach the neck seal to the jumpsuit.

317511015_1140202033536095_6916803973520002930_n.png
 
This thread is more than 3 months old.

Your message may be considered spam for the following reasons:

  1. This thread hasn't been active in some time. A new post in this thread might not contribute constructively to this discussion after so long.
If you wish to reply despite these issues, check the box below before replying.
Be aware that malicious compliance may result in more severe penalties.
Back
Top