You are using an out of date browser. It may not display this or other websites correctly.
You should upgrade or use an alternative browser.
You should upgrade or use an alternative browser.
Mina Fetts - ROTJ WIP Build Thread
- Thread starter MinaFett
- Start date
Cool! I was just curious is all! Nice job on all of it! Can’t wait to see more shots of it!I got my beacon as part of the Fett metal set IB used to offer. I bought it more than a year ago. Pretty sure it is now discontinued.
")
MinaFett
Active Hunter
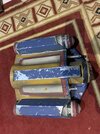
More pictures forgive poor phone pictures. My SLR is dead flat.
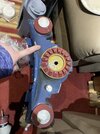
As mentioned earlier DVH painted the kit. My contribution so far is adding greeblies and re attaching the bits that came off on transit. Also trimming down and Velcroing the hatch. All I have left is paint the beacon middle and it’s good to rock and roll.")
As mentioned earlier DVH painted the kit. My contribution so far is adding greeblies and re attaching the bits that came off on transit. Also trimming down and Velcroing the hatch. All I have left is paint the beacon middle and it’s good to rock and roll.
Attachments
-
 5544C697-7848-4A4F-A658-999F17EC89A8.jpeg1.7 MB · Views: 252
 -
 34F396D6-11B6-41A7-B987-75206CD99504.jpeg1.7 MB · Views: 275
 -
 79346B5C-BEA4-4583-B618-5A20456A7491.jpeg4.2 MB · Views: 253
 -
 BBFA20B9-4E62-43D8-BD47-68085C21BCF3.jpeg1.8 MB · Views: 239
 -
 2462B5DC-C650-4577-9C06-86FE2DB8BE1C.jpeg1.6 MB · Views: 267
 -
 943467D6-0858-4B25-9A92-C14E37714F99.jpeg1.8 MB · Views: 248
MinaFett
Active Hunter
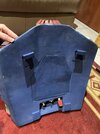
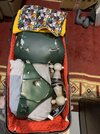
Finally full packed my kit away with jetpack. Fits like a dream. Also finally did my shoulder bell test fit while packing away. For some reason I had put the bolts on but did not do the test fit. Oops.
Attachments
MinaFett
Active Hunter
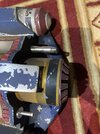
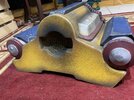
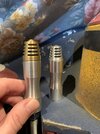
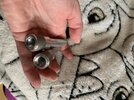
Also for interest sake. I got a set of machine craft parts for my friends JP. Comparison of IB and machine craft parts. Stabiliser hatching is different and top section moves. Beacon top is different in material and slot shape.
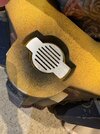
Also got a replacement vent as my resin one cracked and broke in transit. Flame thrower nozzles are for future upgrade.
Also got a replacement vent as my resin one cracked and broke in transit. Flame thrower nozzles are for future upgrade.
Attachments

MCR’s Flame Thrower Nozzles are legit!

correct me if I’m wrong (and you’re probably not done with it yet) but isn’t the Metal Vent mostly painted same yellow as the JP? (With scratches/weathering and soot)
-Iron
correct me if I’m wrong (and you’re probably not done with it yet) but isn’t the Metal Vent mostly painted same yellow as the JP? (With scratches/weathering and soot)
-Iron
MinaFett
Active Hunter
MCR’s Flame Thrower Nozzles are legit!
correct me if I’m wrong (and you’re probably not done with it yet) but isn’t the Metal Vent mostly painted same yellow as the JP? (With scratches/weathering and soot)
-Iron
Based off my existing vent I’d say yes. Yellow with black weathering. Have not painted the vent yet. Still in its lovely pristine state but this will change.
MinaFett
Active Hunter
So these are the promised updates I neglected to post. After the previous posts in July 2021.
I ended up swapping out my stabiliser and beacon for machine craft ones. Wired up my jetpack electrics. Decals got added to jet pack. Collar piece got painted and fitted. Got my board back from Fettrronics and fitted it back in. He kindly fixed my lights after I made a boo boo and connected a higher capacity battery pack.
I had a lot of problems with getting parts, paints and a decline in health which delayed my build a bit. But I’m now out there and trooping. Having an absolute blast
It has been an amazing ride and I thank members of this board for their help and support.
Some learning I did want to pass on:
Rubber knees - while they are comfortable and great for getting lower for fist bumps with little ones. They are heavy and will drag your flight suit down. Velcro and firm elastic is your friend in keeping these up and aligned.
Toe spikes - If you are walking on a marble floor, do put a little bounce in your step. It helps keep traction/balance and stops you clipping your toe spikes. Although if you do, they slide beautifully along the floor after detaching after a few solid whacks.
Sitting - It is possible to sit and be comfortable. I would suggest start with an armless chair. Sit on the edge and gradually ease back. Personally, my biggest fear in doing this was cracking my cod piece. But so far it’s held up beautifully.
Mythosaur
Active Hunter
MinaFett, something I just noticed that I don't believe has been addressed yet, you should run a bolt through the stylus brushes on the Anti-Security Blade, it will help keep them straight.
 I believe it's an M12 bolt if memory serve me correct, have it go as far into the squeegee part as possible and cut the head off.
Everything is coming along very nicely though! Great work!
I believe it's an M12 bolt if memory serve me correct, have it go as far into the squeegee part as possible and cut the head off.Everything is coming along very nicely though! Great work!
Mythosaur
Yep, I did this too. It was a super small detail, but agreed that it holds them together and in place. For the Machine Craft Replica “Shin Tool Rods”, I used a #10-32 X 3/4 bolt and I cut the head off with my dremel and used it as a threaded rod….

Then I used a couple drops of Loctite’s Thread Locker to secure it….

And then once in place, it was solid!

I did this after seeing that detail in the 501st CRL pic….

-Iron
Yep, I did this too. It was a super small detail, but agreed that it holds them together and in place. For the Machine Craft Replica “Shin Tool Rods”, I used a #10-32 X 3/4 bolt and I cut the head off with my dremel and used it as a threaded rod….
Then I used a couple drops of Loctite’s Thread Locker to secure it….
And then once in place, it was solid!
I did this after seeing that detail in the 501st CRL pic….
-Iron
MinaFett
Active Hunter
Hi thereMinaFett, something I just noticed that I don't believe has been addressed yet, you should run a bolt through the stylus brushes on the Anti-Security Blade, it will help keep them straight.
View attachment 240156 I believe it's an M12 bolt if memory serve me correct, have it go as far into the squeegee part as possible and cut the head off.
Everything is coming along very nicely though! Great work!
Thanks for the feedback.
I did end up changing out my tape a while ago which stopped movement. The bolt from machinecraft was not around at the time. I may look at putting one in in future.
I’ve got a second Fett to do, I’m helping someone else build a ROTJ Fett. May look at buying the part as part of a bulk purchase.
Similar threads
- Replies
- 15
- Views
- 458
- Replies
- 102
- Views
- 25,436