Dry sand with 120 to knock off the high spots and create better adhesion for the epoxy
1st layer of epoxy, coating well but not too thick. It self levels and will pool up in areas if you apply too much.
leave overnight to cure and dry sand with 120 again, knocking off the high spots. Don’t worry if you sand through the epoxy a bit.
2nd layer of epoxy same as first, let cure and then start your sanding process. Depending on the model you may be able to just jump to 180 or at least just hit a couple areas with 120
1st primer coat to identify problem areas ( usually seams, my helmet was printed in 4 parts and joined) use body filler if needed and sand to 220. Repeat if necessary
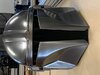
clean with isopropyl and shoot a couple layers of you base coat. I went with a gun metal grey. Let cure and then shoot a couple of wet coats of clear. I have found the clear builds up nicely and self levels. Let cure for a few days and then you can wet sand with 600 followed by polishing and the final top coat of Alclad.
this sounds like a lot of work but in reality each step goes really quickly. I find myself spending far less time sanding and filling then I did in the past and post processing has become a smaller part of the job.