You are using an out of date browser. It may not display this or other websites correctly.
You should upgrade or use an alternative browser.
You should upgrade or use an alternative browser.
Rook's Book of Boba Daimyo build.
- Thread starter Rook 3
- Start date
Rook 3
Jr Hunter
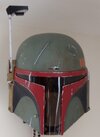
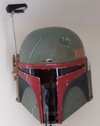
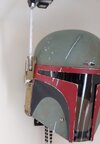
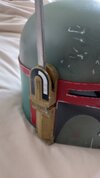
Brown and green combo spray. I WISH I had gotten the Storm paint instead,
but too late to redo all this stuff now.") I painted left to right side, so the armor
I painted left to right side, so the armor
is darker with the brown top coat mix. The Moss green made it look MUCH
lighter in color if I went right to left.


but too late to redo all this stuff now.
I painted left to right side, so the armoris darker with the brown top coat mix. The Moss green made it look MUCH
lighter in color if I went right to left.
Last edited:


Rook 3
Jr Hunter
Crowprops spats...

Leather holster parts from DarmansProps on Etsy.
I also got the JJIndustries awesome metal parts AND the Crowprops underbelt kit.
Still need to do all the sewing/leather modding to make them work.


I also wet formed the holster to fit my particular blaster. The sizing was a little bit off so I'm not sure
what blaster they used as a guide. After forming though, it fits very nice. It also highlights the problem with using a 3D printed blaster. It's just not as durable as a resin or metal one. Even though it slot-locks into the formed holster, I'm always concerned I'm going to break something. It IS just 3d printed, and not solid after all.
Blaster kit came from Traywick Designs on etsy, and it's a great kit. Has a moving trigger which is a nice feature.
Woodgrain finish is a paint treatment.


Leather holster parts from DarmansProps on Etsy.
I also got the JJIndustries awesome metal parts AND the Crowprops underbelt kit.
Still need to do all the sewing/leather modding to make them work.
I also wet formed the holster to fit my particular blaster. The sizing was a little bit off so I'm not sure
what blaster they used as a guide. After forming though, it fits very nice. It also highlights the problem with using a 3D printed blaster. It's just not as durable as a resin or metal one. Even though it slot-locks into the formed holster, I'm always concerned I'm going to break something. It IS just 3d printed, and not solid after all.
Blaster kit came from Traywick Designs on etsy, and it's a great kit. Has a moving trigger which is a nice feature.
Woodgrain finish is a paint treatment.
Last edited:

Rook 3
Jr Hunter
Been a while. Back to working on Boba.
It's amazing how much velcro you have and realize... It's not enough.
This vest was made "for me" but apparently the maker didn't realize that Boba's vest rides 2 inches higher. A lot of colorful language was used to get the hem moved up. Also added a side access Velcro panel, shoulder and side attachment points for the back armor.
Plan on getting all the velcro sewn down tonight, then it's on to print Velcro on the undershirt shoulders and waist. And knees for the armor. Possibly forarms to lock to the vambraces. Soooo much sewing for a "ready to wear" set.
Also have to add a through hole and internal pocket for the chest readout. Sheesh.
 .
.

It's amazing how much velcro you have and realize... It's not enough.
This vest was made "for me" but apparently the maker didn't realize that Boba's vest rides 2 inches higher. A lot of colorful language was used to get the hem moved up. Also added a side access Velcro panel, shoulder and side attachment points for the back armor.
Plan on getting all the velcro sewn down tonight, then it's on to print Velcro on the undershirt shoulders and waist. And knees for the armor. Possibly forarms to lock to the vambraces. Soooo much sewing for a "ready to wear" set.
Also have to add a through hole and internal pocket for the chest readout. Sheesh.
DarthVader1
Well-Known Hunter
Blaster kit came from Traywick Designs on etsy, and it's a great kit. Has a moving trigger which is a nice feature.
Woodgrain finish is a paint treatment.
View attachment 236757 View attachment 236758
I purchased the 3D files on Etsy, but from someone else, also with a functional trigger, with the purpose of adding an LED light at the end inside the barrel, a momentary switch behind the trigger inside, and a battery with a removable grip cover to replace the battery.
DarthVader1
Well-Known Hunter
Still need to finish figuring out how to connect the vambraces.
View attachment 236747 View attachment 236748 View attachment 236749 View attachment 236750
3D-printed piano hinges and bicycle spoke method. That's how I got mine for my Post-Sarlacc Fett vambraces.
Rook 3
Jr Hunter
My vambraces have a lip on the top side that goes over the inside of the bottom.
"Standard" piano hinges won't work on this one. When you open the shell, it creates a gap. I _might_ just cut it off, seal the edge and go the piano hinge route. Sigh, what a pain. Did my first, complete top end suit up and discovered my shoulder armor velcro is about 1" too low. Soooo... spent an hour cutting all the seams of the sleeve and removing the velcro. Now I have to resew velcro after the reposition. I knew I should have put it on while it was pinned in place, before the final stitching.
"Standard" piano hinges won't work on this one. When you open the shell, it creates a gap. I _might_ just cut it off, seal the edge and go the piano hinge route. Sigh, what a pain. Did my first, complete top end suit up and discovered my shoulder armor velcro is about 1" too low. Soooo... spent an hour cutting all the seams of the sleeve and removing the velcro. Now I have to resew velcro after the reposition. I knew I should have put it on while it was pinned in place, before the final stitching.
Rue1977
Hunter
Did you ever do anything with the black series ears or change helmets?
I have a few helmets now but got the same BS helmet as you to wear out. I painted some wear and the slice to make it an in-between of Mandalorian season 2 and BOBF, but with the ears I just repainted, and the right side I took apart to have the button flush and replaced the stalk and topper.
I have a few helmets now but got the same BS helmet as you to wear out. I painted some wear and the slice to make it an in-between of Mandalorian season 2 and BOBF, but with the ears I just repainted, and the right side I took apart to have the button flush and replaced the stalk and topper.
Rook 3
Jr Hunter
I have not modified my Black Series helmet at all yet. I plan on adding the cat scratches and weathering damage, plus a blackwash which I will be doing to the armor as well.
.
I'd be curious to know how you modded the ear and rangefinder stalk. 3D print, or metal you sourced?
I'm kind of surprised nobody has offered the upper ear part or stalk/RF as a replacement part on Etsy. There's a lot of people doing metal work, just not for the Black Series helmet.
Any pics would be appreciated.
I do plan on replacing it with a "real" helmet in the future. The Black Series will get me by for the moment.
Rue1977
Hunter
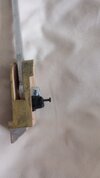
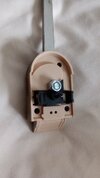
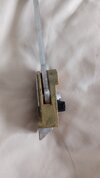
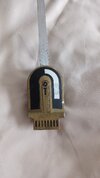
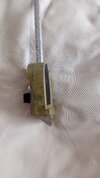
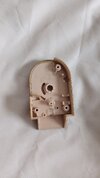
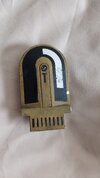
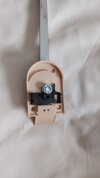
I'm kind of surprised no one has too. I looked a long time for a replacement ear but finally decided nothing would work better than just modding the hasbro ear. The first thing I did was switch one of the screws out for a long one and drilled a hole inside that holds the ear from wobbling since it's notoriously loose. But I'm attaching some pics of it. Not super pretty but good enough for me. My suit is also an amalgam version since my helmet is purposely meant to be an in-between stage that's post-Mando season 2/pre BOBF, with a BOBF jetpack (I have the same kit you got now) that's a mixture paint job, ROTJ armor, Mando season 2 pants, boots, and shirt, BOBF belt, and the hand armor i use has the shapes from the backs of the PP1 gloves.I'd be curious to know how you modded the ear and rangefinder stalk. 3D print, or metal you sourced?
I'm kind of surprised nobody has offered the upper ear part or stalk/RF as a replacement part on Etsy. There's a lot of people doing metal work, just not for the Black Series helmet.
Any pics would be appreciated.
Attachments
-
 IMG_20240414_131710908~2.jpg489 KB · Views: 195
 -
 IMG_20240414_131713177~2.jpg476.9 KB · Views: 199
 -
 IMG_20240414_131717211~2.jpg935.9 KB · Views: 203
 -
 IMG_20240414_131626868_HDR.jpg854 KB · Views: 182
 -
 IMG_20240414_131643854.jpg928.8 KB · Views: 182
 -
 IMG_20240414_112743198~3.jpg1.6 MB · Views: 183
 -
 IMG_20240414_112737544~2.jpg1.8 MB · Views: 180
 -
 IMG_20240414_112626147~2.jpg1.1 MB · Views: 184
 -
 IMG_20240414_112621982~2.jpg1.6 MB · Views: 181
 -
 IMG_20240414_112617877~2.jpg2.4 MB · Views: 193
 -
 IMG_20240414_112605718~2.jpg1.5 MB · Views: 178
 -
 IMG_20240414_112600662~2.jpg1.9 MB · Views: 177
 -
 IMG_20240414_112551499~2.jpg1.4 MB · Views: 177
 -
 IMG_20240414_112545752~2.jpg1.7 MB · Views: 193
 -
 IMG_20240414_131744449_HDR~3.jpg816.2 KB · Views: 207
Rue1977
Hunter
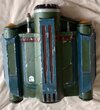
it's looking good. I didn't even want to mess with the silver around the neck of the thrusters, so you definitely have that over me, heh.View attachment 241734
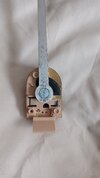
Obviously did some painting tonight. Did all the "metal" and also my collar studs. Gotta figure out how long the right sleeve pocket is for the double hoses so I can get that built and installed tomorrow.
")
Similar threads
- Replies
- 0
- Views
- 148
- Replies
- 15
- Views
- 516
- Replies
- 0
- Views
- 365