Weathering advice (too much or too little?)

Mrpanic241

Jr Hunter
Hey Dented helmet,

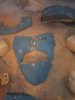
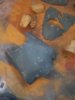
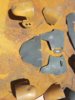
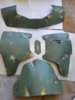
I finally started weathering my ROTJ armor and I am not sure if I have gone too overboard or if it needs more. I've read that once you think its too much, its probably done. That being said, advice is appreciated. The posted pictures are of the armor with black and gray misting done. I was thinking about doing some white chalk as well but depending on the light the armor sometimes seems too dirty and the silver has been toned down too far maybe?
 

Attachments

  • 20190602_180520.jpg
    20190602_180520.jpg
    1.3 MB · Views: 398
  • 20190602_180529.jpg
    20190602_180529.jpg
    1.6 MB · Views: 395
It's fairly hard to tell whether it's too much or not since the pictures seem to be a bit washed out abd. Best would be a picture in daylight.

On these pictures with this type of lighting it does look like too much weathering. But that could change entirely on a different picture.
 
Hey there Mr Panic, it is hard to tell much about the pics. They are on the fuzzy side and the lighting needs to be better to determine much.
Can you take some more pics and post them?
 
Thanks for the replies guys, I will try to get some pictures in better light and post them tomorrow. Intwenothor, what is the rub and buff method?
 
Maybe it's the camera..it looks more blue / gray than it does green What colors did you use?

I made an attempt at using the humbrol greens but in the end I could'nt get it right so i used hunt club green. Here is a pic before weathering with grey and black
20190521_044430.jpg
 
I buffed back the weathering on most of the plates to try to get the green back and this is where im at currently

In the second photo the back plate still has the weathering on to show the difference


20190607_145748.jpg20190607_145809.jpg
 
20190614_130145.jpg


I weathered the armor again (with less gusto this time) and this is what I ended up with. Im happier with it but the collar plate flexed and cracked the paint

20190614_130112.jpg

Any advice on fixing this? Fill with superglue and sand?

Still need to do a light gray mist on the armor
 

Attachments

  • 20190614_130038.jpg
    20190614_130038.jpg
    1.6 MB · Views: 348
Looks pretty good overall but I am by no means a screen accurate Fett paint job expert. However, I can toss my 2 cents into the ring there with that collar plate. Yeah, putting some super glue inside those cracks and then sanding that smooth should work great. At least that process works for me with my kit and I even use that technique on model kits as well.
 
I would go and pick up a small fiberglass kit at a auto store or some big box stores have them. Reinforce the back of the damaged
area, it's a weak spot now and probably will remain so even when repaired. I've done this all over potential stress points that I think
might show up when I start the armor build. It really helps the strength of areas of attachment all over your project. Easy to do.
 
Thanks for the advice, ill do a little bit of both the glue and fiberglass reinforcement... hopefully not ruining the paint in the process
 
Using JB weld putty to the back side or inside the cracks may work as well. Though if you add it to the front it will require significantly more sanding but isn't as toxic as fiberglass
 
This thread is more than 4 years old.

Your message may be considered spam for the following reasons:

  1. This thread hasn't been active in some time. A new post in this thread might not contribute constructively to this discussion after so long.
If you wish to reply despite these issues, check the box below before replying.
Be aware that malicious compliance may result in more severe penalties.
Back
Top