Non-Bondo filler for Sintra (foam PVC) jetpack? And related questions.

Bob A Feet

Jr Hunter
Hi everyone!

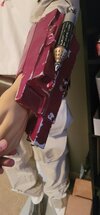
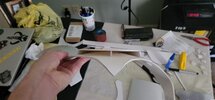
Somewhat surprisingly, my jetpack build is going pretty well:

IMG_20210513_192758.jpg


I'm getting to the point where I think it would be best to start filling in gaps before committing to a final assembly.

Most of the butt joints were done with superglue. Some of the larger pieces that laid flat on each other I attached with PVC primer and cement.

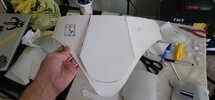
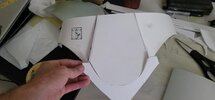
Here's one of the "outer" butt joints I need to work on:

IMG_20210513_192810.jpg


I really don't want to use Bondo for filling these gaps; I believe I heard people mention spackling paste as an alternative? I found this online which sounds promising (flexible, sandable). I'm imagining being able to use my finger to spread and pack it into these gaps before letting it dry and sanding.

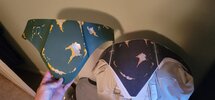
As for the inside of the joints, is there anything I can apply (again, maybe some kind of glue or filler) to help give these pieces a little strength? (more than just superglue):

IMG_20210513_192828.jpg


I believe someone on here mentioned a product they used for this. My dad suggested maybe a silicone caulking.

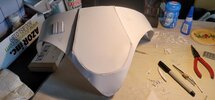
Lastly, and this might be more of a jetpack specific question, but how are people filling these gaps in their jetpack builds? I know I'll have to do something similar towards the tops of the side tanks as well:

IMG_20210513_192929.jpg


I believe I've seen people use spray foam for this. Maybe I can get away with using some Sintra scraps to fill in the gaps first, but that seems like a lot of work.

Thanks!
 
(Wow, I posted that nearly 3 months ago!)

As an update, I ended up using DAP Alex White All-Purpose Caulk to reinforce the "seams" on the inside of the jetpack. As for any remaining gaps, I used DAP Alex Flex Spackling since it's flexible and sandable.

For the gaps below the jetpack side tubes, I ended up gluing in some Sintra scraps and then used spackling after.

I just put my harness mounting points in this week, so I can move on to finish assembling the jetpack now :cool:
 
In the interest of documentation for future people who might see this, I think the DAP Alex Flex Spackling turned out pretty well on my jetpack.

Here's my pack made from Sintra, cardboard, 3D printed parts (PLA+), and spackling as filler:

2488a64d979753cd9139bfaeccd51ea66628bd3c-1.jpg


The colors came out a little wonky in the pic, but the body is regular Rust-Oleum Inverted Striping Yellow (the one that technically requires a machine to spray; it's more orange in color than the one intended for hand use).

The blue is Rust-Oleum Satin Midnight Blue, which is probably a little dark, but closer to the correct Pantone color than Rust-Oleum Satin Ink Blue, just a little dark. If I were to redo it, I'd go with the Ink Blue, and just mist some black on to darken it.
 
Do not use latex caulk. Spackle is for plaster walls. use extra sintra and bondo, Wear a mask when you sand.
 
Do not use latex caulk. Spackle is for plaster walls. use extra sintra and bondo, Wear a mask when you sand.
Thanks for the reply!

The latex caulk was just to reinforce the Sintra joints on the inside; they seemed to be holding together pretty well with just superglue though.

I was in a bit of a time crunch for Halloween 2021, so I went ahead with the spackling. It seems to be holding up fine on the Sintra parts! I didn't really use any on the 3D printed pieces. It worked well as a small gap filler because I could apply and spread it by hand.
spackle works great as a final filler. i use it all the time. i water it down to a almost runny consistency (mustard-like) and spread it on thin just rubbing it on with my fingers. works wonders. easy to sand and fills in small gaps better than anyhting else ive tried.
 
spackle works great as a final filler. i use it all the time. i water it down to a almost runny consistency (mustard-like) and spread it on thin just rubbing it on with my fingers. works wonders. easy to sand and fills in small gaps better than anyhting else ive tried.
I also like that you can thin / thicken the spackle like you said. I accidentally left the lid open on my tub of it overnight. It was a little dry and thick in the morning, but adding a little water to it brought the consistency I wanted back.
 
Does it bond to plastic? Isn't it mostly plaster?
Idk if "bond" is the right word, but it seems to stick to just about whatever, although I haven't applied it to any smooth surfaces (usually sanded with 200 grit first). I put some on the tip of my Hasbro EE-3 and it seems to have dried and hardened in place well.

I will say it seems like it takes 3+ rounds of applying, letting it dry, then sanding for it to come out right, IMO.

But a word of warning: it comes off with water (rubbing alcohol too), so you'll need to be careful. I had to reapply some paint in a couple spots when I was removing the masking fluid (actually toothpaste) while finishing up the weathering.
 
Does it bond to plastic? Isn't it mostly plaster?
yeah good question. i guess i didnt specify that ive never put it straight on plastic as a first step. it always is on top of at least 1 layer of primer when i apply it (sometimes multiple layers and bondo in the mix too, lol), and have at least 1 more layer of primer on top of it before any finish. lots of time i primer, spackle, then primer again just to more easily identify the warped areas that remain.
 
Hey Gents,

All my armor is handmade with 3mm sintra, with exception to my purchased back plate. I used superglue to connect the panels/pieces together after cutting them from stencils. I've used DAP, I believe it's called. It's a drywall spackle that goes on pink and dries white. Which is kinda nice for those who sit and watch it dry so we can get right back to work asap. I found that it's cheap and works great. Yes, mixing with a lil water makes it a lil more spreadable in those tiny gaps. Sanding is a breeze but you gotta go light as it's easy to sand too much. Any pin holes can be filled with spot putty. Here's a few pics of almost finished guants and codpiece. You can see the pink cap tub. Thats the DAP filler.
 

Attachments

  • 2.jpg
    2.jpg
    53 KB · Views: 144
  • 1.jpg
    1.jpg
    58.6 KB · Views: 151
  • 3.jpg
    3.jpg
    53 KB · Views: 143
  • 4.jpg
    4.jpg
    67.9 KB · Views: 132
  • 5.jpg
    5.jpg
    55.3 KB · Views: 128
  • 6.jpg
    6.jpg
    47.4 KB · Views: 133
  • 7.jpg
    7.jpg
    60.6 KB · Views: 131
Afterthought: It's crucial to scuff-up the sintra to give the DAP something to bite onto. I've also sprayed a few coats of matte clear over the sanded DAP before priming and painting. I feel like it might help sealing it if it's near a bend or somewhat flexible part like knees. My 2 cents...enjoy.
 
This thread is more than 2 years old.

Your message may be considered spam for the following reasons:

  1. This thread hasn't been active in some time. A new post in this thread might not contribute constructively to this discussion after so long.
If you wish to reply despite these issues, check the box below before replying.
Be aware that malicious compliance may result in more severe penalties.
Back
Top