Minutefett ESB Restored paint up

Boba’s got some green on his dome now. Really pleased with how this turned out. I’m glad I took the time to get as many of the smaller nicks and scrapes with the masking fluid as I could. Next up will be the kill stripes and then I’ll start doing some of the scratches that were too fine for the masking fluid, as well as any silver or grey damage within other areas. Still waiting on that paintbrush…
 

Attachments

  • 4BD3FEAD-EDAF-44E5-88B2-387FC75A6421.jpeg
    4BD3FEAD-EDAF-44E5-88B2-387FC75A6421.jpeg
    2 MB · Views: 76
  • F1312E73-C46D-4D00-8540-C36C61209226.jpeg
    F1312E73-C46D-4D00-8540-C36C61209226.jpeg
    3.4 MB · Views: 84
  • 40B3E92E-2552-45CA-9B05-F0A3EF561B4A.jpeg
    40B3E92E-2552-45CA-9B05-F0A3EF561B4A.jpeg
    3.2 MB · Views: 79
  • 29AE6D8D-BD7C-4F37-A85A-834E5CDD7EF3.jpeg
    29AE6D8D-BD7C-4F37-A85A-834E5CDD7EF3.jpeg
    2.9 MB · Views: 68
  • E8B08703-6DCC-4495-9309-3DF16FDA0BA6.jpeg
    E8B08703-6DCC-4495-9309-3DF16FDA0BA6.jpeg
    1.8 MB · Views: 74
  • BA7A1CA7-0607-4FC7-BE0C-B41B11A852F5.jpeg
    BA7A1CA7-0607-4FC7-BE0C-B41B11A852F5.jpeg
    2 MB · Views: 73
  • 1BB0D676-BEDC-495D-B780-66BE26DDEAA3.jpeg
    1BB0D676-BEDC-495D-B780-66BE26DDEAA3.jpeg
    2 MB · Views: 71
6F37C107-1BF1-4E36-96DF-F3B6340C20BC.jpeg
Got the killstripes done today. These took FOREVER to mask out yesterday. I genuinely couldn’t remember how I did it last time but I don’t remember struggling with it.

93428D9D-3F32-4F7F-B535-6AC210331F81.jpeg


This time around, my stencil for that side had the killstripes dimensions PERFECT. So, I started by tracing those on to the helmet, then painstakingly masked them out individually using slithers of masking tape and masking fluid.

1C21E159-E254-427E-A2FB-5F7E6747F799.jpeg


Generally happy with how they turned out, I got a few little bits where the paint seeped under the tape but nothing disastrous that can’t be fixed. The paint is all super raised at the moment as I’m yet to wire wool it.

25103C55-A7CA-4C5B-AFDE-923000129785.jpeg
 
Aaaaaand now I’m at a bit of a stalemate.


The mandible templates are nowhere near matching the helmet. I’ve tried scaling, rotating, skewing, distorting, nothing works. I get the vertical bit right and it throws the horizontal bits out. I remember struggling here on my 3D printed helmet and it was the area I was the most disappointed in so I was looking forward to getting to the mandibles on this one but it seems I’ll have the same issue. Not really sure on the best way forward, I suppose I could try drawing the damage myself but I’m not confident it’ll turn out even close to accurate if I go that route.
 
Apologies for the delay, I began to lose my patience in trying to get the stencils sized for the mandibles so I moved on to the rear trim and key slots. I also have covid and it’s kicking my butt so things have been going slower than usual.

047DB838-AB3B-4FDF-8265-4F1BE2FE64CB.jpeg


111996BE-7173-4AFD-9D07-F485B16EB548.jpeg


8A5AD219-41B6-4BB0-912D-F625656FA3E4.jpeg


Now to figure out what to do with these mandibles…
 
Hope you get well soon!
Thanks man!


Ok, silver and grey are on the mandibles. Not particularly happy with this side:

C28AE3E7-073A-4643-8C28-826678FB33A1.jpeg


Couldn’t get the stencils anywhere close to correct so a combination of that, plus not really being able to see what I was doing properly when it came to masking, due to how intricate that area is means it’s not as good as I’d like. But I guess it looks like what you’d expect to see there?

This side came out a lot better, partly because it’s nowhere near as intricate but for some strange reason, the stencil for this side fit perfectly.

95684FA0-781B-4F2E-8646-053A0977734B.jpeg


16C604B0-131E-4FA7-A9A5-07B562B4F19D.jpeg
 
Ok, so - mandibles done, and with that - the bulk of the helmet painting!

Still plenty to do, need to touch up a few areas and add some finer detail, apply the satin cote and begin weathering e.t.c. I’m not adding the ears until I get the servo sorted for the rangefinder which itself needs painting and weathering. Need to install the borden too and I want to fit out the inside.
 

Attachments

  • 8A9B982D-4C5B-4717-8F47-6DEB1953C1CB.jpeg
    8A9B982D-4C5B-4717-8F47-6DEB1953C1CB.jpeg
    2.1 MB · Views: 82
  • B8C6B105-FB1C-43E2-AA27-9036D31FC5DD.jpeg
    B8C6B105-FB1C-43E2-AA27-9036D31FC5DD.jpeg
    2 MB · Views: 83
  • 1739F64E-24AD-488E-8EF4-C7B45FDF4C9D.jpeg
    1739F64E-24AD-488E-8EF4-C7B45FDF4C9D.jpeg
    2 MB · Views: 74
  • 691F7434-A5C0-42DB-A754-6C1D1196ECDC.jpeg
    691F7434-A5C0-42DB-A754-6C1D1196ECDC.jpeg
    2 MB · Views: 70
  • D468ECEB-89F3-4BFB-8F7D-889E26E18111.jpeg
    D468ECEB-89F3-4BFB-8F7D-889E26E18111.jpeg
    2.7 MB · Views: 67
  • 050270C2-396C-41E5-9721-42879422C3B7.jpeg
    050270C2-396C-41E5-9721-42879422C3B7.jpeg
    1.9 MB · Views: 70
  • 648D4BBF-6085-4275-8508-5A54E6473DF7.jpeg
    648D4BBF-6085-4275-8508-5A54E6473DF7.jpeg
    2.2 MB · Views: 71
  • 495802E7-419C-4D03-955A-7C3FD5581579.jpeg
    495802E7-419C-4D03-955A-7C3FD5581579.jpeg
    1.9 MB · Views: 72
  • 2434D6F7-5758-4BB8-816E-0D5B23DF5EE3.jpeg
    2434D6F7-5758-4BB8-816E-0D5B23DF5EE3.jpeg
    2.1 MB · Views: 68
  • 7AC873F8-7053-4EBE-81AE-E369A62E0A26.jpeg
    7AC873F8-7053-4EBE-81AE-E369A62E0A26.jpeg
    2.1 MB · Views: 76
  • B30C0444-9022-4B04-B73A-38F5B609D05C.jpeg
    B30C0444-9022-4B04-B73A-38F5B609D05C.jpeg
    2 MB · Views: 86
Thinking about the logistics of weathering the RF stalk and wondering if anyone has any suggestions...

It's a metal one from MF, the reason I'm having to think about it is the ears are metal too and needed a coat of etch primer for the paint to stick. I'm anticipating the same issue with the stalk although, granted - it won't need anywhere near as much paint, but I won't be able to prime it as it only requires weathering. How do most of you go about it? I was thinking about mixing small amounts of orange, yellow, and brown with some satin clear coat I have, using that for the rust and then applying a plain clear coat to hold it.
 
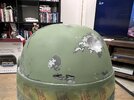
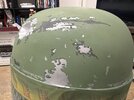
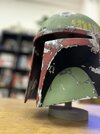
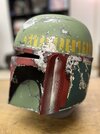
Ok, now the pictures issue seems to have been resolved I can post an update. Finally got around to weathering. Shading on the cheeks:

8E5783E5-57A1-4EC0-85A9-3D6E243DE182.jpeg


6DFCBD44-D193-4928-A76C-CCCCC171E8B0.jpeg


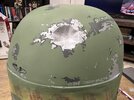
Shading on the top right corner of the rear RH panel:

79986591-5CEC-4BCE-8E07-8FF789385F9E.jpeg


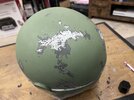
White smudges, you can also see some of the brown grease/dirt marks I’ve added on the back:
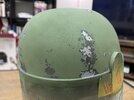
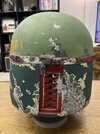
FECF40EB-C24F-441D-A9C5-E50DE4251C4F.jpeg


Dent scorching:

A2F00E39-195C-4FEB-8234-57BB6E36D0D1.jpeg


By the way - I’m not sure how most people tackle the dent scorching but I have a great tip how I did it.

Trace the dent, transfer it to some thick card - the type you get at the back of a hardback notepad is perfect - then cut out the dent shape.

Get a nice big chunk of blu-tack - big enough so that when you stick it in the dent, it sits level with the helmet.

Stick the cardboard dent cut out on to the blu-tack so that the dent is “plugged.”

Start airbrushing VERY carefully in the centre of the dent cut out. Gradually increase the paint and move outwards in bigger circles getting as close to the edge of the card as you dare. Scorch to taste.

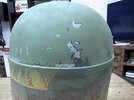
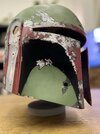
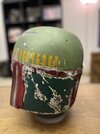
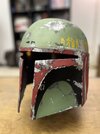
Few more grime marks, black paint, smudges, scratches e.t.c at the front:

E79D2848-02F4-4114-A3E3-36C832C42B29.jpeg


Weathered borden:

image.jpg


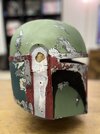
Some more dirt and the diluted white under the killstripes:

image.jpg


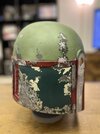
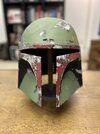
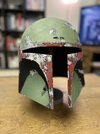
Some additional scratching on the back and the “tick” on the real LH panel:

image.jpg


image.jpg


I’m sure I’ve missed a few spots, I’m sure it’s not 100% accurate but that’s as far as I’m prepared to go and it ticks all the marks on the CRL which is all that matters for me!

I’ve held off on installing the visor or the RF for now as I’m waiting on a wireless servo kit from NeoFett. I figure it’ll be an easier install without the visor so we’ll wait for now. In the meantime, I decided to crack on with my Sidewinder EE3 kit.

Here’s how we’re looking thus far:

5006CF28-A466-46FB-A91C-2C5C250EDEF6.jpeg


A few parts have been “pinned in” wherever possible. I use wooden skewers or thick metal paper clips to create dowels and drill holes in the part and the corresponding fixing point - this helps with dry assembly and also gives an extra anchor point when glueing. The stock greeblie that covers the corner of the grip is one such “pinned part”

3E46B3D1-1755-4507-93CB-D91587412DE6.jpeg


I haven’t finished the scope yet, in fact I think it might be on backwards currently but I’ve only attached one end as I still need to be able to get the scope rings off for painting. Attaching the end that is currently on there was a challenge. As you can see from the other end - there’s not much to glue to:

D5D154B1-6A4E-40CA-A057-11DA78363F10.jpeg


So I rolled a thin little ‘sausage’ of milliput, placed it around the rim of the scope tube and squished the scope end on to it. Once dry, I sanded it back, placed some super glue around the join and sanded again while it was still wet. I’ve done this a lot on blaster builds, it’s a great way to reinforce a join.

All the parts that are screwed on, as opposed to glued and are still removable - trigger guard, D-mount, scope mounts, flash tube e.t.c will be painted before assembly.

I’ve decided to abandon my plans for a movable hammer since there really is no need. Also I don’t see how I’d be able to engineer it to stay cocked/uncooked. It’d just be loose which I don’t like the idea of. The trigger has the classic spring mod so is “pullable” which isn’t necessary but is super satisfying!
 
As far as weathering the stalk you don’t need a self etching primmer even though it’s metal just topically paint it on and it will stay. Worse case scenario you have to touch it up but I’ve had mine on and haven’t had any issues
 
Also be careful with the weathering on the helmet especially those black smudges aren’t present during the actual filming of ESB and are seen on the ROTJ-SE.
 
Also be careful with the weathering on the helmet especially those black smudges aren’t present during the actual filming of ESB and are seen on the ROTJ-SE.
See, this is why I stopped the weathering where I did! It's so hard to differentiate what is and isn't present on the ESB screen helmet! It’s only acrylic and was applied after the clear varnish so it should be relatively easy to get rid of.
 
Last edited:
This thread is more than 1 year old.

Your message may be considered spam for the following reasons:

  1. This thread hasn't been active in some time. A new post in this thread might not contribute constructively to this discussion after so long.
If you wish to reply despite these issues, check the box below before replying.
Be aware that malicious compliance may result in more severe penalties.
Back
Top