Lowberg's ROTJ SE Build

My original knee armor needed some re-working. So I adjusted the colors and touched up the weathering.
The PP2 knee is a pesky bugger because it's supposed to be a lighter yellow than the right knee, and then has another even lighter shade of yellow exposed around the silver damage. It was difficult to get a result where you could easily differentiate all the flavors of yellow lol

I also touched up the damage shapes to be a tad more accurate and recessed my knee darts to look more correct (They were just bolted on top before)

Elastic strapping was added with button snaps, although I may seek a more adjustable solution in the future. I plan to add a patch of Velcro to my flight suit to support the knees so maybe we will be fine.

457300279_1049369666805720_859502818396353230_n (Medium).jpg

SE Knees.JPG

2b573b8a-d9ec-4d96-87f8-a43b03420974 (Medium).jpg


Copied this idea from several builders to recess the darts. I fabricated a plate from some scrap styrene and fitted it in with some epoxy putty and a few dabs of CA glue.

457369067_458329117354790_5905315647833339439_n (Medium).jpg
 
lowberg
Curious as to how you get your (I'm assuming Phillips Head) screw diver in there? Or did you just twist the Knee Darts into place?
I didn't embed my Knee Darts - so in that regard you're a little braver than I (Great job by the way!). Hehehe! I simply put in a Phillips Round Head Bolt into the front of my MCR Knee Dart and then secured it with a nut on the inside of the knee armor...
Machine Craft Replicas  - Knee Darts.jpg


And I carry a small 4 inch adjustable wrench and screwdriver in my kit that goes with me to events.
1726165443611.png

And should I need to do a quick tightening, I can. But with the lock washer, I've yet to have a need for my wrench.
;)

-Iron
 
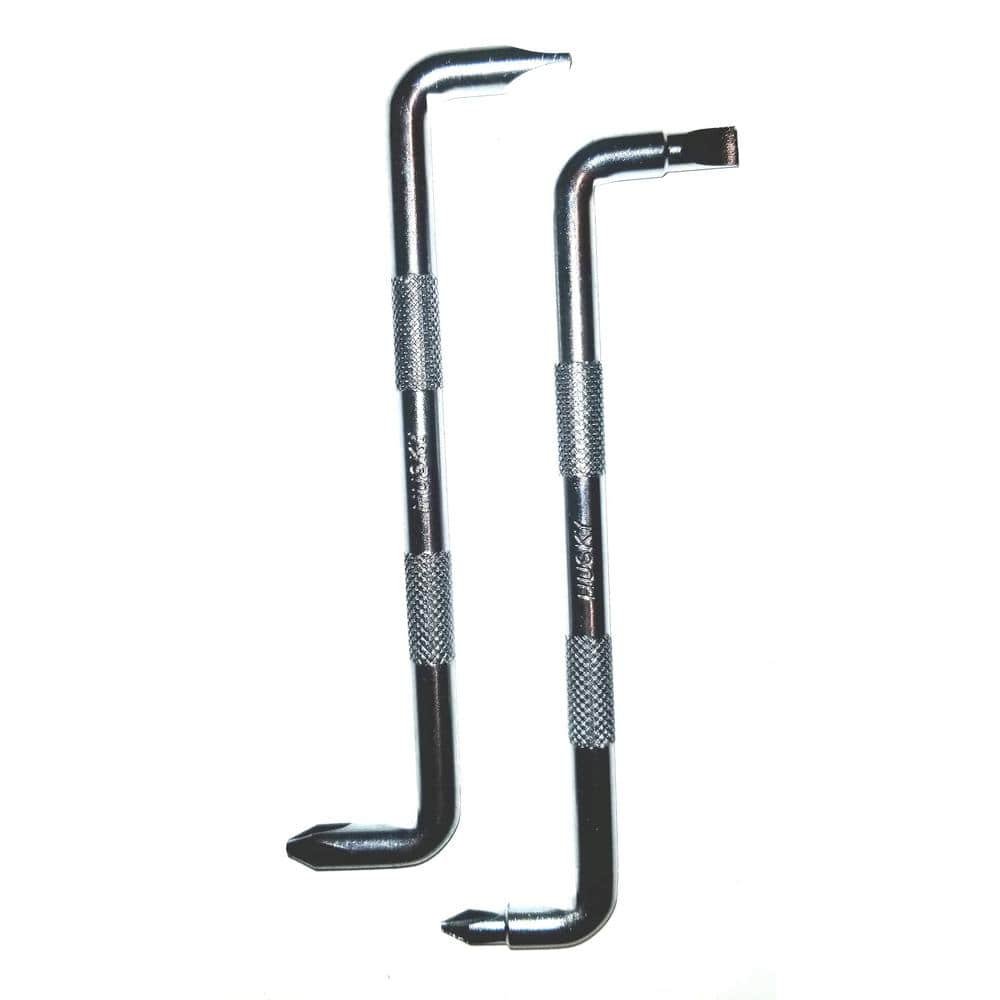
Irongladiator I was able to get a stubby Philips screwdriver in there before I moved the plate back and glued it into position, but I also have a offset screw driver that will fit in if I ever need to tighten. Essentially like an allen wrench but with a philips head.

I must have saved it from a "Some assembly required"/ Ikea style furniture set, as it's the type that usually comes with those.

 
My original knee armor needed some re-working. So I adjusted the colors and touched up the weathering.
The PP2 knee is a pesky bugger because it's supposed to be a lighter yellow than the right knee, and then has another even lighter shade of yellow exposed around the silver damage. It was difficult to get a result where you could easily differentiate all the flavors of yellow lol

I also touched up the damage shapes to be a tad more accurate and recessed my knee darts to look more correct (They were just bolted on top before)

Elastic strapping was added with button snaps, although I may seek a more adjustable solution in the future. I plan to add a patch of Velcro to my flight suit to support the knees so maybe we will be fine.

View attachment 243770
View attachment 243771
View attachment 243773


Copied this idea from several builders to recess the darts. I fabricated a plate from some scrap styrene and fitted it in with some epoxy putty and a few dabs of CA glue.

View attachment 243772
Nice connection point there my friend! Easily removable too.
 
My original knee armor needed some re-working. So I adjusted the colors and touched up the weathering.
The PP2 knee is a pesky bugger because it's supposed to be a lighter yellow than the right knee, and then has another even lighter shade of yellow exposed around the silver damage. It was difficult to get a result where you could easily differentiate all the flavors of yellow lol

I also touched up the damage shapes to be a tad more accurate and recessed my knee darts to look more correct (They were just bolted on top before)

Elastic strapping was added with button snaps, although I may seek a more adjustable solution in the future. I plan to add a patch of Velcro to my flight suit to support the knees so maybe we will be fine.

View attachment 243770
View attachment 243771
View attachment 243773


Copied this idea from several builders to recess the darts. I fabricated a plate from some scrap styrene and fitted it in with some epoxy putty and a few dabs of CA glue.

View attachment 243772
That's an intriguing idea. My metal knee darts just arrived yesterday so I've got to figure out how I want to attach them so I might try this or see if Irongladiators method is better suited once I can better assess the darts and the knees this weekend.

What perfect timing for this post, haha.
 
Small but significant update... After keeping my eyes peeled on forums/facebook groups for a LONG time, an opportunity popped up to get a pair of 2nd hand (but never worn) Wasted Fett boots, beautiful painted with spikes and in my exact size. I jumped on that SO FAST. Hopefully someone starts making these again, as there's definitely a lot of Fetts waiting for boots but I was starting to loose hope!

20240918_135440.jpg
 
lowberg
Nice! Yeah I really wish Imperial Boots kept their Fett Boots offering going. Sad that they got out of the Fett game. Had I knew they were gonna go away I woulda gotten a 2nd pair. Especially at $90 that I got from them, which was a Black Friday special promotion they had going on at the time.

But I digress. Those are a great looking pair of Fett Boots indeed!

-Iron
 
Thanks! Yea wow $90 is crazy for those imperial boots! Someone's gotta start offering accurate Fett Boots soon, there's a decent enough demand of people needing them! Before I got these, I reached out to crow props and they said they would be up for giving their offering an update soon with some minor stitching tweaks ect.
 
Thanks! Yea wow $90 is crazy for those imperial boots! Someone's gotta start offering accurate Fett Boots soon, there's a decent enough demand of people needing them! Before I got these, I reached out to crow props and they said they would be up for giving their offering an update soon with some minor stitching tweaks ect.

Christian, aka Man Of War Studios hopes to get back in to offering boots again soon.
 
Great score! The boots look great, congrats on the find. Yes, the selection for finding good boots has dwindled over the years. MOWS possibly bringing them back would be great. Mine are some of his from ages ago and they're still great boots.
 
With the boots and knees done I was able to partially suit up the bottom half, albiet with the cod just floating in place (need to still get the kidney attached to it).


1726855307321.png


I need to move the thigh pockets up on my suit to create more room below in-between the knees and shin pouches. Just need a plan to do so as I don't think I can get my sewing machine into to these areas without opening up the legs. I may be able to stitch them back on by hand with a curved needle, but we will see.

In addition, my shin tools are sticking up further than they should be. Especially the paterson squeegee tool replica I printed, can not be forced further down in the pouch Since this version of the tool was not actually used on the SE promo costume, I'm going to replace it and the stir stick with a replica of the correct ones shown in the SW visual dictionary. Between better sized tools, and moving the pouches up, I should be in better shape for spacing.

1726855679964.png
 
Yea but you can see they had the SWVD sonic beam version in his shin pouch for the SE photoshoot, look at the stripe's location and the width of the tool compared to where the stipe is on the normal patterson squeege tool. The only reason why I am re-doing them honestly is because I need them to sit further down, and this one will for me.

1726964385582.png


I found an STL here, but beware it's in an incorrectly mirrored orientation. I realized that after I started printing it whoops.

someone else made a really good STL model in this thread but it's not publicly hosted.
 
Yea its not a bad model! I was happy to find out it just barely fit on my resin printer. I printed his design and experimented for the first time doing a hollowed out resin print, so it's not too heavy. Just have a few drainage holes to fill on the sides. The same creator of that sonic beam stl also had a decent model of the survival knife so I printed that too. Both these items are a little shorter than my original tools so they will sit better/lower in the pockets.

1727027627014.png


I also began painting my EE-3. It's a full size 3D print kit from TraywickDesigns on etsy. I struggled getting the print lines cleaned up until I tried the UV resin technique that was recommended to me, brushing thin coats of the resin I use for my resin printer on and curing with a UV light. Never using bondo again! The side greeblies I resin printed from RafalFett's files. I airbrushed a base coat of satin black and then misted with a dark grey in areas for some depth.

1727027883815.png
 
Right?? I cant believe I didn't know about that sooner.

Operation pocket shift was a success, although not without frustrations on the sewing machine.
I moved them up about 2" to allow more space underneath for the knees, and along with the lower profile shin tools I think it's looking at least a bit closer. I also took in the legs about an 1" so there's less bulk in the calf area.

My knees will be a problem with their weight. I'll need to add some velcro at some point. Their color under my LED shop lights is brutal too, makes them look way brighter than they are lol

79871b86-b4a7-42ae-9f98-bfc38e3eac0f.jpg
 

Your message may be considered spam for the following reasons:

If you wish to reply despite these issues, check the box below before replying.
Be aware that malicious compliance may result in more severe penalties.
Back
Top