FirstCoastFett's Beskar Build

Hey gang,

Sorry for not posting my progress sooner, but I'm working on Din Djarin season one beskar build. With all the variations, I honestly love episode 3-6 version the best. So here's what I got so far:

Helmet and armor: Danny Redman
Flight suit, neck seal and vest: Mike Q at Darkside Closet
Cape: Mood Fabrics
Boots: Crowprops
Gloves: Endor Finders
Ammo, metal parts: JJ Industries
Leather (belt/bandolier/ leg straps/ammo belt): Sines Industries
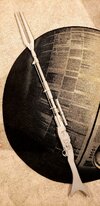
Rifle: Wulwhite's Workshop
Blaster: Rubies
Vibroblade: 3D print, maker unknown

Painting, weathering, left leg wraps: me
 
Last edited:
Got my boots from CrowProps. Nothing major needed, just acrylic for the weathering, matte clear, dusted with fullers earth and resealed.
101814554_10219927895201187_8263901170808683230_o_10219927895161186.jpg
 
Next up, the amban rifle. The rifle weighs a few lbs, resin cast from Wulwhite's Workshop.
 

Attachments

  • 91342869_10219175809599517_6920355111826882560_o_10219175809519515.jpg
    91342869_10219175809599517_6920355111826882560_o_10219175809519515.jpg
    216.7 KB · Views: 175
The body was spray painted with a hammered black paint, then finished off with steel spray paint. The long part was sprayed with satin black, brown, and the prong a lighter metallic silver. MM chrome silver (RIP) accents, the scope same satin black with Vallejo brass. I used Copic markers for the burnt effect on the pronged end. Weathered with acrylics.
94257874_10219484873165913_1000491019327766528_o_10219484873085911.jpg
93806572_10219486374723451_562250917429116928_n_10219486374643449.jpg
 
Got my 3D printed blaster, then decided to have a backup piece. So I painted the Rubies blaster, filled it with sand to give it a little weight. This will be my primary blaster, the other will just be a display piece.
FB_IMG_1616540496687.jpg
FB_IMG_1616540500439.jpg
 
DUDE!! Looks great so far!! All coming together - from some awesome vendors!

Can you expand on how you did made the burnt effect on the prong with Copic markers?

I need to do that to my rifle...right now it looks a bit too dark and it's missing that burnt effect...

rifle.jpeg
 
As good as the Sines leather is, the left leg piece didn't wrap around my leg and was quite uncomfortable. So I made my own. Found thin leather rolls at Hobby Lobby, and used worbla to shape the entire piece. The top part is about 4", just a flat piece. Then I shaped the middle section (with the wrinkles) also 4" and with a heat gun, sealed it to the top piece. Then a smaller 2" flat strip to the bottom. When the piece was complete, i trimmed it from the back so it overlaps about an inch.

I clamped the leather over the top and E6000 all over the worbla, pulling and stretching the leather over the entire piece. I made the orange bottom leather piece from scratch. I cut 6 one inch pieces and glued them to the orange strap, making this one separate piece. When everything dried, I glued the bottom part to the rest of the leg.

Everything was hand painted and weathered with acrylics.

I managed to keep the top leather strap and pouch. I glued that to the leg, making it one whole piece. It stays closed with velcro behind both straps
20201112_092655.jpg
20201112_092742.jpg
 
Abdominal thingy. Found a faux leather at joanns and cut out strips of EVA foam 4mm. Glued with E6000. Used 1/8" square dowels over the creases and laid a bunch of books on top and let it dry overnight. Went over it with a grayish blue acrylic paint, then back over it with gray weathering. Finished it off with fullers earth and sealed with a matte clear.
20210125_004143.jpg
 
For the right leg, primed and sprayed with Montana Gold shock brown. How i assembled this piece got tricky. The two halves are joined at the front with 4 strips of 2" elastic. The boomerang sprayed with Montana Gold chestnut.
FB_IMG_1616542025256.jpg


I used scrap ABS and glued to the boomerang, then I glued the ABS piece to the back of the front strip with E6000. I glued the ammo belt and bottom leather strap to the front strip like this

20210211_110743.jpg


I taped the front piece to the two halves and glued the straps to the actual leg pieces. That way the front strip has some flex when I open it to put on my leg, and will prevent any piece from cracking. The right leg goes on like a TK shin, but like the other leg it closes securely with the velcro on the leather straps. Weathered with acrylics, brushed on fullers earth and sealed with a matte clear.
20210212_143549.jpg
20210212_143855.jpg
 
DUDE!! Looks great so far!! All coming together - from some awesome vendors!

Can you expand on how you did made the burnt effect on the prong with Copic markers?

I need to do that to my rifle...right now it looks a bit too dark and it's missing that burnt effect...

View attachment 209144
Thanks man! Believe it or not, it was easier than I thought it was gonna be. I started with the darker blue, and drew in where I wanted it. Then with a dry brush, feathered it out a little. Then with the violet, red, and yellow following the same process. I washed off and dried that same brush, and then blended each color. Then sealed it with a matte clear coat.
 
Next up, my charcoal gray boiled wool arrived from Mood Fabrics. Dyed with black for about an hour.

pinned the folds in place and glued them down with E6000. Glued velcro under the cape so it attaches to the vest. Added line 24 snaps to make sure it stays, but also lines up how I want it.

FB_IMG_1616543050132.jpg

20210212_172516.jpg


20210212_172442.jpg
 
Resin printed hand plates. Primed, sprayed with Tamiya racing white. It was a little too yellow, so I brushed one white acrylic to break it up. I mixed my own blue for the triangles, weathered with gray acrylic, neutral gray and black for the damage.
FB_IMG_1616542038428.jpg

20210312_100723.jpg
IMG_20210312_162147_308.jpg
20210312_164317.jpg
 
This thread is more than 2 years old.

Your message may be considered spam for the following reasons:

  1. This thread hasn't been active in some time. A new post in this thread might not contribute constructively to this discussion after so long.
If you wish to reply despite these issues, check the box below before replying.
Be aware that malicious compliance may result in more severe penalties.
Back
Top