ReefZombie
New Hunter
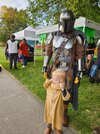
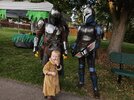
This is my very first costume build ever. I originally intended on just modifying a cheap chinese costume by adding 3d printed armor to it and this kind of ballooned to getting as close to 501st Infamous rating as possible while doing the majority of the work myself. I also did my Wife's Bo Katan kit at the same time and made a Grogu helmet for my Son. Posts will come later for the Wife's kit after we do the leatherwork and finish hers. I took waaaay fewer photos while building this than I should have and I have not done detailed photos yet of the whole costume. I will add those next weekend probably, but have added the photos I have for now.

Armor
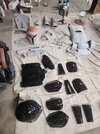
All of the armor was 3d printed in PETG based off the Galactic Armory 3d files. I scaled to fit my body using Armorsmith designer and tweaked anything that was off a bit. Most parts were printed at a 0.2 or 0.3 layer height to speed up prints with a 0.4 nozzle but a few detailed parts were printed at 0.1 layer height with a 0.2 nozzle. Everything was sanded smooth to 320 grit, then a layer of filler primer, then repeat like 2 or 3 times until glass smooth.
Beskar paint process
1. Coated black with duplicolor automotive jet black
2. High gloss with Acme Finish 1 2k automotive gloss
3. Apply chrome with Duralumen
4. Apply another coat of 2k gloss
5. If beskar final color then weather with acrylics
Other color paint process
1. Start with beskar base per above
2. Mask off all areas I want to see metal scratches using liquid latex
3. apply base coat color
4. airbrush in shadows and highlights
5. remove liquid latex and scuff with various items like screwdrivers, wire brushed, sandpaper, etc to get realistic scratches and scuffs down to the chrome layer
6. weather with acrylics
Attachment
- arms are attached as a clamshell with elastic on one side and magnets to hold together. this does come apart from time to time, so working on a more sturdy closure mechanism. Open to any ideas people have here.
- Chest and thighs are attached with heavy duty snaps and velcro
- shoulders and hand guards are attached with velcro
- knee is attached with a heavy duty snap and a leather band
- hip and kidney armor attached to belt with velcro
- I attached buckles and made essentially a backpack strap for the jetpack
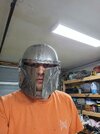
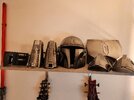
Helmet
- I used motorcycle pads to help get the fit better on the helmet
- I used a hobart face shield to make the visor. The model I used has a slot for the visor.
Leather Work
I have never done leather work before nor used a sewing machine, so my pieces have a few imperfections but came out pretty good regardless
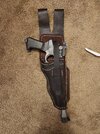
Belt and Bandolier
- I used Mandalorian Inspired Belt & Bandolier Patterns/templates With - Etsy as a starting point to help guide me. These patterns were not very straightforward and did not hold my hand but were still very helpful.
- The holster was made using veg tan and wet molded to the blaster I had made many years ago (This needs to be repainted to match the quality of the rest of the costume).
- The belt and bandolier was made from hobby lobby clearance chrome tan.
- The buckle, clasp and cartridges were printed and chromed based on the files given in the leather patterns.
- The grav charges and holder were custom designed by me in fusion 360 and I will post these for sale on etsy when I get the design absolutely finalized. Theyy actually light up using a $2 keyhain LED from walmart.
- I also custom designed the back aluminum plate that holds the rifle shaft and used veg tan and heavy duty snaps for the closure.
- Most parts are held in place with gunmetal chicago screws so they can be repositioned or replaced if needed.
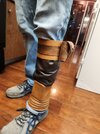
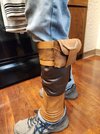
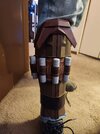
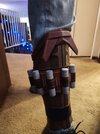
Shin Leather
- The left shin and the leather bits for the right shin were made with the help of these patterns. Mandalorian Greave Leatherwork Patterns that just so happen to be free and very well done I had to make almost no modifications other than length to fit my tiny shins.
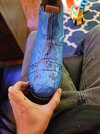
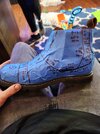
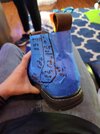
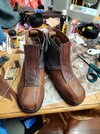
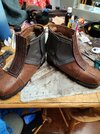
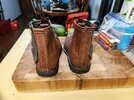
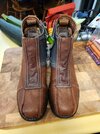
Boots
- I started with the Sketchers Blaine Orson as a base since these are the screen accurate boots
- I then followed the same procedure as the welding geek to put these together.
- The main difference is I stitched together all of my seams before cementing to the show and I am glad I did. the few parts I did not have already come loose a bit after two days of walking in them.
Base Costume
This is the lowest quality part of my kit.
- I started with this costume The Mandalorian Season 2 -Din Djarin Outfits Halloween Carnival Suit Cosplay Costume
- I then removed the armor from the flight suit, flak jacket, cumberbund, pants and shirt.
- I stitched in velcro and attached the grey piece permanently to the cumberbund.
- The cape was made from some fleece and pleated based on this: The MANDALORIAN- Din Djarin Costumers Guild | Heres our short guide for pleating/draping the cape | Facebook. I sewed the pleats in permanently and attached velcro to mount under the chest armor.
- I reused the gloves from the chinese kit but plan on making more screen accurate ones from lambskin gloves soon.
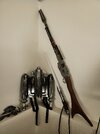
Weapons
- The IB-94 blaster was my first painted prop I ever did. It was still good enough quality to use for the build but I plan on redoing this by modifying the electronic blaster on github to be more screen accurate.
- The amban rifle was my second prop I ever made and also needs a repaint for more believable metal.
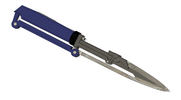
- I am currently working on 3d modeling and finishing a 100% screen accurate vibroblade based off the reference photos from the mandalorian event.
- I intend on also making the belt knife and mini blaster to put in the belt pouches.
- I may down the road modify the nerf rifle to be screen accurate, but this may be beyond my mechanical abilities (I am an electrical engineer not a mechanical one)
Armor
All of the armor was 3d printed in PETG based off the Galactic Armory 3d files. I scaled to fit my body using Armorsmith designer and tweaked anything that was off a bit. Most parts were printed at a 0.2 or 0.3 layer height to speed up prints with a 0.4 nozzle but a few detailed parts were printed at 0.1 layer height with a 0.2 nozzle. Everything was sanded smooth to 320 grit, then a layer of filler primer, then repeat like 2 or 3 times until glass smooth.
Beskar paint process
1. Coated black with duplicolor automotive jet black
2. High gloss with Acme Finish 1 2k automotive gloss
3. Apply chrome with Duralumen
4. Apply another coat of 2k gloss
5. If beskar final color then weather with acrylics
Other color paint process
1. Start with beskar base per above
2. Mask off all areas I want to see metal scratches using liquid latex
3. apply base coat color
4. airbrush in shadows and highlights
5. remove liquid latex and scuff with various items like screwdrivers, wire brushed, sandpaper, etc to get realistic scratches and scuffs down to the chrome layer
6. weather with acrylics
Attachment
- arms are attached as a clamshell with elastic on one side and magnets to hold together. this does come apart from time to time, so working on a more sturdy closure mechanism. Open to any ideas people have here.
- Chest and thighs are attached with heavy duty snaps and velcro
- shoulders and hand guards are attached with velcro
- knee is attached with a heavy duty snap and a leather band
- hip and kidney armor attached to belt with velcro
- I attached buckles and made essentially a backpack strap for the jetpack
Helmet
- I used motorcycle pads to help get the fit better on the helmet
- I used a hobart face shield to make the visor. The model I used has a slot for the visor.
Leather Work
I have never done leather work before nor used a sewing machine, so my pieces have a few imperfections but came out pretty good regardless
Belt and Bandolier
- I used Mandalorian Inspired Belt & Bandolier Patterns/templates With - Etsy as a starting point to help guide me. These patterns were not very straightforward and did not hold my hand but were still very helpful.
- The holster was made using veg tan and wet molded to the blaster I had made many years ago (This needs to be repainted to match the quality of the rest of the costume).
- The belt and bandolier was made from hobby lobby clearance chrome tan.
- The buckle, clasp and cartridges were printed and chromed based on the files given in the leather patterns.
- The grav charges and holder were custom designed by me in fusion 360 and I will post these for sale on etsy when I get the design absolutely finalized. Theyy actually light up using a $2 keyhain LED from walmart.
- I also custom designed the back aluminum plate that holds the rifle shaft and used veg tan and heavy duty snaps for the closure.
- Most parts are held in place with gunmetal chicago screws so they can be repositioned or replaced if needed.
Shin Leather
- The left shin and the leather bits for the right shin were made with the help of these patterns. Mandalorian Greave Leatherwork Patterns that just so happen to be free and very well done I had to make almost no modifications other than length to fit my tiny shins.
Boots
- I started with the Sketchers Blaine Orson as a base since these are the screen accurate boots
- I then followed the same procedure as the welding geek to put these together.
Base Costume
This is the lowest quality part of my kit.
- I started with this costume The Mandalorian Season 2 -Din Djarin Outfits Halloween Carnival Suit Cosplay Costume
- I then removed the armor from the flight suit, flak jacket, cumberbund, pants and shirt.
- I stitched in velcro and attached the grey piece permanently to the cumberbund.
- The cape was made from some fleece and pleated based on this: The MANDALORIAN- Din Djarin Costumers Guild | Heres our short guide for pleating/draping the cape | Facebook. I sewed the pleats in permanently and attached velcro to mount under the chest armor.
- I reused the gloves from the chinese kit but plan on making more screen accurate ones from lambskin gloves soon.
Weapons
- The IB-94 blaster was my first painted prop I ever did. It was still good enough quality to use for the build but I plan on redoing this by modifying the electronic blaster on github to be more screen accurate.
- The amban rifle was my second prop I ever made and also needs a repaint for more believable metal.
- I am currently working on 3d modeling and finishing a 100% screen accurate vibroblade based off the reference photos from the mandalorian event.
- I intend on also making the belt knife and mini blaster to put in the belt pouches.
- I may down the road modify the nerf rifle to be screen accurate, but this may be beyond my mechanical abilities (I am an electrical engineer not a mechanical one)
Attachments
-
 20231007_135756.jpg6 MB · Views: 83
 -
 20231007_135803.jpg5.1 MB · Views: 72
 -
 20231007_135808.jpg4.6 MB · Views: 64
 -
 20231008_235407.jpg5.2 MB · Views: 62
 -
 20231008_235415.jpg5.2 MB · Views: 65
 -
 20230917_213341.jpg5.4 MB · Views: 66
 -
 20230917_213349.jpg5.5 MB · Views: 78
 -
 20230917_231904.jpg1.3 MB · Views: 79
 -
 20230920_201031.jpg4.4 MB · Views: 76
 -
 20230920_201037.jpg4.3 MB · Views: 66
 -
 20230924_194844.jpg7.2 MB · Views: 70
 -
 20231009_232655.jpg7.7 MB · Views: 73
 -
 20231009_232703.jpg7.7 MB · Views: 58
 -
 20231009_232716.jpg7.2 MB · Views: 60
 -
 20231009_232724.jpg5.1 MB · Views: 62
 -
 20231009_234649.jpg7.7 MB · Views: 65
 -
 20231010_190006.jpg3.8 MB · Views: 70
 -
 20231016_231552.jpg4 MB · Views: 71
 -
 20230917_131907.jpg1.6 MB · Views: 74
 -
 IMG_20231014_200731.jpg446.7 KB · Views: 76
 -
 IMG_20231014_200746.jpg416.7 KB · Views: 85
 -
 IMG_20231014_200731.jpg446.7 KB · Views: 82
Last edited: