ESB High Poly count STL files ESB Sidearm

stryker181

New Hunter
In getting into resin printing I realised that higher poly files are easier for post processing of the prints. As I had already downloaded and FDM printed Rafalfett's files I knew that this would be a great place to start. My adventure to date has been to modify these files so that they can be printed in a resin printer to a point where after a quick sand, filler primer be ready for final paint. After hours of reworking the files on Meshmixer and smoothing them out I was able to produce the EE-3 Sidearm, Armour, gauntlets and jetpack. Obviously only the small parts can be printed out in a resin printer (unless you have a commercial machine) but I find that even FDM printing benefits form a higher poly count file.

As these files were based off of Rafalfett's work (except for the gauntlets and I believe the holster) I confirmed that these could be shared for others to use.

As the files are large and are anywhere from 70-225 MB in size I found a place to host them so you can download them for your use. By extension of the files being from Rafalfett's work I would extend that these are for personal use and not for resale.

ESB Sidearm

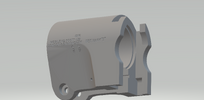
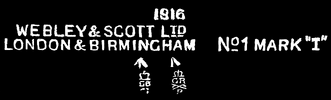
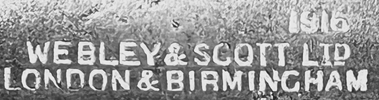
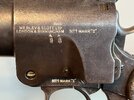
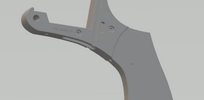
Handle has had texture added to the grip and the emblems removed to reflect the new CRL requirements.

Handle.png
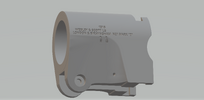
Barrel comes with two versions. Original and a redone sharper version.
Barrel.png

Barrel Sharp.png

Back pin.
Back Pin.png

Trigger
Trigger.png

The tip with dowel.
Tip.png

Two versions of the holster, one with Logo and one without.

Nemrod holster.png


Nemrod holster No Logo.png


I am not a professional and the work done to modify these files was done via a trial and error process. I don't claim that they are perfect and if you have any recommendations please add to the discussion.

If there is interest I will continue to post up the rest of the files that I have modified
 
As I already said, you did a great work reworking the sidearm, but also doing the holster (still a to-do on my list along with the gauntlets).
 
RafalFett thanks for that but you did all the hard work on these files. So I have uploaded the armour files today and will be available to anyone to print them out. A word of warning the back armour plate is a big file and took some processing time to work on.

I found that I needed to print out the armour about 4mm thicker then the files originally were made. I printed them using a flexible PETG filament that warped at thinner thicknesses. Not sure if this was a issue with the filament or not. They actually look like armour plates but I'm not sure if they still meet 501st standards so use at your own risk. All except the knee pads have a return lip on them to add depth.

I added the damage as I saw from multiple sources. I primarily used the Bobomaker and CRL library images to create the damage. There seems to be such a wide range of damage variations. If there is interest I also have an undamaged version. High poly count smoothed without damage that can be made available to those wanting to add their own damage or make a ROTJ version.

Armour is thickened by 4mm, smoothed and damage added for ESB. I again do not proclaim to be an expert in this so if you have any recommendations on how to improve please let me know.

ESB Armour

Armour is as follows:

Chest Plates
Left
Left Chest Plate.png

I maintained the original thickness behind the Left plate to mount the LED
Left Chest Plate 1.png


Right
Right Chest Plate.png

Abdominal
Abdominal Plate.png

Diamond
Center Diamond.png

Collar
Collar.png

Back armour. This file is big and made my computer hurt to process it.
Back Armour.png

Cod piece
Cod Plate.png

Kidney armour
Back Belt.png

Right shoulder bell
Right Shoulder.png

Left shoulder
Left Shoulder.png

Right Knee
Knee Pad Right.png

Left Knee
Knee Pad Left.png


I will continue to post other items as I get time to do a final processing of the files.
 
Here are a set of reworked gauntlets.

So things that I did to the files:

Hollowed out the Right gauntlet so that the flashlight could be added. I also separated the hose connector from the gauntlet. The model that I started with had it built as one piece.

I added a couple of raised panels on the right Greeble. I believe that this is more accurate and amplifies the white panels.

The left gauntlet required the bottom to be "welded" together.

ESB Gauntlets

Left Gantlet top
Left Top.png

Bottom
Left Bottom.png

Right Top
Right Gauntlet without Hose connector.png

Right Hose connector
Right Gauntlet Hose connector.png

Bottom
Right Gauntlet Bottom.png

Greeble
Right Gauntlet Greeble.png
 
I recently reworked the jetpack to now have the piano keys printed separately from the main pack. I've printed the file twice with the keys attached and it makes it very difficult to get into all the corners. Plan is to print out the body in FDM and the piano keys with my resin printer.

This took a lot of work to separate out those parts. Intent was to do it through the use of free tools. Accomplished but I am sure that there are better ways to do it. The main body file is the largest that I have worked on at about 600MB. Normal processing to smooth out the contours for an easier post print sand and fill.

Jetpack Body

AC_Jetpack body no door.png


Dental Left.png


Dental Right.png


Jetpack_door fix Thick.png
 
Continuing on with reworking some files. I decided to work on a high poly Helmet. Again looking to Rafalfett products as the foundation of these efforts.

I reinforced the ring around the inside and thickened the connection from the dome around the back. Thickened the helmet slightly overall, increased poly count and smoothed out the outside and inside. I then added the key on the left mandible.

There are three versions available. Once is simply smoothed, another with damage added a last one with a bulge. I'm not sure of the damage accuracy but it is difficult to recreate in Meshmixer. Again I'm not a professional just having fun. If you want to change it there is a clean version to use that you can add your own damage or do some post processing.

Helmet Files

Helmet high poly Damage and Buldge.png

Helmet high poly Damage and Buldge 1.png
 
No problem. You can also find the EE-3 is at this link.


The main body was cut into two pieces to be printed on a Anycubic Mono X.
 
So I always wanted to add the stamped information of the Webley and Scott on the side of the housing on my files so that when it was printed it would be more accurate. After some attempts, and significant patience, I was able to find a picture on the RPF of the stamped information that I could use. I then reworked this into an image to copy and refine. After some work I was able to make it into a "stamp" version. I then remeshed the product and was able to "as closely replicate" the original stamp on the housing. Keep in mind that this work takes exensive processing time as the mesh needs to be brought to 0.04mm increments. It isn't 100% but it is off of an original Webley and Scott and now allows those with a resin printer to have a housing that has the makers information and proof stamp. I haven't added this to the file repository as I might further refine the product but if there is interest I will post an update to MediaFire with the updated files. I am also looking to do the trigger housing stamp on the lower portion as well. Now that I have the process it will be easier to do that one.
 

Attachments

  • Lower housing stamped.png
    Lower housing stamped.png
    350.5 KB · Views: 68
  • Stamp V3.png
    Stamp V3.png
    55 KB · Views: 65
  • Font1.png
    Font1.png
    533.8 KB · Views: 66
  • F5F4AF92-34EC-49F4-BDF2-EAEE3D5C8A25.jpeg
    F5F4AF92-34EC-49F4-BDF2-EAEE3D5C8A25.jpeg
    2.7 MB · Views: 70
So I continue to play around with debossing the ee-3 parts. I was able to find a font close to the original used and was able to create a cleaner version of the stamp.

As well I worked on the main grip housing. The issue that I ran in to was when printing the part in resin there was a couple of weak areas in the trigger and hammer openings. Unfortunately in reinforcing these areas those items are no longer functional. As well I stamped teh No1 Mark 1 on the side. If anyone wants these files please let me know I can make them available.
 

Attachments

  • Main grip modified stamp.png
    Main grip modified stamp.png
    260.2 KB · Views: 63
  • Housing bottom stamp.png
    Housing bottom stamp.png
    320.8 KB · Views: 61
This thread is more than 7 months old.

Your message may be considered spam for the following reasons:

  1. This thread hasn't been active in some time. A new post in this thread might not contribute constructively to this discussion after so long.
If you wish to reply despite these issues, check the box below before replying.
Be aware that malicious compliance may result in more severe penalties.
Back
Top