What Paint Colors? RESOLVED -Now BKBT Build Log

bigkidbiggertoys

Well-Known Hunter
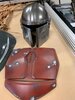
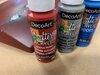
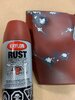
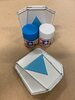
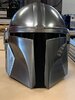
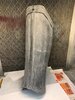
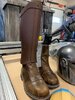
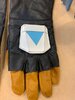
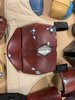
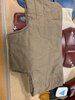
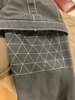
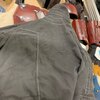
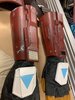
I am wondering what paint brands and color everyone is using for their Gunslinger costumes? I have seen a couple of really fine costumes out there with accurate looking colors.

This just came up in another thread so I thought I would re-post here. It would have save me a bit of trouble if I had gotten this first but I think my end result is close.
FB_IMG_1595633107866.jpg
 
Last edited:
Ok so I just went for it. Painting is not my strong suit but I am getting better at it. These are 3D printed parts slightly modified. The helmet is a print as well.

I painted the helmet a base gunmetal silver, clear coated it and wet sanded with 600 grit before shooting a light coat of Alclad II chome and buffed afterwards.

The chest and ab were painted a base of rust primer and then I airbrushed a custom mix of craft store acrylics for the deeper red. The chips were painted freehand with the same acrylics, again, using a custom mix. Everything was sealed with a satin clearcoat and then the silver of the dents applied.
 

Attachments

  • Mando1.jpg
    Mando1.jpg
    62.4 KB · Views: 716
  • Mando2.jpg
    Mando2.jpg
    57.5 KB · Views: 700
  • IMG_0900.jpg
    IMG_0900.jpg
    116.1 KB · Views: 573
  • IMG_0901.jpg
    IMG_0901.jpg
    53.5 KB · Views: 585
  • IMG_0902.jpg
    IMG_0902.jpg
    58.8 KB · Views: 692
Last edited:
Thank you for coming back and posting your results. It's nice to have you here again BKBT!

I think people is actually using a few shades of brown layered (mist) on the armour instead of just one colour. But I'm no fan/expert of Din Djarin armour.
 
Yes I built up a few different tints and layers. I was more or less looking to see if someone had already worked out a formula.

As I progress with my build I'll post my progress with techniques that I am using except for finishing 3D prints, there is already tons of info on that.
 
The hand plates are printed. I painted a krylon satin white and then used a mix of Tamiya acyrlics for the blue. This is actually my second attempt at the blue, the first was too dark for my liking. The way to mix the blue is start with white and slowly add the blue. If you start the other way then you will already be too dark and have to waste a lot of paint trying to lighten it up. The chips are a dark grey.
 

Attachments

  • IMG_0899.jpg
    IMG_0899.jpg
    53.5 KB · Views: 427
Printed off some more parts this weekend and have started epoxy coating them. I wish I had started this in the beginning as it fills some of the print lines and is a good base for finishing not to mention adding durability to the parts.
 

Attachments

  • IMG_0906.jpg
    IMG_0906.jpg
    73.2 KB · Views: 397
I also made up a paper template for the T-visor and cut it from a welding visor. It is just temporarily held in place with tape but I think I am going to print some sort of screw attachment method as soon as I get a chance. If anyone is interested I can scan the template and throw up a jpg.
 

Attachments

  • IMG_0907.jpg
    IMG_0907.jpg
    47.8 KB · Views: 416
  • IMG_0904.jpg
    IMG_0904.jpg
    110.5 KB · Views: 398
Finished painting a shoulder bell last night. I used the method outlined above but took some progress pics so you can see the difference in every step.

The added red over the primer is subtle in the pics but once everything is clear coated then it really makes a difference and breaks up the monotone color.
 

Attachments

  • IMG_0911.jpg
    IMG_0911.jpg
    57.1 KB · Views: 493
  • IMG_0912.jpg
    IMG_0912.jpg
    60.6 KB · Views: 406
  • IMG_0913.jpg
    IMG_0913.jpg
    57.7 KB · Views: 440
  • IMG_0914.jpg
    IMG_0914.jpg
    64.4 KB · Views: 469
  • IMG_0916.jpg
    IMG_0916.jpg
    78.8 KB · Views: 435
I have printed and painted a few more parts this weekend. I am finding it easier to finish one or two parts at a time to keep things progressing and keep motivated. It is actually coming along faster now than I expected.
 

Attachments

  • IMG_0929.jpg
    IMG_0929.jpg
    30.8 KB · Views: 424
  • IMG_0932.jpg
    IMG_0932.jpg
    45.2 KB · Views: 412
  • IMG_0931.jpg
    IMG_0931.jpg
    38.3 KB · Views: 387
Working on the knee armor. Printed and epoxy coated. I had printed off the undamaged version by mistake so I whipped out my heat gun and was able to press in the damage with the handle of a small screwdriver.
 

Attachments

  • IMG_0928.jpg
    IMG_0928.jpg
    84.1 KB · Views: 369
  • IMG_0933.jpg
    IMG_0933.jpg
    55.9 KB · Views: 405
I finished painting the knee armor but didn't spend any time prepping the printed darts. I bought a mini metal lathe so this will be one of the first projects I attempt on that. Looks like I need to weather them more but I think I will move on to the next part and revisit that later.
 

Attachments

  • IMG_0941.jpg
    IMG_0941.jpg
    487.5 KB · Views: 418
  • IMG_0944.jpg
    IMG_0944.jpg
    299.6 KB · Views: 404
  • IMG_0945.jpg
    IMG_0945.jpg
    327.8 KB · Views: 398
I'm working on the shin armor and have a quick coat of paint on it. One thing I have noticed is that it won't work to well with the Crow Props boots. The boots have more leather at the top than needed and you have to kind of fold the top of the boot in order to get the armor on. One the pants fabric is tucked into the boot I am pretty sure the armor will always want to pop open. I think I will print a larger size and see if I can get a cobbler to modify the boot somehow.
 

Attachments

  • IMG_0946.jpg
    IMG_0946.jpg
    658.7 KB · Views: 508
  • IMG_0951.jpg
    IMG_0951.jpg
    69.9 KB · Views: 469
Also got my buddy to run off a belt buckle today. If there is interest in this I can do a run? Price would depend on how many pieces are produced.
I will also be getting him to produce the sling clip as well if there is interest.
 

Attachments

  • IMG_0950.jpg
    IMG_0950.jpg
    84.9 KB · Views: 284
I just received my soft parts the other day and couldn't be happier. I decided on the Cosplaysky costume based on the stitching details present on the sleeve back that I didn't find on some of the other seller's offerings. First thing I did was ditch the sewn on armor parts and give it a wash to loosen up the fibers and get rid of the pin holes from the sewn armor. If you want to dry it in a hot dryer be aware there will be some shrinkage but not too much. I bought the large sized suit and shrunk it slightly so it fits me well now. I'll get some pics up in the next few days.
 
Received my gloves from Crowprops.

These are large. I'm thinking I may buy a medium set to see how they look. The fingers seem a little long for me.

They are well made and I am happy with the color, I don't think they even need any weathering, they already have a lived in look.
 

Attachments

  • IMG_1024.jpg
    IMG_1024.jpg
    59 KB · Views: 386
  • IMG_1025.jpg
    IMG_1025.jpg
    62 KB · Views: 360
  • IMG_1026.jpg
    IMG_1026.jpg
    45.2 KB · Views: 390
It's been awhile since I have updated this thread but have been busy working on things. First, I received my order from Cosplaysky and am very happy with the finished product. Of course the first thing I did was rip off the crappy armor and give it a wash to loosen up the fibers. Even though I am not going to use most of the costume, for the price I paid I think it is excellent value for the 3 pieces I am using. I did end up re printing my chest armor at 93% as I am about 5'8" tall and I think it fit my frame better. Shout out to Steve for this as I have followed his build thread.
 

Attachments

  • IMG_1050.jpg
    IMG_1050.jpg
    471.1 KB · Views: 376
  • IMG_1051.jpg
    IMG_1051.jpg
    581.8 KB · Views: 413
  • IMG_1052.jpg
    IMG_1052.jpg
    768.2 KB · Views: 352
  • IMG_1053.jpg
    IMG_1053.jpg
    461.6 KB · Views: 407
  • IMG_1054.jpg
    IMG_1054.jpg
    365.9 KB · Views: 373
I have finished printing and painting the gauntlets. Just some details to add but I think I may try to spin these on my metal lathe. This is a new tool for me but I luckily I have a machinist friend willing to give me some pointers. Hell, he would probably spin everything off for me but I don't want to lean on him like that, I'd rather learn a new skillset.
 

Attachments

  • IMG_1049.jpg
    IMG_1049.jpg
    468.5 KB · Views: 332
Is the boot being weird resolved? Or is it just annoying? I was thinking about that since I don't have the shin armor yet and asked for 13 inch calf circumference.
 
I decided against modifying the boot and am making a new set of shin armor. I have taken the existing file and stretched from front to back so it doesn't look too wide from the front. I will end up needing a bit of padding as I have chicken calves but it should work out in the end. For the record, the top outside circumference of my boot is about 14.25"
 
This thread is more than 2 years old.

Your message may be considered spam for the following reasons:

  1. This thread hasn't been active in some time. A new post in this thread might not contribute constructively to this discussion after so long.
If you wish to reply despite these issues, check the box below before replying.
Be aware that malicious compliance may result in more severe penalties.
Back
Top