What Paint Colors? RESOLVED -Now BKBT Build Log

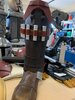
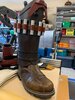
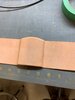
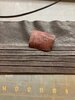
Almost finished with the right leg armor. I just need to attach it the armor piece semi permanently. I am going to use the double faced tape I used on the lower and was thinking about using a couple of Chicago screws and hiding them under the middle strap or behind the aluminum cartridges. I am also going to glue those in as well so they don't slip or fall out when I am walking.

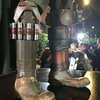
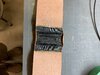
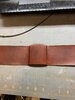
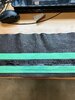
I think I get pretty close to the original. There is one detail that I was going to do but ended up omitting because it was going to complicate the build. If you look closely at the middle strap you can see a wear pattern and a bulge. I think this is paracord used to secure the cartridges. I did a test sample and found it didn't hold the cartridges any more securely so I opted not to include this.

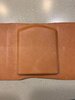
I didn't use white thread for the sewing detail, the color is Buff and looks more natural in my opinion.
 

Attachments

  • IMG_1172.jpg
    IMG_1172.jpg
    434.1 KB · Views: 288
  • IMG_1173.jpg
    IMG_1173.jpg
    445.4 KB · Views: 266
  • IMG_3535.jpg
    IMG_3535.jpg
    262.2 KB · Views: 317
Last edited:
Thanks for the kind words. I am hoping that by posting my progress it will inspire others and it keeps me motivated. There are also things I am learning along the way.

Tonight I finished the leg armor by adding velcro tabs. You can see in the pics that there are two smaller tabs and only when I began to work on it I realized the reason why, the thickness of the middle leather belt is about the same thickness as the velcro. Two tabs keeps it flush and reduces the bulk. I also used double faced tape to secure the strap from moving around. If this works loose I will revisit the Chicago screw idea I mentioned above. Any time I use velcro or tape on leather I always use Barge cement for a sealer or primer for the tape to stick to.
IMG_1174.jpg

I
IMG_1175.jpg
also had a happy accident tonight. I thought the raised bump that you can see on the cylinder strap was some paracord underneath to secure the cylinder. When I did a test piece it proved difficult to insert the cylinder and in fact made it looser so I abandoned that idea. My solution was to just use some double faced taped to secure the cylinder and when I slid it into place, I noticed the tape rolls back on itself and creates the raised bump! I am convinced now that this is how they are secured on the production suits. The trick to getting it centered is to offset the tape a bit lower than center although you would probably need to test your tape.
IMG_1176.jpg
 
I have started work on the left leg. I printed the tombstone shape and added a quick layer of bondo as I didn't want print lines migrating through the leather. I wet formed and worked in the form with a bone folder to create the shape, then let dry overnight. I glued in the tombstone shape and then dyed the final color. The strap will be left long until final assembly.
 

Attachments

  • IMG_1214.jpg
    IMG_1214.jpg
    518.1 KB · Views: 195
  • IMG_1217.jpg
    IMG_1217.jpg
    497.3 KB · Views: 223
  • IMG_1221.jpg
    IMG_1221.jpg
    439.9 KB · Views: 186
  • IMG_1222.jpg
    IMG_1222.jpg
    636.5 KB · Views: 200
  • IMG_1231.jpg
    IMG_1231.jpg
    481.5 KB · Views: 222
I started working on the left leg pouch. The one in the pic above was just a stand-in that I pulled an overall dimension from. I created the pattern in heavy cardstock and transferred to my leather once I was happy with it. It took 2 tries before I was satisfied.
IMG_1232.jpg
IMG_1234.jpg
IMG_1235.jpg


I pre-dyed the leather a warm brown before assembly and glued some of it together. I decided the top detail piece is going to also be the belt loop but I will probably be gluing it permanently in place during final assembly.
IMG_1236.jpg
IMG_1238.jpg


Next is the top stitching detail and final assembly.
 
Tonight I did the top stitching detail on the pouch and strap. The thread is a dark brown on the pouch and a tighter length. I tired to go a little tighter like in the pics but my leather needle punches larger holes and it didn't look great so I compromised a bit. I used the color Buff on the strap as white provides too much of a contrast and doesn't fit in the color palette.
IMG_1242.jpg


The pouch is functional but I will never use it for anything. A piece of high density foam will help it look filled and keep it's shape. I lucked out and had one ball stud so I could finish this off tonight.
IMG_1243.jpg
IMG_1244.jpg
IMG_1245.jpg


All three leg straps finished except for final length.
IMG_1246.jpg
 
I know this thread is being looked at. Would you prefer the pics large or just as thumbnails? Also, is the detail enough or too much? My thought was to chronicle my build and techniques so others could follow.
 
Not too much to show for the last few days. I printed and finished the grav charges. These are going to be non functioning but maybe I'll wire up some LEDs in a future upgrade.

IMG_1253.jpg

I also started the left leg wrap but I think it looks a bit too chunky and am in the process of making a second one.
IMG_1254.jpg
 
Ok so I printed off a new form, this one not as wide but I still have it elongated front to back slightly. The benefit of this is 1) it fits my boots perfectly and 2) I am able to assemble this as an armor piece and won't have to worry about combing multiple pieces that I have to line up or could work loose.

It consists of the upper form with the knee attached and the lower skirt which is the only piece that gets velcro.
IMG_1265.jpg
IMG_1263.jpg
IMG_1262.jpg
IMG_3535.jpg
 
I worked on the lower skirt tonight using the lightest leather I could find. I think this is about 1-2oz weight at the most. The pleats are 1/2" and I decided to fold over and glue in place with barge cement, hammering the pleat flat after. I then distressed with a bit of sandpaper.
 

Attachments

  • IMG_1267.jpg
    IMG_1267.jpg
    529 KB · Views: 226
  • IMG_1268.jpg
    IMG_1268.jpg
    709.2 KB · Views: 175
  • IMG_1269.jpg
    IMG_1269.jpg
    606.8 KB · Views: 210
  • IMG_1270.jpg
    IMG_1270.jpg
    776.9 KB · Views: 218
I mocked everything up one last time. The tombstone strap it being wet formed to follow the leg contours better.
IMG_1271.jpg
IMG_1272.jpg
IMG_1273.jpg


It is a little thick looking from the side profile but this is a compromise I can live with. It matches the look of the other leg better and the benefit of being able to slip it on and not worrying if pieces are misaligned or falling off outweighs screen accuracy on this point for me.
 
I worked on the gauntlet closures recently. I used the removable hinge pin method that is good for Jango. Because the hinges are hidden on Mando I had to use a different method to make a movable hinge. I decided to glue in some 2" elastic strap using Cyanoacrylate adehesive and added a couple of strip of velcro to finish the ends. This isn't necessary but I always strive for a finished look and if I need to add velcro to the suit to keep the gauntlets from rolling it is already there. The hinge was glued in with epoxy and I scuffed and cleaned both surfaces.
IMG_1287.jpg
IMG_1289.jpg
IMG_1290.jpg
IMG_1284.jpg
IMG_1285.jpg
IMG_1286.jpg
 
Awesome Build BKBT!! Love the pics, I really like how your showing how the pieces are put together!
I'm learning a lot!!!
 
This thread is more than 2 years old.

Your message may be considered spam for the following reasons:

  1. This thread hasn't been active in some time. A new post in this thread might not contribute constructively to this discussion after so long.
If you wish to reply despite these issues, check the box below before replying.
Be aware that malicious compliance may result in more severe penalties.
Back
Top