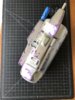
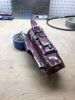
BoochmaN's ROTJ WIP

Thank you so much for those detailed pics, I'm literally tackling the strapping on my knees now. Perfect timing! Also what size elastic strap and snaps did you go with? Thanks in advance!

Hey! No problem at all! I used 3/4” white elastic (as noted in the CRL), and for the snaps I used 5/8” heavy duty snaps, by Dritz. Picked them up at Walmart, but any craft store has them!
 
Not a MAJOR update, but I've spent the last few nights marking out the damage on the left and right gauntlets. I will post photos this weekend of progress on that front.

I recently switched gears back to the helmet to get the RF wired up, and the lights installed. I also temporarily installed the servo so that I could trim the servo extension shaft back as recommended by Jc27 for his kits. This was the last bit of prep-work required before the helmet gets painted. I packaged it up this morning, and its on its way to AFettFullofDollars

More to come on the gauntlets - stay tuned!
 
GAUNTLETS:
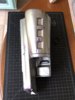
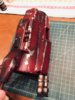
Big weekend on the boba build front. After marking out the damage, I had my first experience with Humbrol masking fluid. It worked OK. I had purchased some fine, and super-fine application brushes from hobby lobby that seemed to do the trick! I also utilized my fineline masking fluid that I picked up based on the recommendation by bh19812 - worked great as well!

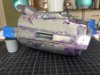
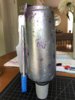
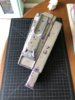
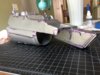
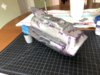
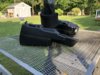
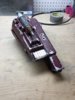
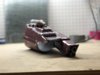
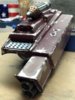
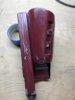
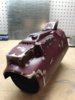
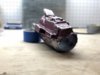
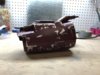
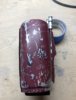
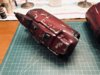
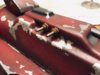
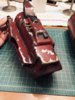
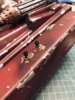
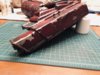
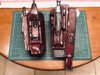
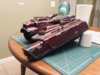
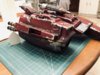
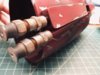
First I hit everything with black (after masking), then about 2-3 coats of Rustoleum Claret Wine. Peeled back the masking, and hit everything with 0000 steel wool to knock it down! Tonight, I topically painted “the hump” on the right gauntlet, as well as the area above the gauntlet darts (this is grey, not metallic).

The plan is to hook up my airbrush, and add shading/ details here and there, as well as topically getting into some nooks and crannies. To me, currently, I’m nervous...they came out beautiful, BUT I did reference MOM images to do this. The ones in those images are weathered ALOT more than the Hero armor, but there were more reference images for MOM, so I went with that...

Not necessarily sure what that means, but it’s the first piece of armor that I’ve actually painted, so maybe I’m not building a ROTJ Hero...? Can someone help me out? What am I building...? Hahahahaha!

In all seriousness, I’m shooting for 501st approval with my build. The only reason I’m using found parts here and there are cause it adds to the build and intrigue of Boba and his story.
 

Attachments

  • 1E52910A-327D-43F7-B67A-665897D94BAC.jpeg
    1E52910A-327D-43F7-B67A-665897D94BAC.jpeg
    1.9 MB · Views: 253
  • 98CDB143-CD3F-42E7-8E24-613085D112CF.jpeg
    98CDB143-CD3F-42E7-8E24-613085D112CF.jpeg
    3.2 MB · Views: 249
  • BBDBDDC7-5C3A-4DD3-B613-A65851E93432.jpeg
    BBDBDDC7-5C3A-4DD3-B613-A65851E93432.jpeg
    1.7 MB · Views: 244
  • B072F8C3-3A50-4D39-9410-A407011C2DFD.jpeg
    B072F8C3-3A50-4D39-9410-A407011C2DFD.jpeg
    743.9 KB · Views: 236
  • 4645BDEF-1984-42EB-95C6-1C7387A07332.jpeg
    4645BDEF-1984-42EB-95C6-1C7387A07332.jpeg
    3 MB · Views: 235
  • 40036513-9C82-4D41-896A-0AA46E95265D.jpeg
    40036513-9C82-4D41-896A-0AA46E95265D.jpeg
    1.6 MB · Views: 246
  • 9FF63C59-8B50-4310-BB72-63EA68D71E71.jpeg
    9FF63C59-8B50-4310-BB72-63EA68D71E71.jpeg
    2.7 MB · Views: 249
  • 5CA649F5-4855-4DA7-A794-69794039691A.jpeg
    5CA649F5-4855-4DA7-A794-69794039691A.jpeg
    4.6 MB · Views: 246
  • 367E20AA-7717-430B-9E92-054C4F9744BF.jpeg
    367E20AA-7717-430B-9E92-054C4F9744BF.jpeg
    4.1 MB · Views: 239
  • 34B2AACB-F55B-4646-B644-BCFEBC2EF1E4.jpeg
    34B2AACB-F55B-4646-B644-BCFEBC2EF1E4.jpeg
    1.3 MB · Views: 245
  • 75A33EC9-DA18-4963-8489-7CC5D2E846E1.jpeg
    75A33EC9-DA18-4963-8489-7CC5D2E846E1.jpeg
    1.5 MB · Views: 255
  • 7A5D8034-58B7-4C1B-B536-4D8296F81008.jpeg
    7A5D8034-58B7-4C1B-B536-4D8296F81008.jpeg
    1.5 MB · Views: 241
  • 260E8C62-B8FB-46E3-A76C-06B207A0AF0E.jpeg
    260E8C62-B8FB-46E3-A76C-06B207A0AF0E.jpeg
    1.4 MB · Views: 265
  • 6B3F1258-4F81-416E-B053-CCFC64502AD6.jpeg
    6B3F1258-4F81-416E-B053-CCFC64502AD6.jpeg
    2.2 MB · Views: 249
  • 6DE20538-8F1E-4A95-B34A-7070CD93C29E.jpeg
    6DE20538-8F1E-4A95-B34A-7070CD93C29E.jpeg
    1.2 MB · Views: 243
  • 5FC2EEA9-9739-4517-A845-EE9EB2A1743E.jpeg
    5FC2EEA9-9739-4517-A845-EE9EB2A1743E.jpeg
    1 MB · Views: 235
  • 21B26520-2E99-4061-929E-8E949D4661A4.jpeg
    21B26520-2E99-4061-929E-8E949D4661A4.jpeg
    1.6 MB · Views: 240
  • DE078A71-A4E2-4D39-94A4-2FABE2752B98.jpeg
    DE078A71-A4E2-4D39-94A4-2FABE2752B98.jpeg
    2.1 MB · Views: 239
  • 767A7076-4D21-473A-9A20-EC522743F519.jpeg
    767A7076-4D21-473A-9A20-EC522743F519.jpeg
    1.8 MB · Views: 252
Last edited:
GAUNTLETS:
Let me preface this by saying I have absolutely NO experience with an airbrush. I bought the thing from Harbor Freight many years ago, and dusted it off recently to add some shadowing and depth to my freshly painted gauntlets.

All in all, it wasn’t too bad of an experience. Ratios (for color) weren’t that precise since I was only adding shadow to the pieces - roughly 1-to-3 paint to thinner. I am very, very happy with how they came out! This afternoon, I added some rusting to the hose connectors, Alco-switches and the flamethrower push buttons. In my mind, all that’s left is attaching the darts on the right gauntlet, installing the slide switch thingy on the left gauntlet, and weathering the keypad. I also picked up rattlecan paints for the armor at Home Depot (also bought one at hobby lobby - the “ESB” color that shows thru on the ab plate). Big decision to go rattlecan, but I’m comfortable enough airbrushing details, but not the whole thing...

Thoughts!?!
 

Attachments

  • 2290DCF4-3281-47B9-92BF-DF008D5BDB7F.jpeg
    2290DCF4-3281-47B9-92BF-DF008D5BDB7F.jpeg
    3.1 MB · Views: 239
  • ABFC253B-4355-4826-8EB8-002BB28C200D.jpeg
    ABFC253B-4355-4826-8EB8-002BB28C200D.jpeg
    2.7 MB · Views: 240
  • 5D6BD955-C22A-4D31-98EF-410934AF63F8.jpeg
    5D6BD955-C22A-4D31-98EF-410934AF63F8.jpeg
    693.8 KB · Views: 233
  • 66644BCD-5072-40DE-AD50-6AB4177967AD.jpeg
    66644BCD-5072-40DE-AD50-6AB4177967AD.jpeg
    662.1 KB · Views: 223
  • 9F45F5B9-3569-4BC4-9693-41193760D136.jpeg
    9F45F5B9-3569-4BC4-9693-41193760D136.jpeg
    686.5 KB · Views: 228
  • 6B472A64-4D7B-4944-81B2-84A1946C643C.jpeg
    6B472A64-4D7B-4944-81B2-84A1946C643C.jpeg
    2.8 MB · Views: 245
  • BAC0D1EF-DC60-47FA-96FD-E05A1333DE4D.jpeg
    BAC0D1EF-DC60-47FA-96FD-E05A1333DE4D.jpeg
    528.2 KB · Views: 238
  • B78952AB-BC0A-4237-AC01-1D9399DCDFB2.jpeg
    B78952AB-BC0A-4237-AC01-1D9399DCDFB2.jpeg
    856.6 KB · Views: 219
  • 993E185A-5B99-419D-B160-ABBCD40B8345.jpeg
    993E185A-5B99-419D-B160-ABBCD40B8345.jpeg
    2.6 MB · Views: 234
  • 14641854-DEFC-4AFB-BBCC-1EC9D3629A68.jpeg
    14641854-DEFC-4AFB-BBCC-1EC9D3629A68.jpeg
    2.8 MB · Views: 215
  • 0DBB4D65-B31C-4BD6-909B-42552056862C.jpeg
    0DBB4D65-B31C-4BD6-909B-42552056862C.jpeg
    2.6 MB · Views: 220
Gauntlet Hose Attachment Question:
How do I go about attaching my hoses to the right gauntlet? The whipcord housing has an extension shaft to fasten to (the hose fits loosely over it, but I can make up the difference with something), the other ones though, don’t have the same extensions...

All that is there are some small washers as shown in the photo below. I’m assuming they are washers anyway; they’re magnetic - so I’m wondering how to go about it now that these are painted...
726FD7D0-0D4D-4408-9F00-393F8F57B4AD.jpeg
 
GAUNTLETS:
With the exception of attaching the hoses to the right gauntlet, I am calling these bad boys DONE! Tonight I weathered the calculator keypad (found part), and epoxied it in place. I also installed the darts in the right gauntlet and weathered them.

Lastly, I finalized the installation of the diggery-doo on the left gauntlet. I used a slide switch that crum dum offers for his Jango Fett gauntlet light kit. I modified it, and fastened a carved up light switch to it. I think it looks very similar to the actual piece, and for me, is functional!

Still need input on the hose attachment, so any thoughts are appreciated!
8FD8F80D-7ECF-4155-8BEC-4B789ED356FD.jpeg
AF42CBFC-763E-4ED2-8F12-70E8F3332B97.jpeg
1750C4DF-9C3A-4475-831C-C0CEA3879296.jpeg
3C4E649F-F7C2-4920-AFA9-26EBA253F2F9.jpeg
 
GAUNTLETS:
With the exception of attaching the hoses to the right gauntlet, I am calling these bad boys DONE! Tonight I weathered the calculator keypad (found part), and epoxied it in place. I also installed the darts in the right gauntlet and weathered them.

Lastly, I finalized the installation of the diggery-doo on the left gauntlet. I used a slide switch that crum dum offers for his Jango Fett gauntlet light kit. I modified it, and fastened a carved up light switch to it. I think it looks very similar to the actual piece, and for me, is functional!

Still need input on the hose attachment, so any thoughts are appreciated!View attachment 178483View attachment 178484View attachment 178485View attachment 178486
Have you thought of a way to secure them to your forearms yet? I'm thinking foam because my left Gauntlet is pretty hefty with all the electronics and aluminum rocket and flamethrower
 
Have you thought of a way to secure them to your forearms yet? I'm thinking foam because my left Gauntlet is pretty hefty with all the electronics and aluminum rocket and flamethrower
Hoping that with some foam glued in there, they stay in place once put on over the flightsuit. My forearms must be irregularly small, hahaha! I feel like other people’s fit great, and mine are HUGE! The other issue is that mine came already assembled; so I am unable to take the top shell off of the bottom shell to work on them - it’s been a PITA to be honest...
 
Hoping that with some foam glued in there, they stay in place once put on over the flightsuit. My forearms must be irregularly small, hahaha! I feel like other people’s fit great, and mine are HUGE! The other issue is that mine came already assembled; so I am unable to take the top shell off of the bottom shell to work on them - it’s been a PITA to be honest...
I feel the exact same way haha, I have about 2 inches of wiggle room in mine. They were also assembled before I recieved them so I couldn't adjust them. I'm going to try the 1 inch foam inserts.
 
SHIN TOOLS:
Before venturing into painting the armor (rattlecan and weathering with acrylics & airbrush); I decided to try my hand at airbrushing some smaller pieces. I followed the pinned thread by The5thHorseman pretty closely, but went probably too heavy on the grey. I can still scale these back and take some steel wool and sandpaper to the grey, but they look great in person.

I weathered with acrylics after following the tutorial and it added another layer to the story for these tools. I also created a recess for the rectangular piece on the squeegee, as suggested in a previous thread.

I realize the survival knife is not present on the ROTJ Hero, but I had the paint for that piece, along with the found part, so I figured I’d paint it up too! I know I need fabric tape as well...
5EDBD32C-342B-459E-BB95-59D9C6BD6A02.jpeg
650CAE13-B847-441D-8388-100214BDED6D.jpeg
3D719889-52D6-4875-852D-8CCF7AADBB5D.jpeg
B62D554E-75FF-46CE-B973-3FB52263B2E4.jpeg
D56AD19D-B447-4DEF-8FF8-7E77565D0CE4.jpeg
004BB80E-D8EC-425E-A81D-47A2C84745DB.jpeg
 
SHOULDERS:
Spent a little time today scaling the incredible damage templates by RafalFett . I measured my Fettpride pieces with a seamstress tape (fabric), and then scaled the templates in Photoshop.

They fit really, REALLY close. It was my first time using transfer paper as well - very easy to do! Hoping to lay down some yellow tomorrow!!!
E01AA153-057A-4515-8413-81416026CB98.jpeg
61E5210C-1F6D-42E9-903E-00BB8F8BABD9.jpeg
15C093BD-0C9C-47FD-847D-ECBA26B43419.jpeg
 
This thread is more than 3 years old.

Your message may be considered spam for the following reasons:

  1. This thread hasn't been active in some time. A new post in this thread might not contribute constructively to this discussion after so long.
If you wish to reply despite these issues, check the box below before replying.
Be aware that malicious compliance may result in more severe penalties.
Back
Top