You are using an out of date browser. It may not display this or other websites correctly.
You should upgrade or use an alternative browser.
You should upgrade or use an alternative browser.
BoochmaN's ROTJ WIP
- Thread starter Boochman
- Start date
Boochman
Active Hunter
I’m right here with you, buddy! We are in upstate New York (Rochester); so I’m familiar with snow and slush until May...hahahaha!Always sucks to have to wait for the weather. Here in the northeast 2/3s of the year sucks so we always deal with it. Enjoying your build.
Boochman
Active Hunter
Thank You! My build is going rather slow, so I’ve been able to focus on parts and pieces of the costume without distraction (cause I had nothing else in hand to work on)...Wow, the damage and weathering on those gauntlets looks amazing!
Boochman
Active Hunter
FLIGHT SUIT:
Recently I’ve reviewed a few things that have been in my “Boba Bin” awaiting attention. One of which was the girth belt - which I have for sale in the cargo hold. Unfortunately it’s not big enough (on me) to meet the criteria in the updated CRL. It’s a great belt, and would fit someone with a smaller torso than my Dorito loving torso...
I also reviewed the flight suit and neck seal. My neck seal is separate, and I’d like to have it attached to the suit. I reached out to Arkady thinking it might be something someone local could do, but turns out it is tricky. I decided to send my flight suit to her to make the alterations, but while I’m at it I’m having her make some more adjustments. The crotch and thigh pockets need to be raised, the waist and thighs taken in, and maybe the arms and ankles as well...?
At her request, I pinned some of the alterations in place. What are your thoughts? I threw on the knees as well, and then added the shin tools to see how the shins might “hang”...thoughts!?!
Shout out to boba87fett for the TDH hat too! Go check out his sale thread and get yourself one!!!
Boochman
Active Hunter
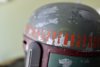
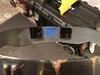
RF STALK & SERVO:
If you happened to be following along, I got my helmet back from AFFO$. It is remarkable, and I was excited to finally install some electronics!
Trial Run!
I have to drill and tap both the stalk, and the servo extension to keep it in place, but the setup from Jc27 is very easy to complete if you have the right tools (tiny screw drivers help).
Looking forward to installing this - what works best to fasten the servo bracket in place? Hot glue or epoxy!?!
Boochman
Active Hunter
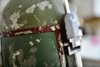
HELMET:
I had a mini photo shoot with my helmet today. I also got the servo switches wired into my gauntlet, and attached the keyless entry remote on the inside with velcro.
Next step is to install the servo and bracket in the helmet, and drill & tap the servo shaft extension and the rangefinder stalk! Coming together tho!
Attachments
-
 1C5F31B5-05FC-44B2-8E0D-F1597E4BCC8C.jpeg431.9 KB · Views: 298
 -
 C635563A-320C-4976-B9FD-B5AA723D5D34.jpeg209.7 KB · Views: 318
 -
 99AC791B-52FB-43FE-B1D2-79ABC0C9223D.jpeg434.2 KB · Views: 311
 -
 5F0C1C3B-7249-4451-BC76-57725B7E942C.jpeg245.9 KB · Views: 318
 -
 2AD50141-93E3-42BE-8DB1-EC239A90C8FE.jpeg275.8 KB · Views: 320
 -
 DA5F15A5-F83E-4390-B202-613ABB2140E9.jpeg181.1 KB · Views: 320
 -
 F6EA7558-E3A1-4EA1-82B5-3B8F3B7D6667.jpeg334.2 KB · Views: 315
 -
 0552C878-BA09-454E-9184-C3128977C453.jpeg315 KB · Views: 324
 -
 D9ACC0F2-74CD-4590-B0A3-F3467EAAD289.jpeg405.1 KB · Views: 305
 -
 435121FA-1D4D-41DC-9D08-FE86A190028F.jpeg362.8 KB · Views: 316
 -
 3DACF6E5-3351-4DA2-BE6E-09DC02C836BB.jpeg370.9 KB · Views: 312
Boochman
Active Hunter
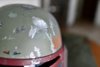
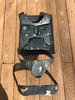
HELMET & SERVO:
I wish I could say that the servo and stalk were a breeze, but it sucked all around...hahahaha! I ended up having to re-drill the servo shaft in another spot so the set screw for the RF stalk lined up when in the up position.
No worries! I have yet to test the servo post install, as luck would have it; the battery appears to have died in the remote from Jc27. I stopped at a few stores and they don’t carry the battery size (A27), so more to come there. It has free range of motion so I think we are good.
I also installed the micro switch (not actually used for the lights), and lined the inside of the lid with Velcro. Preparing myself for mounting electronics & fans.
Lastly, I installed an adjustable hard hat rig from SUTT4869. I FINALLY was able to try the helmet on. Because the FP2 feels big to me, proportionately, I want it to sit higher on my head. So my eye level is JUST below the “T”, FYI.
Last edited:
sutt_hero_rotj
Active Hunter
Looking good man !
Boochman
Active Hunter
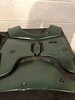
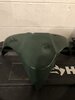
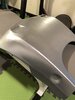
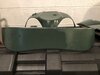
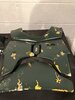
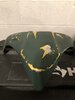
BACK ARMOR & FLIGHT SUIT:
I truly hope you all are making it through this crazy, crazy time in our lives without hardships. Hopefully we all come out of this pandemic with jobs still in tact, families that are closer than ever, and health/ livelihood that is unscathed!
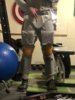
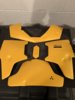
In my free time this weekend, I trimmed my back armor. I also test fitted my flight suit, which is supposed to be with Arkady right now getting adjusted, but it’s in my basement until it makes sense to mail it out...
The plan is to take in the calves, thighs, waist and arms. Also raising the crotch is in the cards as well. Here is a test fit photo with my knees, shin tools and cod in place. Everything look “ok”? The extra material you see near my calves will be gone (it’s currently hanging out beyond where the material is pinned)...
Thoughts!?!
I truly hope you all are making it through this crazy, crazy time in our lives without hardships. Hopefully we all come out of this pandemic with jobs still in tact, families that are closer than ever, and health/ livelihood that is unscathed!
In my free time this weekend, I trimmed my back armor. I also test fitted my flight suit, which is supposed to be with Arkady right now getting adjusted, but it’s in my basement until it makes sense to mail it out...
The plan is to take in the calves, thighs, waist and arms. Also raising the crotch is in the cards as well. Here is a test fit photo with my knees, shin tools and cod in place. Everything look “ok”? The extra material you see near my calves will be gone (it’s currently hanging out beyond where the material is pinned)...
Thoughts!?!
Attachments
Last edited:
Boochman
Active Hunter
ARMOR UPDATE:
Hopefully this is the first of many updates as I TRY to paint my armor while in quarantine. The painting conditions might not be ideal given the season, but I’m hoping to be able to spray outside and bring pieces in to dry...? Maybe...?
Anyways, I sized all damage templates, and transferred to the armor. I then masked everything using a combination of maskol, and the fine-tip masking fluid (which gets clogged constantly). Ready for yellow paint!
Got a “layering” question tho, when does the remnants of ESB green get painted on? Initial thoughts are to paint the yellow, mask the yellow, paint the ESB green, mask that, then paint the final green!?! Thoughts?
Attachments
Last edited:
Boochman
Active Hunter
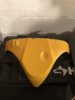
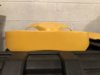
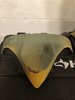
ARMOR UPDATE - MELLOW YELLOW:
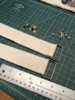
We had some AMAZING weather today, and I ended up being nervous for nothing! I was able to get the yellow down and it came out PERFECT! I’m looking forward to peeling off the masking fluid tomorrow!
You may notice the back is not included yet. I literally JUST trimmed it to do a test fit for my Jetpack straps. I cut the straps, folded and glued in place before adding the rivets, and I’ll likely weather those soon cause the weather looks like it’s going to take another wintery turn (gotta love upstate NY). Big thanks to SUTT4869 for the strap recommendation!
Attachments
-
 E5C55817-04C2-408F-BACA-5B1EFDD0CA39.jpeg745.3 KB · Views: 265
 -
 712723A6-5028-4F50-A870-58AD4315AD13.jpeg1.8 MB · Views: 249
 -
 1D928751-EBD1-4FE2-AF5E-E0012377D0C9.jpeg994.5 KB · Views: 238
 -
 36745719-4ED8-482F-A071-819145EE3D62.jpeg1.1 MB · Views: 233
 -
 B04B4092-7B4F-4794-8F7D-000E409901BA.jpeg2.4 MB · Views: 241
Last edited:
Boochman
Active Hunter
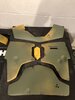
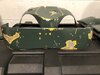
ARMOR UPDATE - MEAN GREEN:
Yesterday I laid down the light green (ESB & Promo) color. I marked out the damage and will be masking it today. The color looks AWESOME! It was recommended by SarlaccSlayer14 in his build thread - he rattlecanned his armor as well, and I used his thread as a color resource!
This color is SAC Bomber Green, by Model Masters. It went down smooth! Super excited to see the final color!
Attachments
Last edited:
Boochman
Active Hunter
ARMOR UPDATE - MEANER GREEN:
First sunny day we’ve had here in a few weeks. We were able to get outside (as a family) and enjoy some sunshine. Put down the top layer (Hunt Club Green) and pushed our youngest on the swing in between coats. I also hit the back plate with silver. Looking forward to peeling off the masking tomorrow!!!
First sunny day we’ve had here in a few weeks. We were able to get outside (as a family) and enjoy some sunshine. Put down the top layer (Hunt Club Green) and pushed our youngest on the swing in between coats. I also hit the back plate with silver. Looking forward to peeling off the masking tomorrow!!!
Attachments
-
 F1200006-8414-412D-8648-BC8E8FF6C275.jpeg1.4 MB · Views: 231
 -
 E98AFD9D-C913-4C1B-A4AB-E727E3D7D302.jpeg1.2 MB · Views: 251
 -
 F917C8C1-08CA-4A3F-AD39-3522B8EB2057.jpeg1.6 MB · Views: 224
 -
 50F552D9-54C9-45D1-9367-8F2B256A6BD7.jpeg1.1 MB · Views: 238
 -
 4E110170-3A6E-4EEE-B5E7-2713EB639E4D.jpeg2.4 MB · Views: 230
Boochman
Active Hunter
ARMOR UPDATE - MAKING MAGIC:
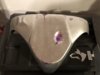
Peeled off all of the masking to reveal my handy work. All in all, not bad (pretty proud of myself, actually). I used RafalFett templates for damage. Everything is accounted for and scaled as best as I could.
The issue I ran into was that the transfer paper (Saral white) was still visible after the masking was removed. I did a search, and also consulted with the packaging of the transfer paper; “can be removed with an eraser”. No, no it cannot (at least mine could not). I used 3 different types of eraser, used a q-tip with water, even a little soapy water wash - NOTHING. Before panicking, I went with the trust “magic eraser”. I wet it a little bit, and it did the trick!
Very happy with it - now I plan to take down some of the edges with some steel wool, and then start the weathering!
Attachments
Boochman
Active Hunter
ARMOR UPDATE - WEATHERING:
Speaking of weather, I was on a conference call today and my dining room window is in front of me (while working from home), and it starts SNOWING! Pissed me right off...
Anyways, I had planned on weathering my armor with an airbrush, but my compressor is NOT working (it runs for 10 seconds and shuts off - I took it apart after watching some YouTube videos, but can not diagnose it). Being that it’s out of commission, I made the decision to weather the armor with acrylics. I’m a fan of being in control of the paint anyways, and I feel like I get that with the washes I put on.
This was my first pass, but I feel like I’m heading in the right direction! I plan to do some oversprays of gray and black as well, in addition to the toothbrush flicks of black...
Thoughts? (One picture is inside with artificial lighting, one is inside with “daylight” coming from the sliding glass door, and one is outside in direct sunlight).
Attachments

Last edited:

Boochman
Active Hunter
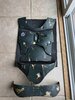
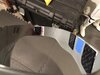
COD & KIDNEY:
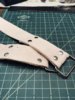
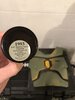
Taking some inspiration from DeathProof for this one. I added Velcro to my cod & kidney as a secondary means of fastening the pieces together (in addition to the stud), and to secure everything in place over the flightsuit.
Velcro is sandwiched between the cod & kidney to fasten the two pieces together, and then applied to the inside of the kidney near the front, and on either side of where the thong will attach. These pieces of Velcro will attach to corresponding Velcro sewn into the flightsuit!
I tried this on and it fit great without having the Velcro sewn into the flightsuit, so I imagine it will be secure once everything is in place!
Attachments

Jetpackfett
Hunter
Looking great! Doing an excellent job on paints!
Similar threads
- Replies
- 15
- Views
- 474
- Replies
- 21
- Views
- 1,181