Tfett40
Active Hunter
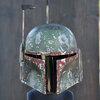
I recently completed my first attempt at painting The Mandalorian Season 2 Boba Fett Helmet.
Here are my results.


For my first attempt, I am satified with it. On the next one, I am going to play around with a few more different shading options. But on this one, here is my paintlist:
Dome/Cheeks: Montana Black Storm Green
Upper Cheeks: Tamiya Sea Blue
Mandibles: Mix of Vallejo Air Hull Red & Fire Red
Back Panel: Rustoleum Hunt Green
Right Ear: Tamiya Tan Spray
Left Ear: Mix of Vallejo Air Olive & Green/Grey
Weathing of light & Medium Greys with Burnt Umber
As for the texture. It was a mess to begin. I started off with the 3M -77 as some people were using and it was a disaster.

Although the texture pattern was good. It took forever to dry and not have a sticky feel. Finally when it dried and I added a layer of paint and I attempted to sand an area, I discovered that the glue, did not dry hard and it peeled easily. See next photo.

Needless to say, that sucked! So I stripped it and started over trying different texture paints and spot putty etc. Below are images of the type of sprays I tested.


The multi texture leaves a sandy look. Which I guess goes well with the sarlacc and desert
The hammered paint looks okay, but not enough texture and it easily gets covered up with other paints.
However, I narrowed it down to 2 sprays for cars.
1st is SEM texture coating, which is used for creating textures on bumpers. I really liked this for the Re-Armored Helmet where there does not appear to be heavy texutre as in the Post Sarlacc. However, the more you add, the more texture you can layer on. It was very similiar to the texture the 3M left, but slightly smaller.

Last is the Rustoleum Rugged Black. The spray pattern is much more textured and on par with what you see in the post Sarlacc version.

Here are my results.
For my first attempt, I am satified with it. On the next one, I am going to play around with a few more different shading options. But on this one, here is my paintlist:
Dome/Cheeks: Montana Black Storm Green
Upper Cheeks: Tamiya Sea Blue
Mandibles: Mix of Vallejo Air Hull Red & Fire Red
Back Panel: Rustoleum Hunt Green
Right Ear: Tamiya Tan Spray
Left Ear: Mix of Vallejo Air Olive & Green/Grey
Weathing of light & Medium Greys with Burnt Umber
As for the texture. It was a mess to begin. I started off with the 3M -77 as some people were using and it was a disaster.
Although the texture pattern was good. It took forever to dry and not have a sticky feel. Finally when it dried and I added a layer of paint and I attempted to sand an area, I discovered that the glue, did not dry hard and it peeled easily. See next photo.
Needless to say, that sucked! So I stripped it and started over trying different texture paints and spot putty etc. Below are images of the type of sprays I tested.
The multi texture leaves a sandy look. Which I guess goes well with the sarlacc and desert
The hammered paint looks okay, but not enough texture and it easily gets covered up with other paints.
However, I narrowed it down to 2 sprays for cars.
1st is SEM texture coating, which is used for creating textures on bumpers. I really liked this for the Re-Armored Helmet where there does not appear to be heavy texutre as in the Post Sarlacc. However, the more you add, the more texture you can layer on. It was very similiar to the texture the 3M left, but slightly smaller.
Last is the Rustoleum Rugged Black. The spray pattern is much more textured and on par with what you see in the post Sarlacc version.