A Simple Man Trying to Find His Way in the Galaxy Build- Pic heavy!

Little update..and I'm glad this bit's done..hahah! If you ever want to cut a plastic funnel to shape and then scribe a line around it...be warned at how much longer it'll take than you think! Using my drill as a make shift lathe was a bit of a game changer though!
 

Attachments

  • 0032.jpg
    0032.jpg
    85.1 KB · Views: 182
  • 0033.jpg
    0033.jpg
    111.3 KB · Views: 164
  • 0034.jpg
    0034.jpg
    97.6 KB · Views: 173
  • 0035.jpg
    0035.jpg
    85.9 KB · Views: 176
  • 036.jpg
    036.jpg
    97.9 KB · Views: 173
  • 0037.jpg
    0037.jpg
    77 KB · Views: 175
I figured I'd pop up a couple more photos of the scope! It's a little wonky in places, but weathering and paint will hide that! I haven't permanently mounted it as I want to paint the barrel separately. But all built from PVC pipe and foamex. And a small brass tube.
 

Attachments

  • 0038.jpg
    0038.jpg
    78.4 KB · Views: 181
  • 0039.jpg
    0039.jpg
    66.1 KB · Views: 160
  • 0040.jpg
    0040.jpg
    47.4 KB · Views: 162
  • 0041.jpg
    0041.jpg
    89 KB · Views: 164
  • 0042.jpg
    0042.jpg
    100.1 KB · Views: 186
  • 0043.jpg
    0043.jpg
    108.6 KB · Views: 186
I'm quite impressed by my eye-ball measuring! I found out afterwards that the prop is a Lyman 4x hunting scope. My measurements are 5mm over length! Aside from that the size is dead-on accurate!
 
Thanks!!! I'm using a combination of screenshots and the amazing 3D model that Dmitriy Kotliar made for 3D printing! Though, mine has some personal touches/differences due to me not being as accurate/construction techniques etc.
 
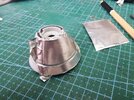
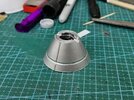
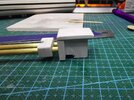
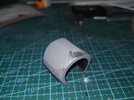
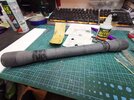
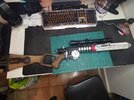
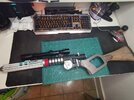
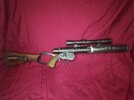
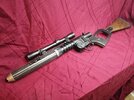
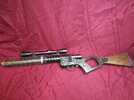
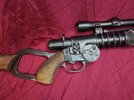
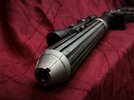
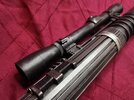
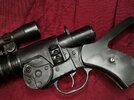
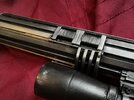
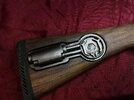
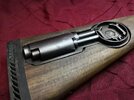
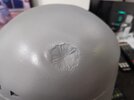
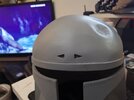
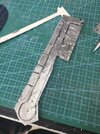
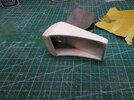
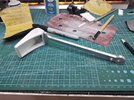
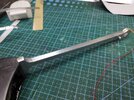
Just seeing how it all fits together before taking it apart and masking/painting tomorrow! Looking at it, I may actually remake the bit between the grip and the butt in metal at some point. It's a little wobble and a bit too long. There are a still a few bits and bobs to do, a little sanding, some sculpting, and fixing the butt, scope and emitter permanently (those will be fixed after paint). Oh, and I have a trigger guard coming that's been very kindly donated. Yes, it's a little more streamlined than the original prop, and some proportions are off, but I don't care!
 

Attachments

  • 046.jpg
    046.jpg
    68.7 KB · Views: 206
  • 045.jpg
    045.jpg
    74.2 KB · Views: 199
  • 044.jpg
    044.jpg
    72.2 KB · Views: 205
And that's a wrap (for the carbine, anyway!) Well, kinda. The trigger guard is a quick place holder, I need lenses for the scope and I really need to do something about tit "bridge" bit between the grip and butt as its flimsy. But, in pretty darned pleased considering this was made from scraps and bits I had laying about. Also Rub n Buff is my new favourite!!! It's a frakking game changer!!
 

Attachments

  • final 01.jpg
    final 01.jpg
    35 KB · Views: 203
  • final 02.jpg
    final 02.jpg
    83.7 KB · Views: 199
  • final 03.jpg
    final 03.jpg
    69.2 KB · Views: 183
  • final 04.jpg
    final 04.jpg
    118.3 KB · Views: 184
  • final 06.jpg
    final 06.jpg
    48.5 KB · Views: 171
  • final 05.jpg
    final 05.jpg
    76.2 KB · Views: 169
  • final 07.jpg
    final 07.jpg
    86.8 KB · Views: 168
  • final 08.jpg
    final 08.jpg
    82.4 KB · Views: 167
  • final 09.jpg
    final 09.jpg
    70.4 KB · Views: 160
  • final 10.jpg
    final 10.jpg
    89.6 KB · Views: 162
  • final 11.jpg
    final 11.jpg
    76.6 KB · Views: 160
  • final 12.jpg
    final 12.jpg
    87.1 KB · Views: 194
Well, I started the bucket! Who knew making a dent would be so time-consuming and stressful !?!
 

Attachments

  • 0047.jpg
    0047.jpg
    27.2 KB · Views: 159
  • 0048.jpg
    0048.jpg
    33.2 KB · Views: 160
  • 0049.jpg
    0049.jpg
    37.2 KB · Views: 159
  • 0050.jpg
    0050.jpg
    26.5 KB · Views: 159
  • 0051.jpg
    0051.jpg
    34.8 KB · Views: 163
  • 0052.jpg
    0052.jpg
    28.8 KB · Views: 165
Looks good!! Did you make the helmet yourself??
Thank you!! Ahh, no, I didn't! I was going to, then an old Uni friend messaged me because he makes them ( www.facebook.com/powerproductionprops ) and very kindly offered me one of his failed mould pulls which he was going to throw away! It's a little warped and cracked, so he couldn't use it for a client! Needless to say I bit his arm off and said I could fix it up! I need to make the ears, sort the padding, reinforce it and of course the visor and rangefinder.
 
Well, this is what happens when I don't update things..many many pictures to post! I hand cut and finished the stalk from 6mm aluminium (never a frackking gain!) - cut a groove down the back for the LED wires which will be set off by a reed switch when it's in the down position. The groove was then filled with bicarb os foda, flattened down and then I CAREFULLY dripped runny super glue on it as that wicks through and dries rock hard instantly. Sanded it and put a strip of aluminium tape over it! There's a small magnet in the base of the stalk. The LED PCB is just a 3 quid cheap kit from Ebay. The mini servo I have has plastic gears, so I've ordered a metal gear version. It's controlled by a cheapo servo-tester with a small switch soldered onto the relevant pins of the potentiometer (I TOLD you this is a budget-Boba! I'm hopefully going to come in at WELL under £100 for the entire build) . Ears are currently in primer - I'll be using a combination of talcum powder and textured rattle can paint for the texture, and mixing the colours myself and air brushing them on. I'm HOPING to start painting tomorrow...the exciting part!
 

Attachments

  • 0053.jpg
    0053.jpg
    94.3 KB · Views: 156
  • 0054.jpg
    0054.jpg
    104.6 KB · Views: 156
  • 0055.jpg
    0055.jpg
    94.2 KB · Views: 152
  • 0056.jpg
    0056.jpg
    110 KB · Views: 156
  • 0059.jpg
    0059.jpg
    125.3 KB · Views: 153
  • 0060.jpg
    0060.jpg
    35.4 KB · Views: 153
  • 0061.jpg
    0061.jpg
    71 KB · Views: 160
  • 0062.jpg
    0062.jpg
    91.7 KB · Views: 149
  • 0062a.jpg
    0062a.jpg
    81.3 KB · Views: 141
  • 0063.jpg
    0063.jpg
    90 KB · Views: 143
  • 0064.jpg
    0064.jpg
    52.3 KB · Views: 151
  • 0065.jpg
    0065.jpg
    89 KB · Views: 144
  • 0066.jpg
    0066.jpg
    60.9 KB · Views: 159
Well, aside from a couple if fitment issues with the battery cover ear, and installing two little buttons on the back of the vent, I'm calling this bucket done!
 

Attachments

  • 0068.jpg
    0068.jpg
    31.1 KB · Views: 179
  • 0067.jpg
    0067.jpg
    33.4 KB · Views: 180
  • 0069.jpg
    0069.jpg
    43.6 KB · Views: 186
  • 0070.jpg
    0070.jpg
    29.8 KB · Views: 184
  • 0071.jpg
    0071.jpg
    26.2 KB · Views: 185
  • 0072.jpg
    0072.jpg
    51.3 KB · Views: 180
This thread is more than 2 years old.

Your message may be considered spam for the following reasons:

  1. This thread hasn't been active in some time. A new post in this thread might not contribute constructively to this discussion after so long.
If you wish to reply despite these issues, check the box below before replying.
Be aware that malicious compliance may result in more severe penalties.
Back
Top