3D Print ESB helmet WIP

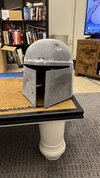
I have a Bobamaker helmet on order, expected around March and since it’ll be my first time airbrushing, I figured I’d do a 3D printed one while I wait as a kind of practice run.

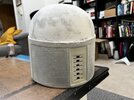
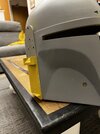
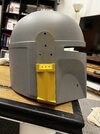
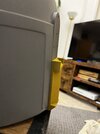
I got this on Etsy from a seller called 3DPingCrafts. Print is good, feels nice and sturdy. I ordered the raw kit so it needs a lot of sanding to get the print lines out. I didn’t take any pictures before I started but this is mid way through filling and sanding the dome. Back panels have been done and feel smooth as a baby’s bum.

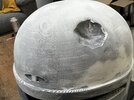
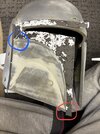
An area of concern for me early on is the dent. I have no idea how I’m going to get in there and get those print lines out. I may be better off just going to town with filler and re-sculpting it. Or maybe the etching tool on my dremel? Don’t know yet.
 

Attachments

  • 8EA15D17-C477-452B-B7D5-6D59397CFE47.jpeg
    8EA15D17-C477-452B-B7D5-6D59397CFE47.jpeg
    1.1 MB · Views: 198
  • E49CB68F-D721-47B9-A34E-C896B26A7854.jpeg
    E49CB68F-D721-47B9-A34E-C896B26A7854.jpeg
    4.2 MB · Views: 196
  • 9D31420C-0DF6-4DAF-A00F-294129E7794E.jpeg
    9D31420C-0DF6-4DAF-A00F-294129E7794E.jpeg
    4.1 MB · Views: 191
  • D6F8D9BD-F384-47BB-912F-9090DE8DF19E.jpeg
    D6F8D9BD-F384-47BB-912F-9090DE8DF19E.jpeg
    3.5 MB · Views: 209
Possibly a few coats of primer / filler and light sanding should get rid of most of the print lines in the dent. Just go slowly with the sandpaper pads from hobby lobby they’re pretty small and should get into that area nicely.
 
Possibly a few coats of primer / filler and light sanding should get rid of most of the print lines in the dent. Just go slowly with the sandpaper pads from hobby lobby they’re pretty small and should get into that area nicely.
I’m in the U.K. so no hobby lobby here but I know what you mean. I’ve got lots of time to kill before my BM helmet turns up so there’s definitely no rush! My usual process with heavy print lines is to give them a good scuff with some super low grit sandpaper, like 60 or 80, before smoothing out with a 120. Then I give it a pass with some filler to take care of the deeper lines, sand that back with 400 and then a coat of spray putty which I sand with 800. Coming along nicely so far.
 
Here’s how the dent is looking now (before on the left).

BB2FA458-254E-408E-9CBF-0D3CADF98D07.jpeg


Happy with this but it was a nightmare! I went the dremel route in the end, used the engraving tool and just let it lightly buzz the surface to grind out the print lines. It was a case of it looking worse before it could look better.

Once I got the lines out, I hit it with a round of filler, then spray putty.
 
Some more sanding/priming/filling done and got the lower right ear attached. I used metal epoxy putty to attach the bolts to the ear piece. Haven’t done the upper right ear yet because the bolts I have are domed and won’t allow for the cap to sit on top so I need to get some countersunk bolts. Also, is it me or does a grey/yellow colour scheme kind of look awesome?
 

Attachments

  • 61ACC621-6F3E-47E8-B0CB-B83AB73276A7.jpeg
    61ACC621-6F3E-47E8-B0CB-B83AB73276A7.jpeg
    1.5 MB · Views: 167
  • C51BD4F8-4477-4D99-834D-C00725167481.jpeg
    C51BD4F8-4477-4D99-834D-C00725167481.jpeg
    1.5 MB · Views: 169
  • F3568EB4-4581-414C-B8D9-6CC527301B90.jpeg
    F3568EB4-4581-414C-B8D9-6CC527301B90.jpeg
    1.4 MB · Views: 165
  • 1A94D2E8-50A2-4CB5-852A-6C5DD5B0716E.jpeg
    1A94D2E8-50A2-4CB5-852A-6C5DD5B0716E.jpeg
    1.5 MB · Views: 174
  • 83D8D669-8E11-4505-9901-13F095621949.jpeg
    83D8D669-8E11-4505-9901-13F095621949.jpeg
    1.3 MB · Views: 166
I’ve run into a problem. Started printing rafalfett’s templates but I cannot work out how to scale them. You can see in this picture, it looks too big in some parts (red circle) but too small in others (blue circle.

How on Earth do I do this?
 

Attachments

  • 4F8D9A72-6819-49DF-8B63-AABC18155A3B.jpeg
    4F8D9A72-6819-49DF-8B63-AABC18155A3B.jpeg
    831.7 KB · Views: 162
Here is a thread of how superjedi does his templates!
 
Here is a thread of how superjedi does his templates!
This is perfect! Exactly what I needed, thank you
 
Ok, so I thought this would solve it for me but I’m still struggling.

I have the RH rear panel aligned with the bottom of the trim and and edge of the rear slot panel. So far so good:

63687973-0945-4ED5-A5C5-DEFF90CDF1E0.jpeg


But, this leaves this edge nearest the ear WILDLY misaligned and I can see it’s too long

8BE12736-F668-49A0-8BE7-1542EA075416.jpeg

Ok, so I need to make it shorter, but the bottom left corner is already too short:

461E1D3A-C699-4090-9CF5-CBB3812AA49D.jpeg


I know I shouldn’t expect perfect alignment but this feels nowhere near good enough to proceed with painting and I can’t see how any amount of stretching the templates is going to fix this.

You can see my problem a bit easier when you look at my traces template laid over Rafal’s:

D05BEB84-7582-4677-82B6-42F7589AA564.jpeg


It looks ok for the most part but if you look at the bottom, it needs to be wider but the top looks like it needs to be narrower. Not really sure if this level of disparity is normal or how to proceed if it’s not?
 
Last edited:
All I can assume is that because it’s just a cheap-ish Etsy buy (£65) the proportions are likely to be all out of whack.

In which case, since I’m not overly concerned about accuracy with this lid - I only got it to practice airbrushing technique and keep myself busy while I wait for my BM helmet (ultimately it’ll end up a display piece) I’d be happy to warp/skew the templates where needed. It’s just a matter of finding a program I can do that with
Photoshop is good for that. I’m sure there are others, possibly even free ones online, but PS is what I use.
 
Yea, I don't have PS and can't seem to find a free option that has the kind of function I need. I'm at a bit of a loss to be honest ?
The template you printed out looks pretty close. Honestly, even with Photoshop and other graphic programs, you will hardly ever get it 100% exact.
 
Just after my last comment, I decided to take one last shot and re-visited a free online editor called Pixlr. Turns out they have a 'distort' option which allows you to size and stretch the image from each corner. I'd NEVER do this for a helmet I planned to troop in but as I say, this one is just for fun and anyone who comes round and sees it on my bookshelf is not going to know. I think/hope that is problem solved.
 
Just after my last comment, I decided to take one last shot and re-visited a free online editor called Pixlr. Turns out they have a 'distort' option which allows you to size and stretch the image from each corner. I'd NEVER do this for a helmet I planned to troop in but as I say, this one is just for fun and anyone who comes round and sees it on my bookshelf is not going to know. I think/hope that is problem solved.
Hope it works out for you.
 
Thanks mate, but it's not really working out. It came out ok with the back panels but once I got to pieces like the mandibles I realised i't not going to be a good enough solution.

Even once I get the templates to fit, their so distorted and pixellated I don't think I'll be able to see what I'm doing.

Is it possible to do it freehand? Just use the templates as reference and draw directly onto the helmet?
 
Ok so I started airbrushing today. Just the base coat of 147 and the results were…mixed.

I think I need a lot more practice. First there was hardly any paint coming out and I had to get really close to see any coverage. So I figured the paint was too thick and thinned it some more which was better. I’m still not sure the coverage is right though, I had the airbrush about 10cm away but it felt more like I was ‘colouring in’ rather than making sweeping passes like you would with a rattle can. Is that normal? From then on it was ok…I guess? I’m not really sure what I’m looking for, it’s hard to tell from other peoples photos. For the base coat should I be going for like a full total coverage with multiple coats or is it ok to be slightly patchy like the base of the dome here?

image.jpg
 
What kind of airbrush are you using and what's the psi coming out of the air compressor? I've found that when I'm doing a base coat I go in light passes and then go back for another coat.
 
This thread is more than 2 years old.

Your message may be considered spam for the following reasons:

  1. This thread hasn't been active in some time. A new post in this thread might not contribute constructively to this discussion after so long.
If you wish to reply despite these issues, check the box below before replying.
Be aware that malicious compliance may result in more severe penalties.
Back
Top