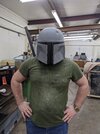
TheLavaMelon's budget build (WIP)

TheLavaMelon
I can tell you that I ordered my Fettronics Light Kit on a Friday at like 11:00pm and THAT Monday morning it was in my hands. He's very fast. I can't recall where he's located, but I'm in the Seattle, WA area.

I can tell you that his stuff is amazing and I love that you can create a custom sequence too!

-Iron
Wow!

I'll get right on that then...

Best regards,
- TheLavaMelon
 

I'm pretty sure I have this same thing, but it has a different sticker in storage since it's from a few years ago. It isn't very good. It doesn't really change your voice it just tries to amplify it, but doesn't work all that well.

I can snap a pic later if you are interested, but honestly it isn't worth the money in my opinion when I was just testing it for fun not in costume.
 
If for some reason you can't get a Fettronics display in time I have a Westaby Electronics kit I built. When I bought my armor it came with Fettronics so the Westaby Electronics is extra now. If you are interested $70 plus shipping and its yours.
 
If you need quick and dirty gauntlets, I have extra tops for both left and right that are very slightly damaged I can donate to you, gratis. No greeblies. Just the abs shells. With your skill level you could fix them up and get them to look just fine.
 
I love this build thread... Fettheads jumping in to help each other out. Awesome!
chris2fett
That’s what we’re all about! :)

TheLavaMelon
I’m not sure if the helmet you’ve purchased comes with a “Borden Connector” but I’ve got a resin (Boba Maker) one. PM your address and I’ll even pay the shipping. Just looking to donate it to a good cause. ;)

If your not familiar with what a Borden Connector is, it’s that little circle piece that has three holes in it that gets attached to the helmet. Like this....
D1E04582-1F82-4B62-9E4D-2C22DD69E802.jpeg


Again, just let me know via PM if you want it.

Thanks,
-Iron
 
If you need quick and dirty gauntlets, I have extra tops for both left and right that are very slightly damaged I can donate to you, gratis. No greeblies. Just the abs shells. With your skill level you could fix them up and get them to look just fine.
PM Sent. Thank you very much!

I’m not sure if the helmet you’ve purchased comes with a “Borden Connector” but I’ve got a resin (Boba Maker) one. PM your address and I’ll even pay the shipping. Just looking to donate it to a good cause. ;)
I'm not sure if I have it, I haven't looked through all of the parts that came with it yet. I'll check back tonight after I assemble it for paint.

Best regards,
- TheLavaMelon
 
I have a set of sintra knee armor I still have from back when I made a scratch built kit. If you want them, they are yours if you just pay shipping. Let me know.
 
If for some reason you can't get a Fettronics display in time I have a Westaby Electronics kit I built. When I bought my armor it came with Fettronics so the Westaby Electronics is extra now. If you are interested $70 plus shipping and its yours.


I’m not sure if the helmet you’ve purchased comes with a “Borden Connector” but I’ve got a resin (Boba Maker) one. PM your address and I’ll even pay the shipping. Just looking to donate it to a good cause. ;)
I do have the Borden Connector (in metal too!), you should be able to see it in the bottom picture below. Thanks for the offer!

I have a set of sintra knee armor I still have from back when I made a scratch built kit. If you want them, they are yours if you just pay shipping. Let me know.
PM Sent. Thank you very much!

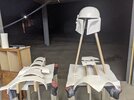
Anyway, not too much progress these past couple days. I cut out the place for the visor in the helmet:
PXL_20201008_021305135.jpg

Then I rounded the edges of the Sintra ever so slightly:
PXL_20201009_032830482.jpg

And then I primed everything:
PXL_20201009_033222960.jpg

I can already see that I will need to sand some drip lines, but it shouldn't take too long.

Regarding the blaster, I did end up filling it the rest of the way with caulk and doing a once over with the black paint again.

Tomorrow I plan on getting the rest of the paint colors needed. I do have an airbrush so that should help with the job.

What is the best method for attaching the armor? I was planning on Velcro, but if there is something better than I'll go for it.

Best regards,
- TheLavaMelon
 
I do have the Borden Connector (in metal too!), you should be able to see it in the bottom picture below. Thanks for the offer!
TheLavaMelon
Not a problem just tryin' to help ya out. I actually got my Stainless Steel Borden Connector in the mail just today and there may be an issue with mine. I'm NOT gonna post my concerns about that here though.

So you got just about 2 weeks till yer function. You think you're gonna make it? Were here if ya got questions. (y)

-Iron
 
gauntlet tops on the way. I wasn't able to find those extra greeblies I wanted to throw in. Sorry about that. But there is a replica mq-1 keypad on the left gauntlet attached with a magnet.
 
Before I get to the "completion" photos, I wanted to thank everybody involved:

Irongladiator and Lazerjock for the parts list
ShortFuse and Lazerjock for the info on Sintra
ShortFuse for pointing me to the wizardofflight armor templates
wizardofflight for the armor templates
batninja for the ammo pouch tutorial
Darth Mule for the flak vest tutorial
joe for the flight suit
ToEleven for the helmet kit
ShortFuse for the knee armor
Ord Mantell for the gauntlet tops (unfortunately, I don't have time to get something together)
Edit: Fettronics for the LEDs (I don't know how I forgot, this thing is awesome)

And some lessons learned:
- Don't use rattlecans. It doesn't matter how close the color looks to your phone screen, it won't come out right.

- Use proper masking techniques, and let the paint dry. I used oil and thought I could wipe it off after an hour or two and it came out a smeary mess in a lot of places.

- Don't use Velcro. It's not worth the convenience. The problem is that it you can put the strips in the right spot, but it will never stay where you want it. It also isn't as strong as you might think and I feel like it's going to fall apart.
- Instead, use the bolt/grommet method. This will probably be the first thing I fix after this dance.

- Don't lace the vest. It requires somebody else to help you and unless you have somebody just as enthusiastic as yourself, it will only bother them.

- Don't use jute rope for the girth belt. It frays.

- When cutting a strap for a belt, account for the hems.

- If you're fat, this costume won't look as good as you think. And also, get larger cod/kidney armor than you think you need.

- Don't skip the jetpack

- Don't put the helmet down on it's top, it will fall over. Don't ask me how I know.

- If you are going to glue something, sand and clamp.

- If you get armor from somebody else, you will probably have to re-form it a little bit.

And now for the rest of the build story:
I don't have any pictures, but I painted a matte metallic silver over the primer (Rustoleum).

I then messed around with the airbrush I had and discovered that I don't know how to use it :p

Eventually, I got it working, but when I mixed the paint for the red part of the helmet it came out pink. I gave up on using it because it was late afternoon on Sunday at this point and I didn't have time. I went to home depot and bought seven rattlecans of varying degrees of color accuracy.

I then got a coat drying that looked ok. I ended up finishing the paint Monday evening.

Tuesday I got the knees and LEDs in. I then proceeded to suit up and broke the left knee pad. (Sorry ShortFuse!) Wednesday I got the Chest LEDs in, and that evening I reformed, reinforced, and repaired the knees.

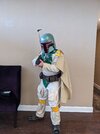
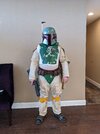
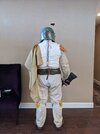
This morning, I got to suit up.

PXL_20201015_132606049.jpgPXL_20201015_132616381.jpgPXL_20201015_132636236.jpgPXL_20201015_132627100.jpg

Overall I am pretty happy with how the damage looks, but the colors are awful.

What do y'all think?

Best regards,
- TheLavaMelon
 
Last edited:
Like ShortFuse said, it looks good considering your time frame.
Please make sure you get pictures of the group from the party too.
 
TheLavaMelon
Echoing ShortFuse and Lazerjock - Considering the time frame it does indeed look good. You should be proud of what you achieved. I read that you were going to be fixing the costume up post-dance? Are you planning to upgrade even more? If so, whats on the horizon?

-Iron
 
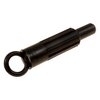
When I did my build, I went to a place that sold women's hair and bauty products, I was able to get some very cheap faux hair extensions and made Wookie braids. Also, when I did a scratch build in the early 90's and was trying to find something for a gauntlet rocket, I happend to notice some clutch adjustment tools at an auto parts store. I think they were smaller than than desired, but they were plastic and not very expensive. Your belt looks a little narrow and I'd open open up the barrel of your blaster. You are off to a good start.
 

Attachments

  • Clutch Adjustment Tool.jpg
    Clutch Adjustment Tool.jpg
    46.1 KB · Views: 116
Last edited:
This thread is more than 2 years old.

Your message may be considered spam for the following reasons:

  1. This thread hasn't been active in some time. A new post in this thread might not contribute constructively to this discussion after so long.
If you wish to reply despite these issues, check the box below before replying.
Be aware that malicious compliance may result in more severe penalties.
Back
Top