SD68 FP Premium Paint Up

SD68

Active Hunter
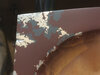
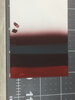
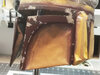
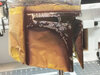
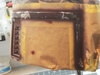
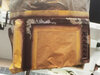
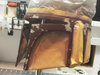
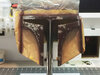
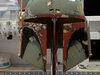
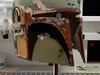
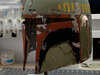
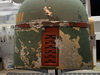
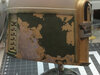
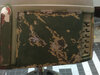
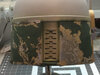
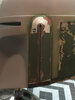
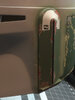
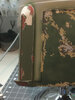
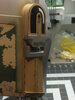
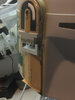
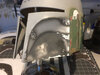
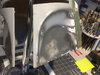
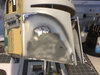
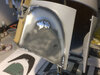
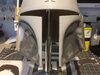
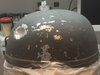
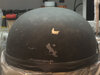
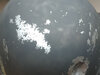
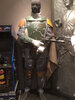
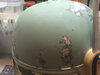
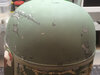
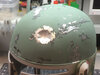
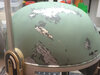
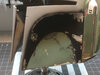
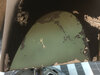
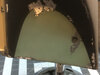
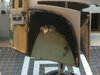
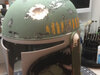
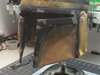
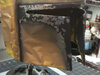
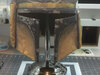
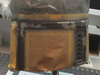
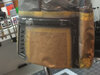
I am starting this paint up thread for an FP Premium that I've had awhile now to go on my mannequin display. Started with the intent to go topical but converted to layered after struggling with the SP Lark Dark Gray on the back panels. Floquil enamels not giving enough time to brush paint and the Polly Scale didn't give the coverage without going over with 2 to 3 coats so I made the switch to layered overall. My hats off to SuperJedi for going topical. Here are the back panels so far. I used Aged Concrete from Floquil and then masked and painted the green with Euro 1 Dark Green enamel from Model Master. My plan is to come in with RLM 73 to add variation and darken certain areas. Actually reverse masked the silver damage so it is actually on top of the first two layers. Came in with fine steel wool to soften this transition. This was after the switch to layered. Topically applied the "base gray" with RLM76 model master acrylic. I still need to apply SP Lark Dark Gray to the RH Panel.
 

Attachments

  • Back Panel 1 Small.jpg
    Back Panel 1 Small.jpg
    224.3 KB · Views: 219
  • Back Panel 2 Small.jpg
    Back Panel 2 Small.jpg
    230.6 KB · Views: 217
  • Back Panel 3 Small.jpg
    Back Panel 3 Small.jpg
    215.4 KB · Views: 209
Last edited:
Decided to tackle the ear pieces after a little frustration with the back panels and give a sense of accomplishment. These are the resin ears. I used SP Lettering Gray for the base color and topically applied Tamiya XF7 for the red. I then masked and used a 3:1 mix of Panzer Olivgrun 1943 MM enamel and US Medium Green to lean it more towards the distinctive green color shift I see on this part. I then used German Camo Medium brown as a wash to weather the lower gray panel and give it its distinctive appearance. Finally I used my Paasche H airbrush set to low pressure and with the tip paint tip unscrewed all the way to apply the Floquil rust paint spatter. May go heavier with this once the final helmet gets its overall weathering. I cut the arch template out of Tamiya masking tape, applied and then sprayed Tamiya Flat White. I used SJs excellent dry transfers on both ears and overcoated them with Future for protection. For the RH ear I used Floquil Bright Silver as the base and Floquil SP Lark Dark Gray and Floquil Earth for the color layers. After spraying the silver I actually painted the arches in reverse to avoid bending thin masking tape to the desired shape. I started by painting the small arch area with Tamiya Flat White and then used RafalFett's ear templates and cut a mask for each of the arch portions. I placed the first arch over the white then sprayed Floquil Brunswick Green for the black. I then masked the entire arch area with the u shaped masked and sprayed the Floquil Earth. This was just an easier method for me. The ears were given a final overcoat of Testors Dullcoat to unify the finish.
 

Attachments

  • LH Ear 1 Small.jpg
    LH Ear 1 Small.jpg
    178.3 KB · Views: 207
  • LH Ear 2 Small.jpg
    LH Ear 2 Small.jpg
    177.1 KB · Views: 197
  • LH Ear 3 Small.jpg
    LH Ear 3 Small.jpg
    213.4 KB · Views: 189
  • RH Ear 1 Small.jpg
    RH Ear 1 Small.jpg
    211.2 KB · Views: 196
  • RH Ear 2 Small.jpg
    RH Ear 2 Small.jpg
    180.7 KB · Views: 194
  • RH Ear 3 Small.jpg
    RH Ear 3 Small.jpg
    175.2 KB · Views: 193
Last edited:
I moved on to the lower cheeks from this point and once again used RafalFett's templates which have proven invaluable for the entire project. I have actually completed the upper and lower cheeks but failed to take completed photos before I masked for the dome. I will include these after I spray the green for the dome and unmask the helmet. The lower cheek photos show the base silver unsmasked after spraying the SP Lark Dark Gray on both and on the LH cheek the darker area where I used Floquil Grimy Black. This shows how I focus the solid spray where needed but mottle the remaining areas to add variation to the green topcoats. Subtle effect but noticeable in the finished product.
 

Attachments

  • Left Cheek 1 Small.jpg
    Left Cheek 1 Small.jpg
    254.6 KB · Views: 205
  • Left Cheek 2 Small.jpg
    Left Cheek 2 Small.jpg
    265.9 KB · Views: 197
  • Right Cheek 1 Small.jpg
    Right Cheek 1 Small.jpg
    254.8 KB · Views: 195
  • Right Cheek 2 Small.jpg
    Right Cheek 2 Small.jpg
    233.8 KB · Views: 193
  • Front View 1 Small.jpg
    Front View 1 Small.jpg
    256.1 KB · Views: 197
After completing the cheeks I moved on to the dome. I masked off the previous work and then applied the Floquil Bright Silver to the entire dome area. I masked the minimal base gray areas before applying deciding to use the Duplicolor Filler Primer as the stand in for the gray color. I will go over these topically with RLM76 afterwards if I am not satisfied with the way the light plays with the color. Right now it seems to have the right effect. I then spent a marathon masking session (made it through Rogue One, Star Wars and a portion of the Empire Strikes Back before completing) for the silver damage and then applied the Floquil SP Lark Dark Gray. That is where I stand currently and will move on to another marathon session of masking the gray in order to apply the green. The base green for the overall helmet which I am going with is a 2:1 mixture of MM Panzer Olivgrun 1943 and MM RLM76. I used this mix on the lower cheeks and really like the color. Once it gets the oversprays and weathering I think it will be as accurate as I am able to achieve and definitely looks right under my mannequin display lighting. This build is over in the costume section if anyone is interested with the helmet being the final piece of the puzzle.
 

Attachments

  • Dome 1 Small.jpg
    Dome 1 Small.jpg
    199.2 KB · Views: 198
  • Dome 2 Small.jpg
    Dome 2 Small.jpg
    189.2 KB · Views: 201
  • Dome 3 Small.jpg
    Dome 3 Small.jpg
    178.1 KB · Views: 191
  • Dome 4 Small.jpg
    Dome 4 Small.jpg
    190.1 KB · Views: 202
  • Dome 5 Small.jpg
    Dome 5 Small.jpg
    174.3 KB · Views: 203
Here is final destination for the helmet once complete.
 

Attachments

  • IMG_2670 Small.jpg
    IMG_2670 Small.jpg
    226.7 KB · Views: 204
I was able to get the green on the dome and was able to unmask to show the previous upper and lower cheek completion. Duplicolor primer gray, Floquil Bright Silver, Floquil SP Lark Dark Gray, Floquil Brunswick Green and MM Panzer Olivgrun 1943/MM RLM 76 2:1. On to the red portions next. Not sure on the consensus for a good match to the DH Caboose. I am leaning towards Floquil Caboose with some Floquil ATSF Red added to push it more red than Caboose straight out of the bottle. Any suggestions on your current mixes would be great.
 

Attachments

  • Dome 6 Small.jpg
    Dome 6 Small.jpg
    174.6 KB · Views: 213
  • Dome 7 Small.jpg
    Dome 7 Small.jpg
    479.7 KB · Views: 220
  • Dome 8 Small.jpg
    Dome 8 Small.jpg
    217.6 KB · Views: 227
  • Dome 9 Small.jpg
    Dome 9 Small.jpg
    202.1 KB · Views: 225
  • Front View 2 Small.jpg
    Front View 2 Small.jpg
    208.4 KB · Views: 205
  • Rear View 1 Small.jpg
    Rear View 1 Small.jpg
    201.3 KB · Views: 213
  • Left Cheek 4 Small.jpg
    Left Cheek 4 Small.jpg
    215.7 KB · Views: 190
  • Left Cheek 3 Small.jpg
    Left Cheek 3 Small.jpg
    195.2 KB · Views: 194
  • Right Cheek 3 Small.jpg
    Right Cheek 3 Small.jpg
    186 KB · Views: 182
  • Right Cheek 4 Small.jpg
    Right Cheek 4 Small.jpg
    235.5 KB · Views: 199
On with the killstripes. Taped off using Tamiya 6mm tape for spacing. In certain overspray/bleed areas of the templates I pushed that area of the tape with a sharp object to give it the correct shaped and diffuse the spray to simulate the references. Used RafalFetts templates once again for placement. I used Floquil SP Armor Yellow as a base and then increased the opacity as I moved to the rear. The SP Armor Yellow takes on a more orange tone the more layers you apply and as opacity increases. I used Floquil Reefer Orange in a mottled appearance for the rearmost stripes and did a light thin overspray to fade the last 4 to 5 stripes overall. Finally I used Floquil UP Armor Yellow to overspray the front 3 to 4 stripes and faded into the middle stripes. The front stripes always seem to be a brighter yellow in tone as opposed to the orangish tone of the SP Armor Yellow by itself. Just personal preference.
 

Attachments

  • Killstripes 4 Small.jpg
    Killstripes 4 Small.jpg
    243.8 KB · Views: 213
  • Killstripes 3 Small.jpg
    Killstripes 3 Small.jpg
    217.6 KB · Views: 221
  • Killstripes 2 Small.jpg
    Killstripes 2 Small.jpg
    212.7 KB · Views: 223
  • Killstripes 1 Small.jpg
    Killstripes 1 Small.jpg
    219.7 KB · Views: 202
Moved on to masking the helmet for the red areas. Using Humbrol Maskol for the liquid masking. Had used Winsor Newton on previous helmets but made the switch and really like how it removes more cleanly than the Winsor Newton along with the purple color being easier to see during the marathon masking sessions. With the masking I am trying to maintain as much accuracy with the larger shape placements to reference the other colors but the detail areas are a little more random in application. I can refine topically when complete with all the colors if the OCD kicks in. I have applied the masking and sprayed the Floquil Bright Silver first for the base gray areas and the attached photos shows the silver and base gray areas after unmasking following the SP Lark Dark Gray application. I am going to experiment with the Floquil Caboose along with darkening with engine black to try and achieve the maroon color and see what I come up with. I will try and make the Caboose a little more red first by introducing some ATSF red to the mix. Not sure if anyone else has done experiments with the Floquil reds and come up with a better combination to duplicate the 1975 D&H Caboose. Any help with your mixes before I commit to the helmet would be great. I may give the Archive X Caboose a try if I can't come up with something satisfactory to avoid a bunch of custom mixing.
 

Attachments

  • IMG_2708 Small.jpg
    IMG_2708 Small.jpg
    233.1 KB · Views: 156
  • IMG_2709 Small.jpg
    IMG_2709 Small.jpg
    227.5 KB · Views: 163
  • IMG_2710 Small.jpg
    IMG_2710 Small.jpg
    250 KB · Views: 163
  • IMG_2711 Small.jpg
    IMG_2711 Small.jpg
    199.1 KB · Views: 161
  • IMG_2712 Small.jpg
    IMG_2712 Small.jpg
    227 KB · Views: 162
  • IMG_2713 Small.jpg
    IMG_2713 Small.jpg
    204.2 KB · Views: 147
Moved on to the maroon color. Made some initial color swatches and started with a bottle of Polly Scale PRR Maroon that I had but thought it appeared too brown. I wanted to stick with Floquil anyway so decided to start with my final red color and add black and blue to get my final shade since that is the way the consensus is leaning for the actual props. I started with a 1:1 mix of Floquil Caboose and Floquil ATSF Red. This is the bottom color on the swatch. The small bright spot on that swatch is a dab of straight ATSF Red to test the "unweathered Caboose" color speckled throughout the helmet and it had the contrast I was looking for. The second color from the bottom is with the addtion of the Floquil Brunswick Green (black) and Floquil Conrail Blue. The final mix was 5:5:1:1 (Caboose, ATSF Red, Brunswick Green, Conrail Blue). The final color was very similar to PRR Maroon but has a slight bluish/purple hue to it now instead of brown and is the top color on the swatch. The overall photos attached are slightly dark and don't show the contrast of the colors quite as well as the closeup of the portion of the mandible which is accurate to the final colors applied and contrast between colors..
 

Attachments

  • Maroon 1 Small.jpg
    Maroon 1 Small.jpg
    193.8 KB · Views: 180
  • Maroon 2 Small.jpg
    Maroon 2 Small.jpg
    167.1 KB · Views: 181
  • Maroon 3 Small Mod.jpg
    Maroon 3 Small Mod.jpg
    235.6 KB · Views: 168
  • Maroon 4 Small Mod.jpg
    Maroon 4 Small Mod.jpg
    244.4 KB · Views: 154
  • Maroon 5 Small Mod.jpg
    Maroon 5 Small Mod.jpg
    224.3 KB · Views: 148
  • Maroon 6 Small Mod.jpg
    Maroon 6 Small Mod.jpg
    221.3 KB · Views: 145
  • Maroon 8 Smal Mod.jpg
    Maroon 8 Smal Mod.jpg
    236.9 KB · Views: 158
  • Maroon 9 Small Mod.jpg
    Maroon 9 Small Mod.jpg
    248.6 KB · Views: 158
Last edited:
Here is final destination for the helmet once complete.

Curious what type of mannequin you have that on? I had to do some minor engineering to get the full arm mobility that your pose and similar poses require. Beautiful suit and helmet!
 
Curious what type of mannequin you have that on? I had to do some minor engineering to get the full arm mobility that your pose and similar poses require. Beautiful suit and helmet!
Thank you for the compliment. The mannequin mods I had to do are explained in the post starting at post #8. I used for both my TK and Boba Fett. I did cut off the hands above the attachment point and added poseable wooden hands used by sculptors and fiberglassed the 2 together at the wrist. I really only had the one pose in mind so once I found it it was locked in with the fiberglass mod. The hands just give me the ability to grip and place the fingers in more natural poses which is everything. I can elaborate more in that thread if you need me too.
 
Thank you for the compliment. The mannequin mods I had to do are explained in the post starting at post #8. I used for both my TK and Boba Fett. I did cut off the hands above the attachment point and added poseable wooden hands used by sculptors and fiberglassed the 2 together at the wrist. I really only had the one pose in mind so once I found it it was locked in with the fiberglass mod. The hands just give me the ability to grip and place the fingers in more natural poses which is everything. I can elaborate more in that thread if you need me too.

Got it. I had to do mods also so I was just curious if there was an out-of-the-box mannequin option that had better mobility. Thanks!
 
Completed the red application this weekend and was able to remove all the masking. To say that was satisfying and nerve racking at the same time is an understatement. I used Floquil Caboose and Floquil ATSF red 1:1 for the red color. Very happy with the color and really ties everything together. I-phone still has an issue with interpreting reds but is very close to actual color just a little more saturated. I will try and get some photos with my DSLR once it is complete. Now to return to back panels and finish them up along with the rangefinder and then on to the weathering and detailing. Glad I am finally past all the major masking and into the homestretch.
 

Attachments

  • Red 6 Small.jpg
    Red 6 Small.jpg
    273.2 KB · Views: 189
  • Red 5 Small.jpg
    Red 5 Small.jpg
    265.1 KB · Views: 190
  • Red 1 Small.jpg
    Red 1 Small.jpg
    258 KB · Views: 177
  • Red 2 Small.jpg
    Red 2 Small.jpg
    265.3 KB · Views: 171
  • Red 3 Small.jpg
    Red 3 Small.jpg
    269.3 KB · Views: 170
  • Red 4 Small.jpg
    Red 4 Small.jpg
    227.1 KB · Views: 180
What I've noticed is the white balance is way off with the iPhone photos. I was in a hurry to post but I want to make sure what you see in the photos are the actual colors I am seeing. I am sure all the photos of the actual helmet have the same issue. I have a 18% gray card coming and I will use that to set the white balance on my DSLR. With the various misting yet to occur with the weathering I want to make sure I'm in the ballpark to start. Like I said very happy with the mixes and want to make sure they translate well over multiple photos and monitors.
 
I was able to get the green on the dome and was able to unmask to show the previous upper and lower cheek completion. Duplicolor primer gray, Floquil Bright Silver, Floquil SP Lark Dark Gray, Floquil Brunswick Green and MM Panzer Olivgrun 1943/MM RLM 76 2:1. On to the red portions next. Not sure on the consensus for a good match to the DH Caboose. I am leaning towards Floquil Caboose with some Floquil ATSF Red added to push it more red than Caboose straight out of the bottle. Any suggestions on your current mixes would be great.
THIS IS FANTASTIC
 
Last edited:
On with the killstripes. Taped off using Tamiya 6mm tape for spacing. In certain overspray/bleed areas of the templates I pushed that area of the tape with a sharp object to give it the correct shaped and diffuse the spray to simulate the references. Used RafalFetts templates once again for placement. I used Floquil SP Armor Yellow as a base and then increased the opacity as I moved to the rear. The SP Armor Yellow takes on a more orange tone the more layers you apply and as opacity increases. I used Floquil Reefer Orange in a mottled appearance for the rearmost stripes and did a light thin overspray to fade the last 4 to 5 stripes overall. Finally I used Floquil UP Armor Yellow to overspray the front 3 to 4 stripes and faded into the middle stripes. The front stripes always seem to be a brighter yellow in tone as opposed to the orangish tone of the SP Armor Yellow by itself. Just personal preference.
Were you able to finish all the main green (dome and cheeks) with a single bottle of each floquil of your mix?
 
This thread is more than 3 years old.

Your message may be considered spam for the following reasons:

  1. This thread hasn't been active in some time. A new post in this thread might not contribute constructively to this discussion after so long.
If you wish to reply despite these issues, check the box below before replying.
Be aware that malicious compliance may result in more severe penalties.
Back
Top