Jango Fett Jr
Well-Known Hunter
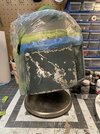
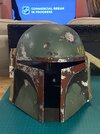
Hey TDH, it’s been at least a decade since I posted a thread here, but news of the ESB hero helmet castings brought me out of my slumber, and I’m the proud owner of a gorgeous helmet from MachineCraft

After many weeks staring at this helmet and running my fingers along all of the paint markings and surface imperfections, I proceeded to begin undoing some of the post-filming damage on the casting. I know this is a piece of history and there are other options for sanitized, later-generation castings that I could use for an ESB-era helmet, but I don’t need an extra helmet in order to preserve this one. I want an ESB hero helmet and this is the best possible starting point, and I’d prefer to have control over which imperfections are cleaned up.
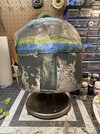
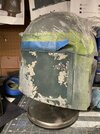
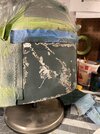
I didn’t take a lot of photos of this process, but basically I used Tamiya surface filler to file in some of the cracks cast into the gel-coat, and a few spots that don’t appear in ESB reference photos. But the big one is obviously the crack in the left side of the visor...
Because of how the helmet cracked there is an offset in the surface, which means it’s not just a matter of using Bondo to smooth it out. If you look at the inside of the visor you can see it doesn’t line up properly. So in order to properly repair this spot, I shaved off the “putty” and I used a boxcutter and exacto knife to slowly re-open the crack. I then used a heat gun to carefully heat up the area, and then align the surfaces to meet. Because I only heated up a few square inches I didn’t have to worry about deforming the entire helmet, and I’m much happier with how it lines up.


From there I just filled in the gap from the back with 2-part epoxy putty and smoothed the surface out. On the dome I simply sanded and surface filled since there weren’t any edges to drastically re-align.
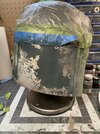
Jumping ahead, I’ve started my paint job using ArchiveX enamels. The work that Guy and his team have done is incredible and I’m really looking forward to working with these paints.
I primed the back with Tamiya fine surface primer, and then layered with of a mix of SP Lettering Grey, with a few drops of a random blue enamel, and even fewer drops of LT Green. Meant to replicate the bluish-grey surface that peeks through the silver. Here’s the first layer masked off, waiting to be sprayed with silver (Tamiya X11 silver chrome)


The next update will be once I’ve got the first couple layers down. Until then here’s the interior in progress, huge thanks to intwenothor for all his research in his thread. Chin cup casting from Darth Voorhees, modified vintage Joe Brown helmet liner, homemade chin strap, kit-bashed electronics board, visor clips from Sidewinder, Borden replica from MachineCraft. Casio MQ1 circuit is on its way.


Can't wait to share more as it progresses!
After many weeks staring at this helmet and running my fingers along all of the paint markings and surface imperfections, I proceeded to begin undoing some of the post-filming damage on the casting. I know this is a piece of history and there are other options for sanitized, later-generation castings that I could use for an ESB-era helmet, but I don’t need an extra helmet in order to preserve this one. I want an ESB hero helmet and this is the best possible starting point, and I’d prefer to have control over which imperfections are cleaned up.
I didn’t take a lot of photos of this process, but basically I used Tamiya surface filler to file in some of the cracks cast into the gel-coat, and a few spots that don’t appear in ESB reference photos. But the big one is obviously the crack in the left side of the visor...
Because of how the helmet cracked there is an offset in the surface, which means it’s not just a matter of using Bondo to smooth it out. If you look at the inside of the visor you can see it doesn’t line up properly. So in order to properly repair this spot, I shaved off the “putty” and I used a boxcutter and exacto knife to slowly re-open the crack. I then used a heat gun to carefully heat up the area, and then align the surfaces to meet. Because I only heated up a few square inches I didn’t have to worry about deforming the entire helmet, and I’m much happier with how it lines up.
From there I just filled in the gap from the back with 2-part epoxy putty and smoothed the surface out. On the dome I simply sanded and surface filled since there weren’t any edges to drastically re-align.
Jumping ahead, I’ve started my paint job using ArchiveX enamels. The work that Guy and his team have done is incredible and I’m really looking forward to working with these paints.
I primed the back with Tamiya fine surface primer, and then layered with of a mix of SP Lettering Grey, with a few drops of a random blue enamel, and even fewer drops of LT Green. Meant to replicate the bluish-grey surface that peeks through the silver. Here’s the first layer masked off, waiting to be sprayed with silver (Tamiya X11 silver chrome)
The next update will be once I’ve got the first couple layers down. Until then here’s the interior in progress, huge thanks to intwenothor for all his research in his thread. Chin cup casting from Darth Voorhees, modified vintage Joe Brown helmet liner, homemade chin strap, kit-bashed electronics board, visor clips from Sidewinder, Borden replica from MachineCraft. Casio MQ1 circuit is on its way.
Can't wait to share more as it progresses!
Last edited:

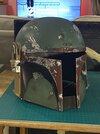
") this is how the helmet should be. Restored to its former glory.
this is how the helmet should be. Restored to its former glory.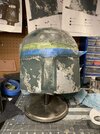
")