Iron's ROTJ WIP

spicy fett
It’s definitely one the those things I kinda had buyers remorse on. I’m mean they’re not that bad! But MoW’s molds are really meant for the ESB Fett and I was using it for ROTJ so the tools themselves only faced one way. And it is like ShortFuse said, can’t beat them found parts. Plus I enjoy putting stuff like this together!

-Iron
I 3D printed mine. Ended up being a lot easier and cheaper than found parts.
Everything is printed except the 3 rivets, the piece of gaffers tape and the threaded part of a bolt holding the adjustment tools together.

Don't get me wrong. There is nothing wrong with authenticity, I happen to have a printer and thought this was the best solution for me.

20200715_105750.jpg
 
Hello once again fellow Fett's,
Continuing on with my Phase II iniative. I wanted to provide an update, be prepared this will be a long one....

Firstly, I recieved my Mike M. ROTJ Gloves! These gloves are great! I don't think I'll be upgrading to anything else anytime soon.
Mike M - ROTJ Gloves - Front and Back.jpg


For those interested in how they compare to the MoW Studios ROTJ variant?
Mike M vs MoW Studios.jpg


Using a little bit of black - I carefully misted on the soot to weather it up some.
Mike M. Gloves Front and Back - Weathered.jpg


Secondly, and after about 5 months of waiting I finally receivd my package back from Customs. To recap this story, Boba Maker (Daz) sent me a painted/weathered ROTJ Shoulder armor with a ESB Mythosaur decal on it. o_O

Painted and Weathered Shoulders.jpg


He was accomodating in that he said he would repair it for me. I shipped it back to him and paid for priority shipping. I tracked it and it got over seas to him in 7 days time! (This was in July) There, it sat with customs where they wouldn't complete the shipping saying that they needed to know the overall value of the package and it's contents. After going round and round with Customs on this - both Daz and I felt frustrated and Daz agreed to send me the ROTJ Mythosaur decal and have Customs "Return to Sender". He initiated the RTS Mid-October of 2020. I knew I would probably NOT have it in time for Halloween - so I went without. I was doing weekly checks on it where it simply for whatever reason fell off the radar. I was about to send both USPS and CTS a nasty gram, when low and behold it re-surfaced on tracking and was here in the states. (Jan 26th, 2021) and finally got back to me this week! I was super excited to have it back and this mess behind me.

I was worred about removing the ESB decal so I took my time (About an hour) and got it removed with out any damage to Boba Maker's fine work! :)
ESB Gunk with Decals.jpg


I was then tasked with removing the sticky residue from the ESB decal. I researched this and landed on Goo Gone. And they state many times that the original formula doesn't remove paint. Using a towel and carefully rubbing in one spot - I can say that it is true - it doesn't remove the paint!
ESB Decal Removed.jpg


and I was able to get the ROTJ decal applied and thankfully and from the looks of it I shouldn't need to do anything else! <WHEW!>
ROTJ Decal on ROTJ Armor.jpg


Again, Daz was great and communicative throughout the entire process! He also felt bad about it and refunded me a portion - which I didn't ask for, nor expected as he took it upon himself to do.

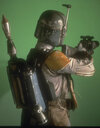
With that said, as you know it was St. Patty's day for us this week! And in the spirit of wearing something "Green" that day, and the fact we had great weather - I asked a friend of mine whos also a photographer to take a few pics of me. I know I still need to get some other things done to make this complete, but......Enjoy....

Fett - Facing Sunset.JPG


Fett - Facing away from Sunset.JPG


Fett - Flamethrower.JPG


Fett - Profile Pic.JPG


Fett - Full Profile.JPG


Fett - Close up with Mythosaur.JPG


Fett - Head Turned.JPG


Again, Still more to do, but I thought these shots came out great! I love the way the sunset hit the armor! Still on the to-do list is:

1) Add-On Woodman's ROTJ Braids! (Which I ordered back in January, I'm super excited to get this one!)
2) Weather the vest and suit a bit more.
3) A complete re-do of my entire helmet!
4) Trim vest so only 1/2 inch of vest shows below the gut armor.
5) Bring the knee straps so they are a bit tighter (Not too much) but hug my knee a little better!

Anything else you guy can think of?

Again, I apologize for the long post.

Thanks,
-Iron
 
Last edited:
Dude....Looking really good!!!!

Please don't think I'm criticizing your work. You do amazing work. I see 2 items that popped out at me.

This happened to me too. The lower armor wasn't curved enough to wrap around me nicely. I carefully used a heat gun to add more curve. In your case I know you are standing with your waste twisted, but it seems like you have the same issue.

Fett - Profile Pic.JPG


The only other thing I see is your jet pack needs to be snugged up tighter to the slots where the straps come out. This is something that I was told when I applied to the 501st.
If your bottom harness bars end up being too low you just raise the US divers waist belt and shorten the shoulder straps. My US divers belt buckle sits about 3" above my belly button.

Fett - Facing Sunset.JPG


Keep up the good work. You are in the home stretch.
Chris
 
Dude....Looking really good!!!!

Please don't think I'm criticizing your work. You do amazing work. I see 2 items that popped out at me.

This happened to me too. The lower armor wasn't curved enough to wrap around me nicely. I carefully used a heat gun to add more curve. In your case I know you are standing with your waste twisted, but it seems like you have the same issue.

View attachment 208969


The only other thing I see is your jet pack needs to be snugged up tighter to the slots where the straps come out. This is something that I was told when I applied to the 501st.
If your bottom harness bars end up being too low you just raise the US divers waist belt and shorten the shoulder straps. My US divers belt buckle sits about 3" above my belly button.

View attachment 208970

Keep up the good work. You are in the home stretch.
Chris
I think he uses the MOW jetpack harness so I don’t think it tightens the same way I could be wrong
 
In regards to the aforementioned Jetpack straps, the jetpack hangs low on the ROTJ Hero. My advice would be to leave it as is.
I'm not saying you are wrong. You of all people know.
I am just pointing out what I was told during my review to get into the 501st. I had to shorten the jet pack straps so that it was snug against the back armor with little to no strap showing.
It's a good bet that Matt's garrison reviewer is different than mine since he is in Washington & I am in Florida. :lol:
I don't even know if he plans to join the 501st.
That’s a tad concerning.

I don’t think I’m going to get on with any 501st reviewer that goes against the actual available reference.

Were you reviewed/pre approved by the BHG peeps 1st or did you go straight to the 501st reps?
 
Lazerjock
No worries, I absolutely wanna be that better Fett. So I do like any critique offered! I love those pictures that were taken, but I also saw the White Straps as being a bit too long after closely scrutinizing the pics. If you recall, and as spicy fett said, I actually don’t have the Great Dane (it’s “Great Dane” isn’t it?) US Divers rig. I'm using the MoW Studios Jet Pack Harness. I like it, but as you put a Jetpack on it (i.e. add weight to it), it slides up and thereby extends the straps. I had thought about maybe having some Velcro sewn onto the harness and my flight suit so that the MoW Studios Jet Pack Harness stays put.

Thanks,
-Iron
 
Last edited:
Absolutely stunning work from start to finish!!! Trying to paint a ROTJ helmet myself, what paints did you use for it? I was only able to catch the ones you wrote (XF-77, XF-11).

Again, wonderful work.
 
SouthHunter
Your first post, and it's on my WIP, I'm honored. And thanks for the kind words! So, for the paints that I used on my helmet - I just realized I never covered that. But I used:

ManufacturerPaint NamePaint NumberPiece PaintedNotes
Tamiya ColorChrome SilverX-11Helmet - Base1st thing applied, after the primer.
Vallejo Game ColorGory Red72.011Helmet - Mandibles
Vallejo Game ColorDark Green72.028Helmet - Back Panels
Tamiya ColorIJN GreyXF-77Helmet - Keyhole Slots
Tamiya ColorSea BlueXF-17Helmet - Upper CheekAlso used topically, via brush for sporadic damage throughout the helmet.
HumbrolOlivgrunMatt 252Helmet - Lower Cheeks and DomeThis is a very thick enamel paint, make sure to use thinner so that you can use it in your airbrush.
Vallejo Game ColorOrange Fire72.008Helmet - KillstripesUse a drop or two of Flat Red - this will give it that deep orange.
Vallejo WashGrey76.516Helmet - Ear CapsApplied via large brush.
Vallejo Model ColorFlat Red70.957Helmet - Left Turn SignalPainted via brush.
Vallejo Model ColorDark Blue70.930Helmet - Right Turn SignalPainted via brush.

Hope this helps!

-Iron
 
Hey Iron!!! It helps a lot! Thank you for helping me, I´m just trying to find alternatives for the Humbrol 252, since I can no longer find it.

Will post my progress!!!
Are you in the states? I did a google search and saw some posted on a few different sites and if you are doing acrylic paints they also have it on Amazon
 
I just realized that I hadn't shared any pics of my updated Shin Tools. I used an actual Patterson Squeege as well as the Machine Craft Replica's - Shin Tool Rods. So here they are...

Finished Shin Tools Pic 1.jpg


Finished Shin Tools Pic 2.jpg


I have a set of MoW Studio's Resin Shin Tools that I got in January of 2020, and was one of my first purchases. One of the things I didn't know was that they cannot be flipped around to face the other direction. I pressed on and finished them anyways - with the intention of upgrading. But here are the MoW Studios compared to the Patterson and MCR version...

Shin Tool Comparison.jpg


Thanks,
-Iron
 
This thread is more than 3 months old.

Your message may be considered spam for the following reasons:

  1. This thread hasn't been active in some time. A new post in this thread might not contribute constructively to this discussion after so long.
If you wish to reply despite these issues, check the box below before replying.
Be aware that malicious compliance may result in more severe penalties.
Back
Top