Iron's ROTJ WIP

I got around to finishing my Cape. I forgot to mention earlier that I got this off of eBay for $15.00, it is a genuine US Army Half Shelter! (y)
View attachment 196343

I saw that the stitching was not correct but I have a local alterations gal that does my fine tuning. We have good rapport, but she laughed at what a dork I was for bringing this and asking. Hahaha! :lol: I had her complete the stitching (as I'm not comfortable working a sewing machine myself) and another $20.00 later I had this!
View attachment 196344

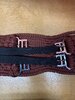
I thought she did a great job on it. I know it looks long in this picture and I had her do it that way cause I didn't know how it would looked on me when attached to the armor. (Thus I had to wait a few months for the armor to get to me). But, now that I have it I can finish it! I did my trimmings and cut out the holes and using my airbrush, misted on my black burn and soot markings. when done, I was treated with this.....
View attachment 196345

I'm 6' 2" tall and the cape measured out at 28 1/4 inches wide and 41 1/2 inches long. As a former member of the US Army (1994-2004 - Combat Engineer) I couldn't help but feel somewhat bad about doing this to this poor half shelter, but then I remembered it's going to a good cause. :lol: I also wanted to guy your thoughts on should I look into removing the US stamp on the back side of the cape?
View attachment 196349

In addition, I also took it upon myself to make that little piece that also attaches to the cape. This was also before I had my airbrush so I used rattle cans and dry brushing on some silver and some nuts and washers I found at my local Lowes.
View attachment 196346
View attachment 196347

Using my Dremel with a cutting wheel bit and round sanding tip I was able to create this......
View attachment 196348

Whatcha guys think?

-Iron
I think you did a good job! Also in including that "little piece" :)
The 501st costume guidelines do not mandate it, am I right? So doubly good!

And I'd like to know more about why your alterations girl laughed at you :)
 
Irongladiator The grommet tutorial is GREAT! You essentially have all the parts and pieces I have (even the install kit), but the difference is you’ve actually gone through and done it!

My issue is that the bolts that are already attached to my armor have no washers, and the washers I bought that were supposed to fit do not. Maybe I’ll try the nuts that came with these bolts, along with a separate washer...?
 
Irongladiator The grommet tutorial is GREAT! You essentially have all the parts and pieces I have (even the install kit), but the difference is you’ve actually gone through and done it!

Thanks Boochman ! It’s been super fun watching this all come together. (y)

Your comment of “You’ve actually gone through and done it!” Had me rollin’! :lol:

Oh trust me.....as stated earlier, I was not too comfortable in taking on the grommet job. Checking the armor and ensuring it would line up with the grommets was a process. The problems is, the armor has curves to it and what your attaching it to is a flexible fabric. You have that on top of bolts that sit at funny angles and things could turn into a mess in a hurry. So I was super careful. Cause to me.....once you make that cut and the grommet goes in......there’s really NO going back! So extra care was used.

-Iron
 
Last edited:
This is why I'm glad the armor I bought was already attached to the flack vest with pins and clutch backs. This allows me to easily adjust the armor if needed. Which I did.
I know it won't get me level 2 501st approval, but I'm not going for level 2. At least right now. Lol!!
 
Thanks Boochman ! It’s been super fun watching this all come together. (y)

Your comment of “You’ve actually gone through and done it!” Had me rollin’! :lol:

Oh trust me.....as stated earlier, I was not too comfortable in taking on the grommet job. Checking the armor and ensuring it would line up with the grommets was a process. The problems is, the armor has curves to it and what your attaching it to is a flexible fabric. You have that on top of bolts that sit at funny angles and things could turn into a mess in a hurry. So I was super careful. Cause to me.....once you make that cut and the grommet goes in......there’s really NO going back! So extra care was used.

-Iron
Gotta aggree with Boochman . Those photos of the grommet process are valuable!
Have you (Booch) tried to take the plates with the screws attatched to the hardware store and just try out different fasteners?

If I ever do a Mando again, I am debating using a method of blending verlcro and grommets. ... I love Velcro for the sturdiness and simplicity, but if you ever need to remove the plates, getting the spacing right again is a PAIN so I do value the "fixed in place" spacing of grommets. To understand my annoyance with that, you need to know, that to suit up in my custom Mando required to remove and reattatch some of the plates... NOT FUN :D
Well... I guess with plates permanently attatched, it wouldnt matter now that I think about it.

Ok then. Move along. ;)

Next topic....
Irongladiator you still did not diclose the vital information of what made your alterations girl laugh at you... ;)
 
Hey guys,
I hope everyone had a great weekend! I finally got around to getting my Ankle Spats dyed-n-weathered & my Shin Tools completed over the weekend! (y) For my Ankle Spats I used some "RIT Pearl Grey" and "RIT Color Stay Dye Fixative", and then some black mists for soot/weather effects.
Ankle Spats.jpg


For my Shin Tools I picked up MoW's Shin Tool set. I got these early on in my quest and after reviewing the Shin Tools more in depth I realized that what I bought was a ESB Shin Tool Set. MoW's Shin Tool set is a resin cast set and as such I'm unable to turn them around to be correct for a ROTJ Boba Fett. As you can see the extra tools shoulda been a dead giveaway that it was ESB. :oops:
MoW Shin Tools.jpg


When I picked it up I thought to myself "Cool, I can hock the extra tools in the Cargo Hold and make some of that money back!" Oh well......It'll have to do for now, but let it be known it is driving me pretty crazy. In addition, I knew there were a few things to fix on the Shin Tool set from MoW. First was to dremel out a little notch in the top of "Sonic Beam Weapon" and the second was to fix the Shin Tool Rods on the "Anti-Security Blade". As you can see from MoW's pics they are incorrect in that sense (For a ROTJ build).
Shin Tools - Base Grey.jpg


I know I probably shoulda waited it out a bit more and picked up the Patterson Squeegee and Machine Craft Shin Rods Set. But I finished these anyways.......whatcha guys think?
Shin Tools.jpg


I'll be working on my Gauntlets this week! More to follow! (y)

-Iron
 
Last edited:
That paintjob all around is just stellar. Your share and BobaMakers. They match really well and thats a testament to your level of work! Your chalk skills resemble your armor painting skills ;)
My favourite has got to be Duffy Duck though along with that initial Cinderella. You.... dont happen to have a Roadrunner or Coyote, do you? :D
(I apologize in advance of derailing your WIP even more but... well... you kinda had it coming...)

Next topic....
Irongladiator you still did not diclose the vital information of what made your alterations girl laugh at you... ;)

RamSkirata - I didn't mean to ignore your questions and wanted to address your inquiries:
1) I do not have a Road Runner or Coyote Chalk Drawing at the moment....but I did do a chalk drawing over Easter of that one episode where Bugs is an Easter Bunny and there is that Red-Headed brat kid in it! As seen in this clip to refresh your memory:

Photo Apr 21, 4 53 29 PM.jpg


Also, rather than carve a pumpkin for Halloween I decided to draw Bugs Bunny and Hazel the witch on it!
Bugs Bunny and Hazel.jpg

....Enjoy! (y)

2) And now.....why the Alterations girl laughed at me? You know what? That's Private! Hahaha! Just kidding, I fear, she only laughed at what a sci-fi dork I am.....that's it! :lol:

-Iron
 
Last edited:
Irongladiator
I didnt feel ignored, dont worry. I only tried to be funny.

Thanks for adressing those 2 questions! Maybe a Roadrunner will show up in your portfolio eventually :)
And for the alterations girl...
Well... I applaude your guts for not caring about appearing as the geeks that we are before strangers :D
 
Speaking of my Alterations Girl, I got another update.

I had a few additional tasks for her to do and gave her some of my soft pieces to work on. Here is what I had her do this time around.
1) Sew on a small square of matching color Velcro to the top of the right shoulder on my vest near the Shoulder Armor to attach Wookie Braids to. (When attached, it would be barely visible)
2) Pun in a tiny circular hole in the vest behind the right Chest Armor to feed the electrical wire for the Fettronics Chest LED.
3) Sew on 2 straps to right side of Girth Belt. (These will be elastic straps for a more comfortable fit, I was able to source some that looks pretty dang close to fabric straps provided by MoW Studios)
4) Reinforce the hole on Cape (So it doesn't tear any further) where it attaches to the collar armor via the square stud.
5) Sew on the 1.5 inch wide white fabric to MoW Jet Pack Harness - leaving the length as is - I'll have wife assist with Jet Pack fitting when that time comes.

Here is #1 on that list - She did a great job in getting that stitched on there and just like I thought it barely shows when the Wookie Braids are mounted on it. And the color of the Velcro matches the vest great too!
Vest Velcro for Wookie Braids.jpg

Vest with Wookie Braids Attached.jpg


#2 on that list also looks great, the hole is just small enough to feed that Fettronics wire through. (y)
Vest Hole for Fettronics.jpg


Next up is #3, She did a great job in sewing the elastic straps on the Girth Belt. Again I think it is pretty close to the fabric straps that were provided by MoW Studios (Seen above the Girth Belt in the picture below). I chose elastic cause I feel it could be a more comfortable fit and would hug you a bit more.
Elastic Straps Comparison to Fabric Straps.jpg


#4 on my hit list was to have her sew a reinforced hole that would be just big enough to fit the bolt through my cape, where it attaches to the Collar Armor. But also be small enough to be hidden by the Square Metal Stud. Turned out great I thought! (y) I did this so that the hole wouldn't tear any more.
Cape with Reinforced Stitching Around the Hole.jpg

....and like I thought, with the stud over it.....Yep, can't see it! ;)
Cape with Stud Covering Hole.jpg


And lastly #5, I had her sew on some 1.5 inch wide white fabric strapping onto the MoW Studios Jet Pack Harness. I left the length pretty long so I can get the measurements correct for the Jet Pack. I'm also in the talks with Full Metal Fett about getting some of his Hooks and Rings to finish the job. Again great job by her on this....
Jet Pack Harness with White Straps.jpg


So yeah, a big shout out to "Kimberley's Tailoring & Alteration's" (in Issaquah, WA) for coming through with this big list of things to do for this dork - Hahaha! :lol: She did a great job, but just glad they are done! (y) Whatchu guys think?

-Iron
 

Attachments

  • Girthbelt with Elastic Straps.jpg
    Girthbelt with Elastic Straps.jpg
    1.3 MB · Views: 122
Last edited:
Speaking of my Alterations Girl, I got another update.

I had a few additional tasks for her to do and gave her some of my soft pieces to work on. Here is what I had her do this time around.
1) Sew on a small square of matching color Velcro to the top of the right shoulder on my vest near the Shoulder Armor to attach Wookie Braids to. (When attached, it would be barely visible)
2) Pun in a tiny circular hole in the vest behind the right Chest Armor to feed the electrical wire for the Fettronics Chest LED.
3) Sew on 2 straps to right side of Girth Belt. (These will be elastic straps for a more comfortable fit, I was able to source some that looks pretty dang close to fabric straps provided by MoW Studios)
4) Reinforce the hole on Cape (So it doesn't tear any further) where it attaches to the collar armor via the square stud.
5) Sew on the 1.5 inch wide white fabric to MoW Jet Pack Harness - leaving the length as is - I'll have wife assist with Jet Pack fitting when that time comes.

Here is #1 on that list - She did a great job in getting that stitched on there and just like I thought it barely shows when the Wookie Braids are mounted on it. And the color of the Velcro matches the vest great too!
View attachment 196709
View attachment 196710

#2 on that list also looks great, the hole is just small enough to feed that Fettronics wire through. (y)
View attachment 196711

Next up is #3, She did a great job in sewing the elastic straps on the Girth Belt. Again I think it is pretty close to the fabric straps that were provided by MoW Studios (Seen above the Girth Belt in the picture below). I chose elastic cause I feel it could be a more comfortable fit and would hug you a bit more.
View attachment 196713

#4 on my hit list was to have her sew a reinforced hole that would be just big enough to fit the bolt through my cape, where it attaches to the Collar Armor. But also be small enough to be hidden but the Square Metal Stud. Turned out great I thought! (y) I did this so that the hole wouldn't tear any more.
View attachment 196714
....and like I thought, with the stud over it.....Yep, can't see it! ;)
View attachment 196715

And lastly #5, I had her sew on some 1.5 inch wide white fabric strapping onto the MoW Studios Jet Pack Harness. I left the length pretty long so I can get the measurements correct for the Jet Pack. I'm also in the talks with Full Metal Fett about getting some of his Hooks and Rings to finish the job. Again great job by her on this....
View attachment 196717

So yeah, a big shout out to "Kimberley's Tailoring & Alteration's" (in Issaquah, WA) for coming through with this big list of things to do for this dork - Hahaha! :lol: She did a great job, but just glad they are done! (y) Whatchu guys think?

-Iron
Wow, I really like the work!
Good job on her and actually on you for the ideas, too!

Im curious how the girth belt will wear with the elastic band once you are trooping.
 
Wow, I really like the work!
Good job on her and actually on you for the ideas, too!

Im curious how the girth belt will wear with the elastic band once you are trooping.

RamSkirata - I'm curious about that too. If it's no good. Then the good thing about it is that it is NOT permanent I can remove it and find another solution. Just an idea I wanted to try out.

-Iron
 
It looks good-and good ideas as well. Haven't dyed anything yet, do you just follow the RIT directions?

603Fett - Thanks man! Yeah, the only thing I've dyed thus far was the ankle spats. And, for me, actually in the history of dyeing anything EVER. Yes, for that I followed the instructions of:


The dying of my Ankle Spats only took me about 5 mins, pretty quick.....then followed the videos direction of putting it in the RIT ColorStay Fixative Solution.

After that, took em' out in the sun to dry and then I misted on the black soot effects. Pretty easy actually.

-Iron
 
Last edited:
Speaking of my Alterations Girl, I got another update.

I had a few additional tasks for her to do and gave her some of my soft pieces to work on. Here is what I had her do this time around.
1) Sew on a small square of matching color Velcro to the top of the right shoulder on my vest near the Shoulder Armor to attach Wookie Braids to. (When attached, it would be barely visible)
2) Pun in a tiny circular hole in the vest behind the right Chest Armor to feed the electrical wire for the Fettronics Chest LED.
3) Sew on 2 straps to right side of Girth Belt. (These will be elastic straps for a more comfortable fit, I was able to source some that looks pretty dang close to fabric straps provided by MoW Studios)
4) Reinforce the hole on Cape (So it doesn't tear any further) where it attaches to the collar armor via the square stud.
5) Sew on the 1.5 inch wide white fabric to MoW Jet Pack Harness - leaving the length as is - I'll have wife assist with Jet Pack fitting when that time comes.

Here is #1 on that list - She did a great job in getting that stitched on there and just like I thought it barely shows when the Wookie Braids are mounted on it. And the color of the Velcro matches the vest great too!
View attachment 196709
View attachment 196710

#2 on that list also looks great, the hole is just small enough to feed that Fettronics wire through. (y)
View attachment 196711

Next up is #3, She did a great job in sewing the elastic straps on the Girth Belt. Again I think it is pretty close to the fabric straps that were provided by MoW Studios (Seen above the Girth Belt in the picture below). I chose elastic cause I feel it could be a more comfortable fit and would hug you a bit more.
View attachment 196713

#4 on my hit list was to have her sew a reinforced hole that would be just big enough to fit the bolt through my cape, where it attaches to the Collar Armor. But also be small enough to be hidden but the Square Metal Stud. Turned out great I thought! (y) I did this so that the hole wouldn't tear any more.
View attachment 196714
....and like I thought, with the stud over it.....Yep, can't see it! ;)
View attachment 196715

And lastly #5, I had her sew on some 1.5 inch wide white fabric strapping onto the MoW Studios Jet Pack Harness. I left the length pretty long so I can get the measurements correct for the Jet Pack. I'm also in the talks with Full Metal Fett about getting some of his Hooks and Rings to finish the job. Again great job by her on this....
View attachment 196717

So yeah, a big shout out to "Kimberley's Tailoring & Alteration's" (in Issaquah, WA) for coming through with this big list of things to do for this dork - Hahaha! :lol: She did a great job, but just glad they are done! (y) Whatchu guys think?

-Iron
Well now I know if my leather straps don't work for my girth belt I can just use my elastic ones!!
 
Just doing another update, this time I've been working on my Gauntlets......specifically my Left Gauntlet. I've completed it.....let me know your thoughts. My goal is to have my Right Gauntlet completed by this weekend. I have to blame work and family life for the delay. But I'm in total "Boba Mode" this weekend.
Left Gauntlet 1.jpg

Left Gauntlet 2.jpg

Left Gauntlet 3.jpg

Left Gauntlet 4.jpg

Left Gauntlet 5.jpg


Using my Airbrush I sprayed on some Tamiya X-11 (Silver) as my base, then liquid mask'd it all and then sprayed on some Vallejo "Game Color" paint called "Gory Red". I did zero mixing of this paint (except for some Vallejo Airbrush Flow Improver) as I felt the color looked great right out of the bottle. (y)

The Metal Gauntlet Darts were supplied by QuestDesignCanada and were installed using my new favorite tool - Gorilla Hot Glue Sticks!

-Iron
 
Last edited:
This thread is more than 3 months old.

Your message may be considered spam for the following reasons:

  1. This thread hasn't been active in some time. A new post in this thread might not contribute constructively to this discussion after so long.
If you wish to reply despite these issues, check the box below before replying.
Be aware that malicious compliance may result in more severe penalties.
Back
Top