Grommets - Cape and Girthbelt

Irongladiator

Active Hunter
TDH PREMIUM MEMBER
Hello Fellow Fetts,
I'm looking to see if anyone knew the answers to a couple questions I had, as well as some advice. Just an FYI I'm not looking for 501st approval, just want to create a movie quality Fett costume. But I turn to the 501st as they seem to be thee authority on all things Boba Fett.

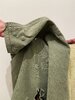
1) On the Cape - what size grommets should I be looking for?
a) The 501st reference pic shows two Grommets - but doesn't state if that IS a requirement.
b) Can someone explain the Level 2 certification - where it calls out Two Screws and Washers, I'm a bit confused.
Cape.jpg


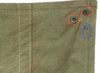
2) Concerning the Girthbelt - Looking at the reference pic I see no Grommets installed on the black nylon straps, would it be ok to add them? I'm just concerned about tearage on the Nylon straps. I also like how it is permanently stitched to one side too, a 501st approved method I take it?
Girth Belt.jpg


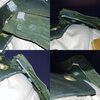
3) And lastly, what grommet install kit do most people go with? (I see quite a few out there on the market) I see cheap ones, expensive ones, hammer on ones, and crimp style ones. Any name brands to go with or stay away from?

Thanks in advance for any input!

-Iron
 
For #1, I believe the two grommets you are talking about are actually the screws and washers. The cloth gets sandwiched between the screw with the washer and the plastic underneath.
 
This is meant to represent a broken clip insert. The PP1 Fett had a Martin Baker Clip on the right side of the collar plate. ROTJ reused the cape but not the clip on the collar, so it looks like they snapped off the end of the clip insert and left the remnants.
 

Attachments

  • D02DC7F9-A05E-41FF-9CF3-A445C7680F73.jpeg
    D02DC7F9-A05E-41FF-9CF3-A445C7680F73.jpeg
    1.6 MB · Views: 222
  • BB18A906-1CC7-4177-AA3B-7517792C6DCB.jpeg
    BB18A906-1CC7-4177-AA3B-7517792C6DCB.jpeg
    2.6 MB · Views: 215
roger12RAMJET - Thanks for the pics! That helps clarify things a bit. Your pic shows both grommet holes attached to the piece of plastic. I'm assuming that when it comes time to "Suit up" that you remove the bolt/nut that you'd attach to the collar/back armor stud? Very interesting that this was even caught in film. The scenes happen so quickly that even I don't catch it.

Thanks,
-Iron
You would think that might be the best way to do it, but the grommet for the cape to attach to the collar stud is off to the side. This with the bolts/washers is off to the side...
 
Boochman - Maybe I'm still confused about how it all hooks up then. When I look at the 501st reference pic I can see the two grommets (I labeled them as #1 and #2 - for ease of reference). The #1 Edge Grommets (Closest to the edge of the cape) is hooked up to the Collar/Back armor via the square stud. So......that would mean that #2 Grommet has the other has the blot/nut on it to hold in that plastic piece. And the #1 Edge Grommet is not only secured to the Collar/Back armor but also the plastic piece too - yes?

Boba Fett - Full Reference.jpg


Forgive me roger12RAMJET for stealing your photo, but I'm just looking for clarification on this. Please see your photo I doctored up to see if I'm understanding it correctly.
ROTJ Grommet.jpeg


Thanks for educating this noob! ;)

Thanks,
-Iron
 

Attachments

  • Boba Fett - Full Reference.jpg
    Boba Fett - Full Reference.jpg
    304.2 KB · Views: 176
Hey Irongladiator - no worries at all. I have yet to do this myself (modify how my cape attaches), so this will help me better understand it too!

roger12RAMJET said it perfectly regarding the clip. It no longer functioned the same as it did previously, where the cape can be draped across the front like a badass cowboy poncho, but the clip remained in place. If you scroll down on the CRL, you will see the images of the cape. I blew one up, and circled in red are not grommets, but the bolts and washers. On the underside of the cape, they’re bolted to the clip.

Circled in blue is the attachment location to the collar stud, which I believe is a grommet. Also included are some reference images - hope these help!
 

Attachments

  • DC2E2D07-126B-4D4E-89A5-DE5420E64B48.jpeg
    DC2E2D07-126B-4D4E-89A5-DE5420E64B48.jpeg
    431.7 KB · Views: 220
  • CEDB575F-98E2-45E0-8406-58B8F1BF07AB.jpeg
    CEDB575F-98E2-45E0-8406-58B8F1BF07AB.jpeg
    796.6 KB · Views: 248
Last edited:
This is meant to represent a broken clip insert. The PP1 Fett had a Martin Baker Clip on the right side of the collar plate. ROTJ reused the cape but not the clip on the collar, so it looks like they snapped off the end of the clip insert and left the remnants.

It's not the reused Pre-Pro #1 cape, but a different one.
 
Boochman - Thanks for the pics - I totally get it now. I NEVER noticed on the CRL pics that there was a 3rd Grommet. It looks smaller than the rest too. Does anyone have an official size of these grommets?

Thanks,
-Iron
 
All,
So what are folks using for the grommet installation kit?

Thanks,
-Iron

Not done that bit yet on mine. I don’t think I’m going to put a grommet on. I’m leaning towards a 4 mm washer on either side and glue it down. That way it’ll protect the cape and not make the the collar stud stick up too much.
 
I bought a grommet installation kit, which came with assorted sizes of grommets. I’ll pick a small one for the cape I guess. I’m at the point where idk when to install the armor on the vest, before or after tailoring...:unsure:
 
I was leaning on towards getting a canvas material cloth and dying it Olive Drab - but in the end I ended up getting this off of eBay ($13.50 +$6.00 S&H)....
Half Shelter All Pics.jpg


I figure I can make a decent cape out of this, plus I see the 501st CRL states that it should be made from a US Army half shelter! I also see that they don't give an "Official" size of the cape itself, but does state that the cape should not go more than 4-5" past the left knee strap. I'm guessing that's because that's how it looks on Fett - and the various different sizes of Cosplayers out there.
;)

I'm still waiting for my Boba Maker Collar/Back Armor to see what size those Square Studs are so I can judge what size of Grommet(s) I should get.

Thanks,
-Iron
 
The Army surplus store in my area had dozens of those for around $10 each. That’s what I used to make mine. Here is a pretty good tutorial I found years ago.
 

Attachments

  • Return of the Jedi Cape Tutorial.pdf
    301.4 KB · Views: 240
The Army surplus store in my area had dozens of those for around $10 each. That’s what I used to make mine. Here is a pretty good tutorial I found years ago.

ShortFuse - $10.00 eh? Nice, now I feel like I overpaid! hahaha! And yep, I seen that .pdf too, a great tutorial for sure! A couple points that could use revision on in my opinion.
1) Doesn't make mention of the two other Grommets like the 501st pic - for that piece of plastic. (Only for Level II Cert)
2) The picture show a bit too much damage (holes) in it.
Other than that I thought it was a great tutorial.

Fett Cape.jpg


Also, has anyone used a lighter to achieve the burn and scoring marks as opposed to black paint (air brushing)? A bit more risky for sure.

Thanks,
-Iron
 
That tutorial is from several years ago and is not definitive. It serves as a good starting point for orientation, sizing, etc. Also, that $10 was from several years ago when I did mine. Not sure what the price would be now.
 
ShortFuse - $10.00 eh? Nice, now I feel like I overpaid! hahaha! And yep, I seen that .pdf too, a great tutorial for sure! A couple points that could use revision on in my opinion.
1) Doesn't make mention of the two other Grommets like the 501st pic - for that piece of plastic. (Only for Level II Cert)
2) The picture show a bit too much damage (holes) in it.
Other than that I thought it was a great tutorial.

View attachment 188513

Also, has anyone used a lighter to achieve the burn and scoring marks as opposed to black paint (air brushing)? A bit more risky for sure.

Thanks,
-Iron

There is no definitive answer on how much or how little damage there was on the ROTJ cape. Just because it’s a certain way on the CRL doesn’t mean the CRL is right in every way.

This ROTJ Hero CRL is far more accurate than the one that one that was there before. BUT the creator has even modified things since it was first uploaded.

roger12RAMJET - Oh I totally agree. For me anyways (and this is just my opinion), is that the 501st seems to be the leading authority on all things Star Wars costume related - and how a lot of folks here base their costumes on. However, I know there are quite a many different variations and iterations of not only the version of costume, but the pieces that go along with it. But you're absolutely right, who knows, in 5 years the version of the cape could change completely! It's clear to me that we may never have a truly "Finalized" version of the costume or it's pieces!

So if I came off as being negative - just know, that wasn't the intent. I wasn't knocking that "ROTJ Cape Document" one bit! In fact I applaud the creator of that document (anyone know who the author is?) - as everyone else on this forum, this person was trying to help us all out in our quest for a better ROTJ Boba Fett Cape! (y) I was just trying to lend some insight and constructive criticism and opinion(s) - if they are unwanted or unwarranted, by all means, please let me know.

Thanks,
-Iron
 
This thread is more than 3 years old.

Your message may be considered spam for the following reasons:

  1. This thread hasn't been active in some time. A new post in this thread might not contribute constructively to this discussion after so long.
If you wish to reply despite these issues, check the box below before replying.
Be aware that malicious compliance may result in more severe penalties.
Back
Top