General DrToothache's ESB Boba Fett

Those leg pouches are comically huge, it covers your entire thigh area, need to fix that
Yes they are big - I did mention that earlier in the thread. Thanks for pointing it out anyways though. Wasn’t about to skip a con over it and had to focus on my Jango for this one.
 
Last edited:
Got the suit placed back on the mannequin finally after the con. Took some of the foam out of my overstuffed thigh pouches lol.

Before:
before.jpg


After:
after.jpg


Also finishing up a more accurate girth belt to replace the one that is way too red. Going to add a little more red before attaching the black elastic straps. Here they are side-by-side:

new.jpg


After the girth belt, next up is repainting the gauntlets as the current paint job is several years old, is chipping, and isn't accurate.
 
The weathering on the suit looks so good.
What dirty down colors did you use?
I have mid brown and nicotine on the way
Would the soot black be good or should I use the regular black? Any recommendations for powders brands?
 
The weathering on the suit looks so good.
What dirty down colors did you use?
I have mid brown and nicotine on the way
Would the soot black be good or should I use the regular black? Any recommendations for powders brands?
Thank you very much man, I appreciate the feedback.

For the flight suit, I used a little soot black, and mostly regular black around the ankles. I followed this up with khaki and mid-brown (unfortunately nicotine is not available in my area so I used khaki instead but nicotine is more accurate).

Then a little mid brown on the thigh pouches, and khaki for the upper legs as well as the arms. Just a little though, the flightsuit is not as weathered as you go up from the thigh pouches.

A little goes a long way but if you overdo it you can always go rinse your flight suit in the bathtub to get rid of excess.

Do it in small bits and then let the suit dry, look at it in both outdoor and indoor lighting.

For me, I only used dirty down as a base. I added more intricate weathering with watered down acrylic paint and then finally powders. Powders are great, and look the most natural in my opinion - but they do not last forever (need to be reapplied).
 
Thank you so much for your quick response! I am getting a suit made from arkady and I am getting all the weathering supplies this week. I love your use of the powders. Did you do a slight base all over the suit or just choose specific areas? Also what did you weather the flak vest with ? Looks so good
 
Thank you so much for your quick response! I am getting a suit made from arkady and I am getting all the weathering supplies this week. I love your use of the powders. Did you do a slight base all over the suit or just choose specific areas? Also what did you weather the flak vest with ? Looks so good
Not exactly all over the suit, but in general areas. More specific with the soot black and black though - those tend to lay on dark so hit the ankles and rub it upwards into the shins. If you look back in the thread with my first flight suit I overdid it a bit, had to wash the shins in the bath tub to tone it down.

When you apply the dirty down, keep some wet rags nearby. When you spray the ankles with soot black for instance, start scrubbing it with the wet rag to "rub it in". It will make it look more natural and give you less "hot spots" where the dirty down laid heavy.

The khaki I tried to focus on edges of the upper sleeves, back of the arms on the main sleeves, and around the legs/thighs/knees/back. The khaki is great because it doesn't lay on heavy and will cover larger areas without standing out too much (I would imagine the nicotine performs similarly). I also rubbed this in with a separate wet rag.

For the flak vest I used just a little bit of khaki and gray. I went really light on the flak vest.

Remember, you can always touch spots up with powders/acrylics. I didn't try to achieve the final result with dirty down, just really light coats for a base.

With my new flight suit I actually need to go over it once more. I went a little too light in certain areas such as the thigh pouches. I think that my old flightsuit was more accurate in those areas. I will be updating this thread soon, I took a break to finish my Jango build but it just got approved so I'll be giving Boba some attention again.
 
Last edited:
Finally, some updates!

First up, I received my Pulce 40 blaster from Andy Meyers - the quality on this thing is amazing! Feels like a legit blaster while still remaining to be pretty light. Has real metal parts which makes a big difference. Below you can see it side-by-side with the 3D print one that I have been using. Honestly the 3D printed one was pretty decent but Andy's is a work of art. I might remove the metal rod below the barrel since I believe that it was missing on the actual prop, but I might just keep it there.
485084097_24026292660294354_6025582685314890275_n.jpg
482071027_960291902967690_848764363848849479_n.jpg
483996299_961981836132797_5741687128615571989_n.jpg
485083841_1641639723146736_2639791083481797048_n.jpg


Additionally, I finally got around to painting the collar studs and the red / black rings on the knee darts. Small changes, but important. I went with the 3 white studs (one red top) and 1 gray stud setup.

484135173_3999932733620455_5684849081180223948_n.jpg
484214695_2595719947300488_3647690683449225092_n.jpg
484640821_1370319784416425_1519055262682831396_n.jpg
484645880_978370881142648_7124970181403575172_n.jpg
484868765_998549705067088_9024341845055122097_n.jpg


484227615_9240942892607476_914334158549913989_n.jpg


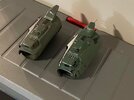
Next up will be touching up the jetpack paint since the "mannequin incident" (mugshot of the wanted criminal below).

485084867_1175401534076189_1042156273602749611_n.jpg
 
Last edited:
Another update today - received my upgraded gauntlets by MinuteFett! I have been using an old set of RKD gauntlets and had planned on eventually repainting them...but ultimately decided to upgrade. The biggest difference between the two sets is the size. MF's are longer and more narrow compared to the bulkier RKD gauntlets. The other major difference is the flamethrower dimensions and design on the left gauntlet.

485614697_615784728161852_3132034670395453603_n.jpg

485084259_1331633028074405_4389220035602032781_n.jpg


485084124_1161835878488793_5049086019143865057_n.jpg
485084199_2555281608004615_8508138961364367682_n.jpg

485088094_1036450741709902_2182945457426550588_n.jpg

485084142_661019959912010_2371902127726954888_n.jpg

485087493_1194857845516701_5581930843514089391_n.jpg

485087728_694663259909425_3398525758983711023_n.jpg
485087512_645171201591925_438451264226588714_n.jpg
485087527_1653335788719022_6136936718289428822_n.jpg
484785137_1022958659699792_3545514152309563324_n.jpg
485447813_1357566202235684_91241958393234392_n.jpg

484941250_1162402778443019_2314405072662807596_n.jpg
484797737_1022825393071887_7976828911451542034_n.jpg
485084091_635115335994558_9096824725130893767_n.jpg


485084479_1884997008969649_3333392040332313178_n.jpg

485994361_616154821240083_2968603986897149304_n.jpg

485087878_1370107447218094_3334110545369811111_n.jpg
 

Attachments

  • 485299947_1376396206849454_2477316887807869316_n.jpg
    485299947_1376396206849454_2477316887807869316_n.jpg
    68.6 KB · Views: 27
  • 485083687_1681067155817586_2700840502013907641_n.jpg
    485083687_1681067155817586_2700840502013907641_n.jpg
    187.4 KB · Views: 27
Last edited:
Zazzy new gauntlets. Crazy how far gauntlets, armor, and jetpacks have come!
Thanks man! It is really crazy. I remember planning my parts list years ago before I actually started on the build. Then when I started there were newer and better parts....and then when I was close to finishing more accurate stuff was released by other vendors. It's always changing around here! haha

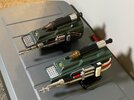
So glad I sold my RKD armor for minutes stuff I think they look so much better!!
Me too! It always bothered me how bulky my RKD gauntlets were compared to reference photo's....but I didn't realize how much different they were until I received MF's gauntlets. Extremely accurate gauntlets and armor.
 
Finally a troop with my Boba! (no offense Jango). Technically not approved yet but I wanted to test him out so I switched from Jango to Boba on the last day of Steel City Con. The new gauntlets are so much better than my old RKD's...

Wearing the suit again helped remind me of some last minute things to do, and also how rusty I am at putting this one on. For one, I NEED to sew the neck seal to the flight suit. That thing spins easily, moving the closure to the side when it should stay centered. It also is required by the CRL, so I need to get on that.

Other planned changes:
  • Alter my flak vest so that it is slightly shorter. I have been folding the bottom of it up half of an inch and ironing the fold so that it stays there, but it started undoing itself after wearing it a few hours, making the bottom of the flak vest look odd.
  • Cape needs shortened still.
  • I need to attach a longer visor piece to the anti-security blade. As it currently is, it falls completely into the shin pocket so it is not visible.

Other than that, I still need to touch up the jetpack after the mannequin incident, and add the 2 decals. Also, I didn't realize that my helper placed my wookie scalps under the collar armor rather than closer to the shoulder armor...

But....boy was it fun to wear Boba again!

489008370_1630237790963180_3711876905682158179_n (1).jpg

482587888_1201148701673100_8709948691158970282_n.jpg
80d9fd00-a77e-4852-b6e3-bfaf235a0d8f.jpeg
482948152_1383644323056628_680299348846774620_n.jpg
483608608_1240508527499318_340069225861183434_n.jpg
488936938_1360941095116517_2380634030767591515_n.jpg
489610798_548659891161781_1867120544802670210_n.jpg

488517200_1025502209454132_9062092381582519650_n.jpg
488527283_1428876898483748_4522475637401037184_n.jpg
488542322_522428317356685_6436774625953970039_n.jpg
488584656_698891969326336_3828189446098947041_n (1).jpg
488595285_1694270731185288_3536190497837174525_n.jpg
488865641_1839743440214591_2006159736659028856_n.jpg
489597220_651262547832318_7810510250965854243_n.jpg
 
**** dude your weathering looks perfect!!!! I need tips!!!
Thank you man! It's the part that I enjoy doing the most actually. Just added the weathering/bunny ears to the helmet tonight.

For the soft parts I am a huge fan of powders! They are so much easier to apply (I use makeup pads and brushes).

I first applied light coats of dirty down (black, brown, yellow in specific areas). I then use acrylic paints with a brush to accentuate lines/seams or darker spots as seen in the reference photos. For the acrylic paints I mostly used the dry-brushing technique.

The last step that I do is apply powders. I just dab the makeup pad to apply it and scrub it in a little bit, especially around the shins. Powder's aren't permanent, so it is very forgiving. One downside could be that they need reapplied over time, but they do leave a slight permanent stain.
 
Last edited:
Update on the helmet - after the con I realized that my helmet is way too clean. Just added some black/brown weathering to the cheeks, around the dent and added the "bunny ears" above the dent.

Before and after:
488932642_730512229305879_360693246099391936_n.jpg

489879818_621255614279294_6263059270416069579_n.jpg

488851461_1341188710422527_3424675948651218163_n.jpg
488491141_638712549047581_4157458455404500487_n.jpg
489610798_9523140991111336_6186685164690932371_n.jpg


Going to work on this some more tomorrow.
 
Last edited:

Your message may be considered spam for the following reasons:

If you wish to reply despite these issues, check the box below before replying.
Be aware that malicious compliance may result in more severe penalties.
Back
Top