Catching up with some updates here.
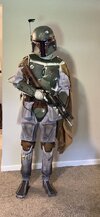
Wookie Braids - I am finally happy with my wookie braids! At least I think that I am. I did a lot of work on these, and went back and forth on what braids to use. I ended up using Katarra braids but cut the frizzy ends off and added braid ends from the MxBolla ones (this was necessary to get the proper curl on the gray braid). I then added my own wraps using red, blue and black embroidery thread. For the connection point of all of the braids - I first used twist ties to hold them in place. I then used black embroidery thread to tighten them together. Once I was done with that I removed the twist ties and wrapped them with the loose end of an extra black braid that I had. It's hard to see exactly how the braids are all connected together in reference pictures, but I used what was available as well at the 501st reference image.
In the reference images it appears that loose braid ends were wrapped around the connection point. You can see the thicker wrap in the first photo before filming. Then in the screen cap from ESB (2nd image) you can see the loose end is on top and no longer tightly wrapped. (at least this is what I
think that I am seeing here..)
The finished braids:
They aren't perfect, but after 3 iterations and too many hours of messing with these, this is what I am going with (at least for now lol).
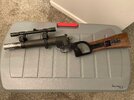
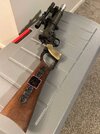
I also received my EE-3 from Andy Meyers (both ROTJ and ESB versions). I now have 5 EE3's.....I don't know how this happened.
Anyways, this thing is phenominal! The only thing I changed was I dry brushed some bronze onto the grip as it was silver when it arrived. Not a big deal and an easy fix.
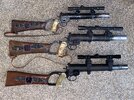
Here are all 4 EE-3 blasters, ordered from time of construction. The first 3 were put together / painted by me. The bottom one is the new blaster from Andy.
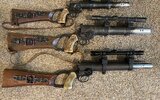
Andy Meyers (top) and my Sidewinder/mixed parts build (bottom):
I also received the new MOW boots from the most recent run. I originally bought these as a backup pair / ROTJ build boots. I know that there is a lot of disappointment in the air about these boots. I agree that the proportions are off and it would've been nice if they arrived white or light gray, but I decided to work on them to see how they look after painting/weathering.
I get it, they aren't perfect, but after working on them they really are not bad. I will definitely be using my 2020 MOW boots until they are worn beyond repair but these make a decent enough boot, especially when compared to many of the "boba boots" that are out there, even if they aren't up to usual standards. They look worse without the flightsuit, as the ankles are very wide (the ankle ties help pull them in). The main issues when wearing them is how wide and tall they are...
New vs Old:
After painting / starting weathering:
New vs old:
I think that is all of the updates for now! I have some more updated parts arriving this week, including my commissioned MF helmet!
")
")
 . 3 days and 4 dye baths for a measly knee strap. The problem was that I didn't dye my ESB flightsuit so I wasn't sure the exact shade/dye that I needed. I dyed my cod/kidney strap at the same time - but purposely left it a little longer in the darker dye baths.