Din Djarin Helmet and Rebound 25 Mold

darth wombo

Hunter
Hello,

It has been a very long time since I've posted here and a similarly long time since I've built anything Mandalorian related, but ever since the new series was announced, I've had that itch. I'm older now and I like to think I have a higher attention to detail and standard for quality. I wont ramble on. Here are pictures of my Mando helmet build. It took me several weeks to build and mold and I finally have some that are close to done. Let me know what you think and let me know if you have any questions! Thanks.


Started with WOF's paper template, (Same as I did in the old days lol).
File_000.jpeg

File_002.jpeg
File_003.jpeg


After fiber glassing and an initial pass of bondo. I forgot to take pictures in-between, but I actually fiberglassed the bucket without the cheek cutouts and then modified the WOF pattern, which is based on Boba (I think), and added them in.
File_005.jpeg
File_007.jpeg


More Bondo...
File_010.jpeg


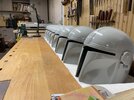
After an initial coat of primer to reset and see what areas needed filling/sanding.
File_016.jpeg


More sanding and Bondo. and pizza hut.
File_019.jpeg


I wasn't thrilled with how the cheeks were turning out. They we're slightly different than the reference photos I was using from the show...
File_020.jpeg


Added some face details with a thin sheet of card board and then resined over for rigidity.
File_024.jpeg


Decided to make some big changes to the structure of the face to more accurately reflect Din's helmet.
File_030.jpeg
File_031.jpeg
File_032.jpeg
File_033.jpeg
File_035.jpeg
File_036.jpeg


More changes...
File_038.jpeg


More primer
File_041.jpeg


More sanding
File_044.jpeg


Decided the dome needed a lot more attention.
File_045.jpeg


More primer and started to use glazing putty. Amazing stuff.
File_046.jpeg
File_048.jpeg


Marking flaws.
File_050.jpeg
File_051.jpeg


More bondo... I lost count of the alternating layers of bondo/primer/glazing putty...
File_053.jpeg
File_058.jpeg
File_061.jpeg
File_062.jpeg
File_063.jpeg
File_065.jpeg


I'll post more with continued detail.
 
Started work on the ear caps in these photos. Made them out of MDF. Did the primary shaping with a bandsaw and belt sander, then coated them in CA glue for rigidity and durability. These pieces were all built mostly by eye, using some of WOFs templates for basic dimensions, but obviously heavily modified.
File_067.jpeg
File_068.jpeg


Back vent:
File_071.jpeg
File_072.jpeg
File_074.jpeg


Cut with a dremel.
File_076.jpeg
File_078.jpeg
File_083.jpeg
File_085.jpeg


Forgot to get photos of the build process for these guys... sorry.
File_086.jpeg
File_087.jpeg


Onto the mohawk...
File_089.jpeg
File_091.jpeg


Laminated thin layers of card board with CA glue for rigidity and adhesion.
File_093.jpeg


More bondo... And I used a fine toothed hand saw to get the grooves.
File_096.jpeg


Decided the best way for me to attach the upper part of the ear cap would be to sand down the base helmet perfectly flat where they meet so that they would line up nicely.
File_097.jpeg
File_099.jpeg


After some more primer and countless hours of sanding, she's starting to look like a mando helmet...
File_101.jpeg


Stay tuned for more.
 
At this point, I was pretty happy with the helmet overall. There were minor things that could have been better, and even now, I see things that bug me, but I found that I came to a point of diminishing return, where the more work I did, the less it mattered overall, and the more frustrated I became... So I moved onto molding, which was my focus from the start. I opted to use Rebound-25 as I have for small projects in the past. I've also used DragonSkin, but thought that rebound may be a better fit for this helmet. Here we go...

File_124.jpeg
File_125.jpeg
File_126.jpeg
File_128.jpeg


So it begins...
File_129.jpeg
File_130.jpeg
File_132.jpeg
File_133.jpeg


Started to add a thickening agent to fill in deep voids.
File_135.jpeg
File_136.jpeg
File_139.jpeg


Added keys for the mould jacket
File_143.jpeg
File_148.jpeg


Opted for a fiberglass 2-part mother mold because it's inexpensive and also I've done it before, so it was familiar for me.
File_149.jpeg
File_150.jpeg
File_151.jpeg


Original, first cast, second cast. Used Smooth cast 300 for these first few, but then moved to 65d after talking to the folks at smooth on about my project.
File_153.jpeg


Scoring the inside of the earcaps and helmet for better adhesion via two part five minute apoxy.
File_154.jpeg
File_155.jpeg
File_156.jpeg


More photos to come on the painting process.
 
My initial thought was that I could get away with the graphite method, which looked great without a clear coat, but as you will see, the 2k clear I eventually used really darkened the finish and I wasn't really into it... It still looked good, it just wasn't looking like Beskar from the show.


High gloss grey, followed by graphite. Looks kinda cool. (I ended up not being happy with this, plus the graphite gets all over everything, so I rubbed it all off with acetone). Hours wasted...
File_157.jpeg


Casting!
File_158.jpeg


Sanding... And more sanding... and more. sanding.
File_161.jpeg
File_163.jpeg


Gluing on ear caps with five minute epoxy.
File_165.jpeg


I also have to do bondo work on each one to fix up the cut seam from the mold. I was really hoping to make this a glove mold with no seam, but in the end, I had to cut it because my undercut was just too deep at the base of the helmet. Great for casting, not so great for demolding.
File_166.jpeg
File_170.jpeg
File_171.jpeg


More graphite and clear coat action...
File_172.jpeg


The 2k clear is actually pretty amazing stuff, just crazy expensive and you better be ready to use it all...
File_174.jpeg


Oh, haaaiiii.
File_178.jpeg


Got the visor in and trimmed the inside with some fleece. Trimming the inside has been the worst, most frustrating part of this whole project by far...
File_181.jpeg
File_183.jpeg
File_186.jpeg
File_188.jpeg


Okay, more to come.
 

Attachments

  • File_168.jpeg
    File_168.jpeg
    2.1 MB · Views: 188
One word. One very expensive word.

Alumaluster.

I broke down and decided this was the best way to get the Beskar look.

Gloss black, cured for 48 hours... here we go.
File_196.jpeg


oh look, it's $5 worth of paint.... :'''(
File_197.jpeg


Okay, but the difference is pretty crazy... Alumaluster on the left, graphite and 2k on the right.
File_200.jpeg
File_201.jpeg
File_202.jpeg
File_205.jpeg


And here's where we are today. Did a run of 8 casts, ruined 2 by terrible accidents (wind blew one off a high place onto concrete and the other was also dropped and cracked), 2 have Alumaluster with a black gloss under coat, one of which has also been lightly weathered with some acrylics (pictured below). 1 has Alumaluster, but it's over the graphite and 2k and I'm not a huge fan of the look. The rest still need black gloss, alumaluster, weathering, visor, and interior trim.
File_207.jpeg
File_208.jpeg


Thanks for checking out my build thread!

I may post more pictures in the future as I complete more helmets.

Cheers!
 
darth wombo so does the alumaluster need a top coat?
Really appreciate the perspective you're providing on the different paints and applications.
Hi there, I have not put a top coat on, although I played around with the idea of doing a 2k clear, just to add some durability. My fear is that it will bring down a lot of the shine that makes alumaluster so nice like it did when I sprayed it over the graphite. I will say that it’s fairly durable as is. I did find out while weathering that you do have to be careful about how hard you rub it though, as you can rub away the alumaluster if you apply too much pressure. If I do end up experimenting with a top coat, I’ll post the results here.
 
This thread is more than 2 years old.

Your message may be considered spam for the following reasons:

  1. This thread hasn't been active in some time. A new post in this thread might not contribute constructively to this discussion after so long.
If you wish to reply despite these issues, check the box below before replying.
Be aware that malicious compliance may result in more severe penalties.
Back
Top