Dan’s Mandalorian Build

Picked up WarMachine’s IB-94 Blaster kit...I gotta say...I LOVE this replica...still lots of work and weathering to do, plus oiling the grips, but MAN, this thing is beautiful!! I’m still playing with different looks for the steel parts. Some are fire blued and some aren’t. I’ve found that there’s so many different looks to the pistol depending on what chapter/scene. I’m sure they had several different props - all with different levels of visible wear. I’d be interested to know if anyone thinks they’ve seen definitive source material for the pistol.

5C58A450-FED3-4C77-A1A9-8591E62F9A6F.jpeg

0B38C42D-3D2F-494A-B8E9-A81035832875.jpeg
 
Looking good! What are you using to weather it?
Thanks! Some black and brown washes to really layer the grime in certain areas - then just handle with and without gloves to wear off the grime naturally. Gonna use brass black on the brass pieces next. Otherwise. I just used the edge of a razor to expose the aluminum on the high edges.
 
Wanted to post a quick update...been really taking my time on this one...right now I’m working on the grips - walnut stain and first coat of tru oil.

Also working on the “flash hider” (I think it’s called) - it came as a mil piece of aluminum with lots of mil lines I’m assuming from being on a lathe. I didn’t like how visible the lines were so I decided to sand them down...while I was at it, I just went for it and wet sanded until I could polish it to a shine. Pretty happy with the result. The first 2 pics are what it looked like before...as I tried to weather it with a black burn, it was really bringing out the mil lines.

5E1ABC47-175E-4EEA-903D-F4CE7D711694.jpeg

3E7D48A4-10B9-41CD-94E6-FA006877D8F8.jpeg

415E67FE-427A-4508-8379-D0F569E8DFAF.jpeg

84323EC1-898E-40AA-9FDE-EAF8DA2E4CEF.jpeg

C3FE665C-9636-4857-A49D-7F3409A80D67.jpeg
 
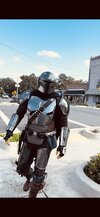
It's been quite a while since I've posted on my build, so as I get ready for 501st submittal, I figured I'd update this thread and start posting some of the progress and final touches.

Until now, suiting up has been extremely laborious because I was only using gorilla tape to attach it all lol - it actually worked really well for two Halloweens!

Time to make everything easy to attach and practical, so as I add all of my attachments, I'll post my progress in this thread with pics. I've done exhaustive research on magnets, Velcro, snaps, etc. and I believe it all comes down to user preference, (and how secure you want your expensive armor to be, lol)

A HUGE thanks to this forum and those who have posted their progress and ideas throughout the years - without whom I would have ZERO idea as to how to do any of this! THANK YOU!

First off - here is an updated list of where I've attained all of my pieces:

Helmet - Nomad Props
Chest Armor - Nomad Props
Back Armor - Nomad Props
Shoulder Armor - Nomad Props
L/R Gauntlets - Nomad Props
Hand Plates - Nomad Props
Kidney Armor - Nomad Props
Tasset Armor - Nomad Props (original) Redman (New-on order)
L/R Thigh Armor (S1&S2) - Nomad Props
Right Leg Greave - Nomad Props

Left Leg Greave - Steven Walker (Original) Deb Di Meo (New - on order)
Cape - Steven Walker (Original) Deb Di Meo (New - on order)
Flak Vest - Steven Walker (Original) Deb Di Meo (New - on order)
Flight Suit - Steven Walker
Neck Seal - Steven Walker
Cummerbund - Steven Walker
Abdominal Tasset - Steven Walker

Belt, Bandolier & Holster - Delta Leatherworks

All metal pieces & ammo - JJ Industries

Gloves - Crow Props
Boots - Crow Props

Grav Charges - JJ Industries
Vibro Knife - Nomad Props
Amban Phase Pulse Rifle - Nomad Props
Blastech IB-94 Blaster - Warmachine
Beskar Spear - JJ Industries
Rising Phoenix Jetpack (w/sound smoke & lights) - Nomad Props
Jetpack Harness - Christian Cucblack (on order)

9C18C50E-0922-4119-995E-19A43A5E5824.jpeg
 
Last edited:
I’m calling this one good…finished the Warmachine blaster and I honestly couldn’t be happier. I know there are several used in production, with minor differences, so I just kinda picked what I wanted mine to look like after pouring over screenshots, etc.

440B8145-7FFF-4B24-9B3B-F1AA69EC2B12.jpeg

4675CEF0-417A-4B88-AB4D-52B72F2C36D1.jpeg
 
I decided to tackle the attachment for the gauntlets first because frankly it was the most intimidating for me. I did tons of research and decided to follow the technique that Builder shared (pictured below) Gauntlet attachment methods
49C89000-07DE-474A-84EC-FB5D3665AD5B.png


The gauntlets I received were basically just two halves with no connection built in.

First, I prepped the areas by sanding with a course grit to really scuff up the magnet/epoxy contact points. Next, I lined up my magnets and separated them with a playing card - this helped to make sure that the magnets were exactly aligned with the closure gap, because the playing card slightly slides into the gap.

Next I epoxied one side, let it set for about 30 minutes, removed the playing cards, and let it cure over night. I repeated this process for the other side as well.

Both gauntlets are done, and I’m happy to report that they clamshell shut PERFECTLY.

These are the magnets I went with: 3/4 x 1/4 x 1/4 Inch Neodymium Rare Earth Bar Magnets N42 (18 Pack)

Next, I’ll be adding the hinge straps.
221FAC3F-281B-4AF7-A46A-1BC10CF2F59C.jpeg

BAC91F3C-FBC0-42D7-8D2E-06A8EC1AEA09.jpeg

348E96F7-9F40-4C5E-99C1-2B734CF112EC.jpeg
 
Last edited:
Added the “hinge” straps. These are 2.5” stretch nylon strips that serve to make this more of a clamshell design. Without the straps, the magnets would hold together just fine - they’re super strong - but being that I spent a ridiculous amount of money on this suit, I’d rather have the redundancy. Additionally, it’s nice to have the gauntlet be essentially one piece now.

After trying to punch the hole in the strap with the grommet pliers, I decided to use the trusty ol’ hot nail method to poke my grommet holes - this provided a nice clean, cauterized hole for the grommets to poke through.

F2C8A8B9-C41C-431A-BFCD-FBE1062A8FDB.jpeg

36A63C70-549E-43E3-8FD4-7D12943A3051.jpeg


I’ve seen some people use epoxy directly on the strip to secure it to the gauntlet - I opted to epoxy low-profile Chicago screws and then just popped the strips on and secured. I did this both to keep the look clean, and to ensure that if one of the straps ever broke, it wouldn’t be a messy repair.

6581E523-95D7-4872-A560-349E17D671D4.jpeg

ECFCF2CF-4292-4D68-A286-99729A0901DF.jpeg


VERY happy with the way these turned out. Just enough elastic to hold them in place when opened - also in the (unlikely) event magnets break or fail. Next step: adding the straps that will hold the gauntlet to my forearm, add a little foam padding - then these will be ready for easy suit-up!
 
Last edited:
Added the first strap - decided to epoxy an extra strap ring on the side that will be tugged on most. Once it cured, I did a test to see how well it held just on my bare forearm.
7FA092BE-E299-4A17-985A-A6D12E39F580.jpeg

046E5D67-341F-4CCE-8430-BF056B6CB1B9.jpeg

C7ACC031-BCDE-4FEC-9D62-8E3DC9C4F9E0.jpeg

29CA8424-4AF8-4A3E-8A6B-FE7D12DF1212.jpeg

432A7F49-7B25-496A-9D2E-4B684506C378.jpeg

8815D784-9B21-45FE-8D28-A924E6585CA1.jpeg


As you can see, it held really snug - even on my skinny forearm!

Decided to add a second strap at the wrist for extra stabilization. (Straps are 15” and 12” long)

This thing is stable, clamshells perfectly, and is 100% secure. These magnets are STRONG. Again, even if the magnets fail, the straps and hinges will keep it from falling off and getting damaged. I’ll repeat this process for the other gauntlet, and then these will be good to go!

5C751564-612C-4046-8B97-E379B77C294F.jpeg

00381100-DDF8-46F9-B0F4-30089DC7D4FB.jpeg

6E709DC4-5D67-4BAC-8A64-ACCD5FC13986.jpeg
 
Very clever attachment method Dan! The extra safety redundancy was a wise addition. It's a relief to know I am not the only one dealing with the plight of slender forearms lol.
 
Very clever attachment method Dan! The extra safety redundancy was a wise addition. It's a relief to know I am not the only one dealing with the plight of slender forearms lol.
Thanks Andy! Like I said - all credit goes to those who pioneered these methods!

The slender forearm thing is no joke, lol. I’m 6’4”, so Sean had to scale up some of the Great Ape files so the suit would look proportionate to my frame. Unfortunately, this made for some larger gauntlets. It was very difficult keeping them in place before - but not now!
 
Finally got around to some finishing touches on my build - getting ready for several Halloween events

Took the plunge and weathered my cape a bit…still need to iron the sides that are curling up and add some dirt, but all in all I like how it turned out - used some old screws to rip the bottom up and then a heat gun to “melt” the tears a bit. Maybe it’s more weathering than most, but I’m not a fan of the little scissor snips I see on most capes - looks unnatural IMHO

IMG_0717.jpeg
 
6’4”!! Dang! Well the scaling sure did work!! Looks wicked!

Really glad to hear this! I’m 6’3” and have been concerned about being too tall for Din, but you pulled it off nicely!

Sean
Thank you gentlemen! I will say that you definitely need to size up the armor to be proportioned correctly - made all the difference. People are always commenting on how massive I look as Din, but in a good way lol
 
This thread is more than 3 months old.

Your message may be considered spam for the following reasons:

  1. This thread hasn't been active in some time. A new post in this thread might not contribute constructively to this discussion after so long.
If you wish to reply despite these issues, check the box below before replying.
Be aware that malicious compliance may result in more severe penalties.
Back
Top