You are using an out of date browser. It may not display this or other websites correctly.
You should upgrade or use an alternative browser.
You should upgrade or use an alternative browser.
BoochmaN's ROTJ WIP
- Thread starter Boochman
- Start date
")
Boochman
Active Hunter
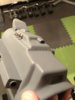
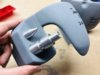
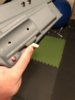
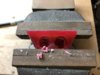
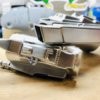
Tonight I did some prep work on the right gauntlet. Using the templates created by RafalFett I was able to mark our some dart locations.
Roughly evenly spaced, any thoughts before I drill these out!?!
I also used some tiny point files to sand the RF topper so my lights fit better!
Roughly evenly spaced, any thoughts before I drill these out!?!
I also used some tiny point files to sand the RF topper so my lights fit better!
Attachments

Last edited:
Boochman
Active Hunter
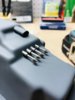
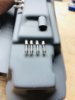
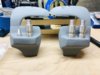
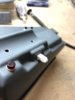
Didn’t have a lot of time today for Boba, but I managed to drill the gauntlet darts and put them in temporarily (they’re just taped in place on the inside).
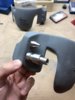
Also prepped one of the knees. Fettpride didn’t include the knee launchers OR the handy resin blocks that sit behind the knee and holds the launchers. I have the machined ones from MCR though, and picked up the resin blocks from Wastedfett.
I will adjust the depth of the darts based on the templates.
Attachments
-
 5BDE602C-BA1F-4337-B9B6-8D20DF338AB5.jpeg401.2 KB · Views: 444
 -
 BE6816C6-1FCB-44A6-84A7-A2DCFF027DCA.jpeg365 KB · Views: 445
 -
 4C68744A-E459-4426-917B-F7D6C634EB55.jpeg426.6 KB · Views: 437
 -
 7C7C1D52-FC05-4FAB-82BD-93219CA40E49.jpeg423.1 KB · Views: 468
 -
 FE3A994C-ED22-4B73-8A17-7D694E4CC00E.jpeg512.4 KB · Views: 434
 -
 194748B3-898C-4437-949E-7575A909019C.jpeg424.9 KB · Views: 431
 -
 405554DE-0960-4044-80D4-671C08F1B64F.jpeg444.6 KB · Views: 454
Last edited:
Vader41607
New Hunter
Love the flame thrower lights, I wish I did that with mine. Where does the battery pack get stored?
Boochman
Active Hunter
Hey, thanks! Not really a battery “pack” for the lights. They are wired to a small watch style battery. Haven’t figured out a long term solution on storage, since I’ll need to access it to replace it. Thought about cutting access locations in the foam that I’ll be filling the gauntlets with (so they sit snug on my forearms).Love the flame thrower lights, I wish I did that with mine. Where does the battery pack get stored?
Boochman
Active Hunter
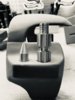
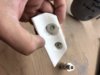
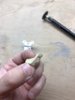
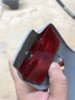
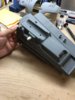
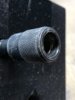
After referring to the images in the template thread by RafalFett , I marked the knee launchers and “recessed” them slightly in the resin knee blocks.
I then countersunk a bolt in the backside of the block. Theoretically, I should be able to secure the block to the knee armor, then screw the launchers in from the front. I hesitate gluing the bolts, only cause I want there to be some play when attaching the launchers...
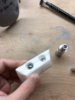
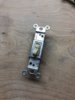
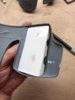
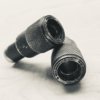
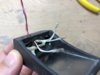
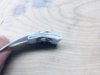
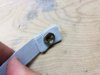
Lastly, I cut up a light switch. I’m happy to find that they are a solid chunk of plastic. That slide switch on the left gauntlet resembles a light switch to me, that maybe they carved bits away to get their final shape...? So what do you think? Proportionally speaking I think it works (ignore the “angle” of the switch itself)...
I then countersunk a bolt in the backside of the block. Theoretically, I should be able to secure the block to the knee armor, then screw the launchers in from the front. I hesitate gluing the bolts, only cause I want there to be some play when attaching the launchers...
Lastly, I cut up a light switch. I’m happy to find that they are a solid chunk of plastic. That slide switch on the left gauntlet resembles a light switch to me, that maybe they carved bits away to get their final shape...? So what do you think? Proportionally speaking I think it works (ignore the “angle” of the switch itself)...
Attachments
-
 CC521E1D-7E45-4D76-B2CC-D6797E3B3DC6.jpeg843.7 KB · Views: 459
 -
 52654536-122D-4487-B99A-D7E829CD33D7.jpeg810.1 KB · Views: 458
 -
 B3AEFA74-9544-4D83-BAC8-EBCF513956A6.jpeg952.7 KB · Views: 434
 -
 DDEC9FF8-21B7-46A7-9D14-3FE532115D5A.jpeg1.6 MB · Views: 436
 -
 4375026F-99E5-4082-825A-5AC00FE0699C.jpeg858.6 KB · Views: 443
 -
 530EC15F-08D4-4680-B85F-8D9A742D4C18.jpeg1.6 MB · Views: 447
 -
 6B250324-6394-444E-A050-6EAE612A0752.jpeg728.2 KB · Views: 438
 -
 35867DFB-6CFE-4A97-AB8D-4313551FFF22.jpeg1.2 MB · Views: 438
 -
 528CCA5E-453F-4855-AC8C-9153867FAA0B.jpeg976.8 KB · Views: 441
Boochman
Active Hunter
You’re likely going to get to that before me, but my plan is to take the elastic, and do something similar to what DeathProof did, where he folded the elastic on itself to ensure that the heavy duty snaps had something to secure to.
I’ll either do that or fold the elastic around a small piece of polystyrene before installing the snaps...
I’ll either do that or fold the elastic around a small piece of polystyrene before installing the snaps...
evnltr
Hunter
Ok, sounds great. I'll love to see the pics here when you are done. I've been waffling on my holding method a couple of times now. I'm not sure if I do snaps though. I haven't been to DeathProofs thread for a while to see, but I will definitely look it up now when I start getting back to them. Thanks again for the reference.
Boochman
Active Hunter
KNEES:
Worked on wrapping up the knees last night. I wanted to get a lot of prep work out of the way so when the weather is decent, I can start painting them!
My order from Fettpride was missing some odds and ends (kind of finding that out as I go). Knee launchers and the knee inserts were both NOT included. I reached out to Wasted Fett and ordered the knee inserts. The darts are beautiful pieces from MachineCraft
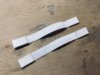
I’d like to add some polystyrene to the top of the knees to reinforce them - any advice on thickness!?! Also, i picked up some 3/4” white elastic and heavy duty snaps evnltr , so I’ll be doing the straps soon too!
Worked on wrapping up the knees last night. I wanted to get a lot of prep work out of the way so when the weather is decent, I can start painting them!
My order from Fettpride was missing some odds and ends (kind of finding that out as I go). Knee launchers and the knee inserts were both NOT included. I reached out to Wasted Fett and ordered the knee inserts. The darts are beautiful pieces from MachineCraft
I’d like to add some polystyrene to the top of the knees to reinforce them - any advice on thickness!?! Also, i picked up some 3/4” white elastic and heavy duty snaps evnltr , so I’ll be doing the straps soon too!
Attachments
Last edited:
Boochman
Active Hunter
GAUNTLETS:
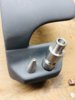
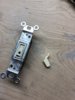
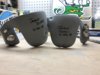
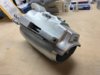
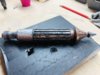
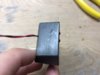
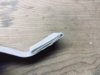
So I did a little more prep work on the gauntlets before paint. Tonight I cut up an OLD light switch. The older style ones are solid, and new ones are hollow. I wanted more meat on the piece to trim and shape it.
It came out great, and I think once painted it won’t look out of place, plus it will be a functional slide switch
Attachments

Last edited:
Boochman
Active Hunter
GAUNTLETS:
More prep work and I finally started to paint this weekend!
First I epoxied a small piece of polystyrene on the left gauntlet in front of the calculator keypad. Then taped off a few odds and ends and hit them with rustoleum silver metallic.
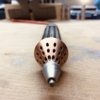
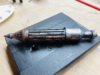
I also painted the rocket: silver, then black, then rub ‘n’ buff on the head of the rocket. Then hit the rocket with steel wool & sandpaper to give it a weathered look. Next step is sponging on black acrylic to match reference images.
Lastly I painted the flamethrower nozzles flat black, then took steel wool, sandpaper, small picks & files to them. I think they look great - I’ll be masking out the gauntlets as the week progresses. Waiting on some fineline masking fluid before I get too far (Fineline Masking Fluid Resist Pen | Hobby Lobby | 253492)
More prep work and I finally started to paint this weekend!
First I epoxied a small piece of polystyrene on the left gauntlet in front of the calculator keypad. Then taped off a few odds and ends and hit them with rustoleum silver metallic.
I also painted the rocket: silver, then black, then rub ‘n’ buff on the head of the rocket. Then hit the rocket with steel wool & sandpaper to give it a weathered look. Next step is sponging on black acrylic to match reference images.
Lastly I painted the flamethrower nozzles flat black, then took steel wool, sandpaper, small picks & files to them. I think they look great - I’ll be masking out the gauntlets as the week progresses. Waiting on some fineline masking fluid before I get too far (Fineline Masking Fluid Resist Pen | Hobby Lobby | 253492)
Attachments
-
 85497B1B-128F-48E2-AF6E-7E1885AD88CA.jpeg2.3 MB · Views: 373
 -
 66F253B7-B33D-48E1-9CC0-848BB9EA4E4E.jpeg463.7 KB · Views: 359
 -
 16364B2C-62BA-452E-B17C-0F5CC64002ED.jpeg589.9 KB · Views: 358
 -
 22577FFC-17CF-4786-B28B-D40419E977B6.jpeg2 MB · Views: 364
 -
 07B6AF89-2FEC-40BE-B1B8-F95898119EAB.jpeg576 KB · Views: 352
 -
 06145863-C77A-470F-BD2D-504E39DBB839.jpeg582.9 KB · Views: 333
 -
 08D73859-4963-4C53-BE7A-AFFAE3ED3626.jpeg856.5 KB · Views: 374
 -
 1994BDF8-8532-45D8-A0EB-E6E5C5B74104.jpeg1.7 MB · Views: 341
 -
 C52A6E0C-EFF0-4472-93A4-4C355DB8224B.jpeg2.6 MB · Views: 352
 -
 CD569988-62EE-476C-9CF9-96E1A803E318.jpeg589.9 KB · Views: 354
Boochman
Active Hunter
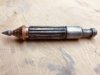
GAUNTLET ROCKET:
I ended up applying black acrylic onto the rocket with a sponge, then sanded it back with steel wool and a razor blade. Not a lot of good reference photos of the rocket, but I’m satisfied with the results!
I ended up applying black acrylic onto the rocket with a sponge, then sanded it back with steel wool and a razor blade. Not a lot of good reference photos of the rocket, but I’m satisfied with the results!
Attachments

Boochman
Active Hunter
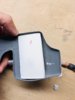
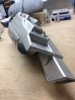
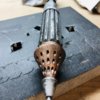
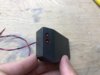
Bounced around a little bit today (still waiting for my fineline masking fluid to arrive). I ended up installing the lights in the rangefinder - they’re a super tight fit.
I then enlarged the mounting hole on the hollow stalk so that it fits snug over the servo shaft - next step is to dry fit in the helmet and trim the shaft to length. I then plan to install a set screw that connects the rangefinder to the shaft!
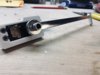
I also had the hot glue out, so I started my knee straps! I used the aforementioned “fold, glue, fold, glue” method that DeathProof used to strengthen the snap mounting location. I then drilled the holes and attached the snaps! I’ll weather the straps at some point too, obviously...is this the info you’re looking for, evnltr ?
I then enlarged the mounting hole on the hollow stalk so that it fits snug over the servo shaft - next step is to dry fit in the helmet and trim the shaft to length. I then plan to install a set screw that connects the rangefinder to the shaft!
I also had the hot glue out, so I started my knee straps! I used the aforementioned “fold, glue, fold, glue” method that DeathProof used to strengthen the snap mounting location. I then drilled the holes and attached the snaps! I’ll weather the straps at some point too, obviously...is this the info you’re looking for, evnltr ?
Attachments
-
 59CCBB58-A438-4C8E-BDB2-6C048E6ADDD3.jpeg2.1 MB · Views: 343
 -
 1E079BF8-0985-4A02-8B74-490F2C0B9196.jpeg394.9 KB · Views: 319
 -
 0D688377-A9D9-4382-8EBF-4F28BA7146EA.jpeg360.3 KB · Views: 327
 -
 A720C60B-34F9-4854-A7C1-4A040A3CF91B.jpeg849 KB · Views: 314
 -
 579371D0-4F4C-43D3-B71F-9A493A77459D.jpeg522.7 KB · Views: 313
 -
 23451A8B-1004-4A73-8C9F-E820B1C3D584.jpeg804.2 KB · Views: 299
 -
 1945BF2C-051D-4711-9888-1E2F3B08800D.jpeg387.6 KB · Views: 319
 -
 2376B7F4-77F4-42D7-A7AA-9A3B2B9EABD2.jpeg582.7 KB · Views: 322
 -
 427155DD-B53F-444C-9740-291CA4248857.jpeg390.8 KB · Views: 309
jetpackman
Hunter
Thank you so much for those detailed pics, I'm literally tackling the strapping on my knees now. Perfect timing! Also what size elastic strap and snaps did you go with? Thanks in advance!Bounced around a little bit today (still waiting for my fineline masking fluid to arrive). I ended up installing the lights in the rangefinder - they’re a super tight fit.
I then enlarged the mounting hole on the hollow stalk so that it fits snug over the servo shaft - next step is to dry fit in the helmet and trim the shaft to length. I then plan to install a set screw that connects the rangefinder to the shaft!
I also had the hot glue out, so I started my knee straps! I used the aforementioned “fold, glue, fold, glue” method that DeathProof used to strengthen the snap mounting location. I then drilled the holes and attached the snaps! I’ll weather the straps at some point too, obviously...is this the info you’re looking for, evnltr ?
Similar threads
- Replies
- 15
- Views
- 475
- Replies
- 21
- Views
- 1,181