Ninjamonkeysd

New Hunter
Hey everyone! So the time has come where I need to actually dust off my box of unpainted armor and get this show on the road as they say.

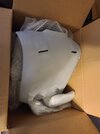
I purchased a set of Boba Maker armor and its been sitting in its box for 2 months as I've been a bit scared of getting started. I've also got my soft armor and electronics already as well. Basically, I have everything but I'm terrified of screwing this up so I haven't started.

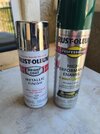
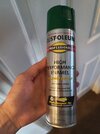
I went out and picked up some rattle cans (pictured) and I guess I'm just gonna have to go for it mistakes be damned. If anyone knows of any good threads that can guide me or if anyone wants to be the Yoda to my Luke, any and all help is appreciated.
 

Attachments

  • 20210727_100239.jpg
    20210727_100239.jpg
    1.9 MB · Views: 166
  • 20210727_103725.jpg
    20210727_103725.jpg
    1.2 MB · Views: 174
Good luck :)! Loads of good threads, you can search for boba paint threads and you’ll definitely find many helpful ones
Thanks! I did a search and thats how I found the paints. Im mainly confused as to the order to go in. Doing a "repainted" set I guess I have it pretty damn easy compared to others. My plan is to hit it with a few coats of silver let that cure and then figure out the texturing part and then mask a small portion of the edges and then hit it with a few coats of green. I also have questions to find the answers to like: do I paint both sides of the armor? whats the best way to secure the plates to my soft armor? So hopefully I can do research when I get a moment.
 
Thanks! I did a search and thats how I found the paints. Im mainly confused as to the order to go in. Doing a "repainted" set I guess I have it pretty damn easy compared to others. My plan is to hit it with a few coats of silver let that cure and then figure out the texturing part and then mask a small portion of the edges and then hit it with a few coats of green. I also have questions to find the answers to like: do I paint both sides of the armor? whats the best way to secure the plates to my soft armor? So hopefully I can do research when I get a moment.
Okay! i would prime everything, then do the texture.. then do the green and do the silver topical! there are so few silver details on the repainted one that i don't think it's worth the work painting the whole thing silver and masking it off. I'm painting my esb helmet now and i masked off all the silver using the stencils just to have the correct placement of the scratches but painted every silver detail by hand afterwards to refine the shapes.

And painting the back of the armor is entirely up to you, i would do it to the shoulder bells maybe paint the underside black because the underside tends to show a little bit. but with the rest of the plates i don't think it's necessary because it won't show.

By ''attaching the plates to my soft armor'' do you mean the flakvest ? i used snaps for mine. but there are plenty of ways and plenty of very useful tutorials on how to attach the plates to the soft parts on youtube for example.
Ok cool! The armor came primed already from boba maker. So I'll start with the texture then and proceed from there. I was talking about the flak vest. I picked one up off of etsy and it looks great. I was just trying to figure out what seems to be the best way of keeping the armor on without it coming off. I'll update this thread when I add the texture.
 
What color green is that? I thought the green was the same as the ROTJ armor. If your going to use spray paint Rust-oleum Hunt Club Green is a good color for that. ( I can be wrong about the repaint armor being the same color as ROTJ. I’m sure others can confirm. )
Also, the silver looks like chrome. Personally, I would do the silver after the texture. You only need to paint it silver in the small areas that it will show and then use some liquid masking on the area you want the silver to show. Any other underlying colors should be painted in a similar fashion before the final green paint. The layered effect better IMO, albeit more labor intensive. The result is the payoff.
Oh good call. So what do you guys think I should use for texture?
 
Hi Ninjamonkeysd ,
I see yours has the "Dent" in the Back Armor, which tells me this is a ROTJ set you've got! I also have full set of Boba Maker ROTJ armor that I got last year and was able to paint it pretty well. In fact I had Boba Maker (Daz) paint up and finish JUST the Chest armor and shoulders and Knees for me and I emulated his work with the other pieces Collar, Back, Kidney, Cod, Gauntlets, Jetpack and the Helmet. For the armor I didn't use any texture. However, like you, never having done any of this before and zero time on an airbrush (Oh yeah, I Air Brushed EVRYTHING!). I set off and found that if I took my time then I actually had a lot of fun with it and was amazed at how good I did it. In fact, I've been told a few times that many of the pieces I've done, looked like Boba Maker himself did it.
;)

You can do it man. I've done a pretty good and detailed write up of my journey
Here's the link: Iron's ROTJ WIP
.....Just be prepared for a long read - again I was pretty detailed - but give it a look through and hopefully some inspiration will set in. And if you have any questions on how I did stuff that I didn't mention, let me know. Here's a few of my more recent pics - and I've actually upgraded a few things since then too!
(y)
Iron as Boba Fett.JPG


Since you've asked how to go about attaching the armor to the vest, I can provide some information that I've learned along the way. I opt'd to do what Boba Maker posted about: Attaching Armour : Tutorial

It definitely is an older method for sure, but sometimes the older "tried & true" methods are the way to go! I've read the discussions on attaching the armor to the vest via Velcro, Clutchback Pins, and even Magnets. But being kinda old school myself and the fact that this information comes directly from Boba Maker (Daz), I went with his recommendation. (Which was Grommets and Bolts and Nuts)

Here's what I used for tools and materials....
What I used.jpg


Now, I originally wanted the hot glue to be temporary but they were strong enough that even with some force to try and remove them they wouldn't budge. That was all the test I needed. (y)
Screws Placed and Hot Glued.jpg


After I got the Bolts attached to the armor I then placed my armor on my vest to get spacing correct, I did so via this method:
Step 1: Place your armor with flat grommet pieces under it, and adjust where needed to get the armor looking right.
Step 2: Using something long and skinny (I used a long scissors) maneuver the grommets in a way that they'll seat the screw just right. Also go under the fabric and gently lift it to see if the screw will land correctly in the grommet.
Step 3: Do Step 2, for all other grommets.
Step 4: Very gently lift the armor leaving the flat grommets in place and then with a sharpie, put a dot in the center of the grommets.
Armor Placement.jpg


Once that was completed I then started to install the grommets. Here are the steps I took....
Step 1: Hammer on the grommet cutting tool, which doesn't cut all the way through Arkady's vest material by the way.
Step 2: You can see the circle indent it makes.
Step 3: Using a hobby knife, cut out the hole.
Step 4: You'll also have some padding to deal with underneath, so make sure to clean that out.
Step 5: Using the Grommet Cutting Tool Hammer the hole again. (This is for the reverse side)
Step 6: Flip the Vest over and you should see the indent, Using a hobby knife, cut that piece out.
Step 7: Put on the Grommet.
Step 8: Pound on the Grommet.
Grommet Procedure.jpg


When I was finished, the end result was this....
Vest Grommets.jpg


It was a chore indeed and felt great once done....and the armor mounted?
Mounted Armor.jpg


Ok so this is probably WAY more than you wanted to know. But I hope this helps you out in some small way. Let me know if you have any questions. And good luck with your build!
:cool:(y)

Regards,
-Iron
 
Last edited:
Hi Ninjamonkeysd ,
I see yours has the "Dent" in the Back Armor, which tells me this is a ROTJ set you've got! I also have full set of Boba Maker ROTJ armor that I got last year and was able to paint it pretty well. In fact I had Boba Maker (Daz) paint up and finish JUST the Chest armor and shoulders and Knees for me and I emulated his work with the other pieces Collar, Back, Kidney, Cod, Gauntlets, Jetpack and the Helmet. For the armor I didn't use any texture. However, like you, never having done any of this before and zero time on an airbrush (Oh yeah, I Air Brushed EVRYTHING!). I set off and found that if I took my time then I actually had a lot of fun with it and was amazed at how good I did it. In fact, I've been told a few times that many of the pieces I've done, looked like Boba Maker himself did it.
;)

You can do it man. I've done a pretty good and detailed write up of my journey
Here's the link: Iron's ROTJ WIP
.....Just be prepared for a long read - again I was pretty detailed - but give it a look through and hopefully some inspiration will set in. And if you have any questions on how I did stuff that I didn't mention, let me know. Here's a few of my more recent pics - and I've actually upgraded a few things since then too!
(y)
View attachment 213720

Since you've asked how to go about attaching the armor to the vest, I can provide some information that I've learned along the way. I opt'd to do what Boba Maker posted about: Attaching Armour : Tutorial

It definitely is an older method for sure, but sometimes the older "tried & true" methods are the way to go! I've read the discussions on attaching the armor to the vest via Velcro, Clutchback Pins, and even Magnets. But being kinda old school myself and the fact that this information comes directly from Boba Maker (Daz), I went with his recommendation. (Which was Grommets and Bolts and Nuts)

Here's what I used for tools and materials....
View attachment 213721

Now, I originally wanted the hot glue to be temporary but they were strong enough that even with some force to try and remove them they wouldn't budge. That was all the test I needed. (y)
View attachment 213722

After I got the Bolts attached to the armor I then placed my armor on my vest to get spacing correct, I did so via this method:
Step 1: Place your armor with flat grommet pieces under it, and adjust where needed to get the armor looking right.
Step 2: Using something long and skinny (I used a long scissors) maneuver the grommets in a way that they'll seat the screw just right. Also go under the fabric and gently lift it to see if the screw will land correctly in the grommet.
Step 3: Do Step 2, for all other grommets.
Step 4: Very gently lift the armor leaving the flat grommets in place and then with a sharpie, put a dot in the center of the grommets.
View attachment 213723

Once that was completed I then started to install the grommets. Here are the steps I took....
Step 1: Hammer on the grommet cutting tool, which doesn't cut all the way through Arkady's vest material by the way.
Step 2: You can see the circle indent it makes.
Step 3: Using a hobby knife, cut out the hole.
Step 4: You'll also have some padding to deal with underneath, so make sure to clean that out.
Step 5: Using the Grommet Cutting Tool Hammer the hole again. (This is for the reverse side)
Step 6: Flip the Vest over and you should see the indent, Using a hobby knife, cut that piece out.
Step 7: Put on the Grommet.
Step 8: Pound on the Grommet.
View attachment 213724

When I was finished, the end result was this....
View attachment 213725

It was a chore indeed and felt great once done....and the armor mounted?
View attachment 213726

Ok so this is probably WAY more than you wanted to know. But I hope this helps you out in some small way. Let me know if you have any questions. And good luck with your build!
:cool:(y)

Regards,
-Iron
Dude... This was amazing. HOLY **** Thank you SO much. Just ordered the grommet set and some extra grommets.

Yup got a set of the ROTJ armor from Daz. The funny part about it was that this whole mission started when I was on etsy one day and I saw the chest electronics and bought them on a whim because I thought it was kinda cool and I got to thinking and just bought the armor to go with the electronic bit lol. I feel like this all snowballed so hard and so fast and before I knew it I was in over my head (and out A SHITLOAD of money) but its gonna be worth it! So thanks for the inspiration. Ill look at it all tomorrow in depth. My wife and I have a 1 year old so its time to go off and do some dad stuff.

So, you didnt paint the backside of your armor plates did you? Or did you wait until you had seated everything? You just answered SO many of my questions and absolutely gave me more hope than I had before. I actually bought a kick ass airbrush at the same time as the armor but I didnt even really think to use it because I felt that it would just take forever and I wasnt sure which paint to use with it. You have no idea how much you just helped me! Ok, cool. I can do this. Ill keep the thread updated with my progress this week.
 
Ninjamonkeysd
I know I'm a year late, but congratulations! It seems so long ago since I said "I have a 1 year old". My daughter is 10 now. But I totally get having to do the "Dad Stuff". (And that's fun too)

You're most welcome for any inspiration you got off of me. I got a lot of my inspiration from many of the TDH guys on here too! I'd like to think we're all here to help on another. So your other couple questions:

Question: So, you didnt paint the backside of your armor plates did you?
Answer: Nope, I sure didn't. If you dismount them and turn them over you will find maybe some overspray of paint. But it's mostly raw.

Question: Or did you wait until you had seated everything?
Answer: See answer above. ;)

For ALL of my base paint I used Tamiya X-11 Chrome Silver. (for a full Fett - you're gonna need a TON of this stuff)
Tamiya X-11.jpg


After that I went around with Humbrol's Liquid Masking (Humbrol calls it "Maskol") and a small paint brush to apply "damaged areas".
Humbrol Maskol.jpg


When talking about the armor, I then I applied my Green's which for the main armor (Collar, Back and Cod/Kidney - Remember I had Daz do my Chest) I used Tamiya XF-26 Deep Green. I only mixed a tiny drop of white (Tamiya X-1) into it to lighten it up just a touch.
Tamiy XF-26.jpg
Tamiya X-2.jpg


Then I topically applied the little bit of that pale yellow, which for that I used Tamiya XF-60 Dark Yellow.
Tamiya XF-60.jpg


I also went around with a tiny scribe for any fine scratches, for that I used a slot screwdriver (the kind you'd repair glasses with ;)), something like this would work....
Precision Slotted Screw Driver.jpg


And then sealed it up with Rustoleum's Matte Clear Enamel Sealer. (Only Spray Product I used)
Rustoleum Matte Clear Enamel.jpg


And when I first compared my Collar work next to Boba Maker's (Daz's) Chest paint job......
Finished Collar.jpg


Not too shabby, eh?


Cheer's,
-Iron
 
Haha Thanks! She's turning one next month. In fact, we are taking her to Disneyland for the Halloween party and that's where I'm going to wear this armor for the first time. I'm going to be building it during her daily naps haha.

You did a great job with the paint on the armor can't tell the difference between you and Daz' work. I'm a bit lucky I guess doing a reamored build. I'm gonna have to do a lot less work and detailing. Very little masking work. I bought some Rust-oleum hunter Green but I kinda feel like Italian Olive might be a better fit. The new armor looks like it's more olive than a bluish hue. I'm a bit undecided though. I guess I can always repaint it if I don't like it.
 

Attachments

  • 20210729_095100.jpg
    20210729_095100.jpg
    1.8 MB · Views: 137
Oh I get it now! "Boba Re-Painted"......hahaha! Silly me. I had thought you meant that you had it painted already and are stripping it back down and you are gonna re-do the paint. But what you meant was that you are going after this.....
The Mandalorian - Boba Fett.jpg


Hahaha! Got it! Understood! Then yes, ignore my ROTJ paint's! Sorry for that super late catch!

Thanks,
-Iron
 
Oh I get it now! "Boba Re-Painted"......hahaha! Silly me. I had thought you meant that you had it painted already and are stripping it back down and you are gonna re-do the paint. But what you meant was that you are going after this.....
View attachment 213749

Hahaha! Got it! Understood! Then yes, ignore my ROTJ paint's! Sorry for that super late catch!

Thanks,
-Iron
Haha, yes. REPAINTED also known as Dad Bod Boba which is more fitting for me I think. It seems like I fairly easy paint job. Sorry for the confusion.
 
This thread is more than 2 years old.

Your message may be considered spam for the following reasons:

  1. This thread hasn't been active in some time. A new post in this thread might not contribute constructively to this discussion after so long.
If you wish to reply despite these issues, check the box below before replying.
Be aware that malicious compliance may result in more severe penalties.
Back
Top