Hi
Ninjamonkeysd ,
I see yours has the "
Dent" in the Back Armor, which tells me this is a ROTJ set you've got! I also have full set of Boba Maker ROTJ armor that I got last year and was able to paint it pretty well. In fact I had Boba Maker (
Daz) paint up and finish
JUST the Chest armor and shoulders and Knees for me and I emulated his work with the other pieces
Collar, Back, Kidney, Cod, Gauntlets, Jetpack and the Helmet. For the armor I
didn't use any texture. However, like you, never having done any of this before and zero time on an airbrush (
Oh yeah, I Air Brushed EVRYTHING!). I set off and found that if I took my time then I actually had a lot of fun with it and was amazed at how good I did it. In fact, I've been told a few times that many of the pieces I've done, looked like Boba Maker himself did it.
")
You can do it man. I've done a pretty good and detailed write up of my journey
Here's the link:
Iron's ROTJ WIP
.....Just be prepared for a long read - again I was pretty detailed - but give it a look through and hopefully some inspiration will set in. And if you have any questions on how I did stuff that I didn't mention, let me know. Here's a few of my more recent pics - and I've actually upgraded a few things since then too!
") View attachment 213720
View attachment 213720
Since you've asked how to go about attaching the armor to the vest, I can provide some information that I've learned along the way. I opt'd to do what Boba Maker posted about:
Attaching Armour : Tutorial
It definitely is an older method for sure, but sometimes the older "
tried & true" methods are the way to go! I've read the discussions on attaching the armor to the vest via Velcro, Clutchback Pins, and even Magnets. But being kinda old school myself and the fact that this information comes directly from Boba Maker (
Daz), I went with his recommendation. (
Which was Grommets and Bolts and Nuts)
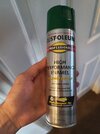
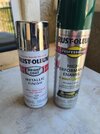
Here's what I used for tools and materials....
View attachment 213721
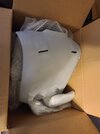
Now, I originally wanted the hot glue to be temporary but they were strong enough that even with some force to try and remove them they wouldn't budge. That was all the test I needed.
View attachment 213722
After I got the Bolts attached to the armor I then placed my armor on my vest to get spacing correct, I did so via this method:
Step 1: Place your armor with flat grommet pieces under it, and adjust where needed to get the armor looking right.
Step 2: Using something long and skinny (
I used a long scissors) maneuver the grommets in a way that they'll seat the screw just right. Also go under the fabric and gently lift it to see if the screw will land correctly in the grommet.
Step 3: Do Step 2, for all other grommets.
Step 4: Very gently lift the armor leaving the flat grommets in place and then with a sharpie, put a dot in the center of the grommets.
View attachment 213723
Once that was completed I then started to install the grommets. Here are the steps I took....
Step 1: Hammer on the grommet cutting tool, which doesn't cut all the way through Arkady's vest material by the way.
Step 2: You can see the circle indent it makes.
Step 3: Using a hobby knife, cut out the hole.
Step 4: You'll also have some padding to deal with underneath, so make sure to clean that out.
Step 5: Using the Grommet Cutting Tool Hammer the hole again. (
This is for the reverse side)
Step 6: Flip the Vest over and you should see the indent, Using a hobby knife, cut that piece out.
Step 7: Put on the Grommet.
Step 8: Pound on the Grommet.
View attachment 213724
When I was finished, the end result was this....
View attachment 213725
It was a chore indeed and felt great once done....and the armor mounted?
View attachment 213726
Ok so this is probably
WAY more than you wanted to know. But I hope this helps you out in some small way. Let me know if you have any questions. And good luck with your build!

Regards,
-Iron
") ! Loads of good threads, you can search for boba paint threads and you’ll definitely find many helpful ones
! Loads of good threads, you can search for boba paint threads and you’ll definitely find many helpful ones