What Paint Colors? RESOLVED -Now BKBT Build Log

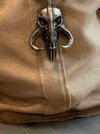
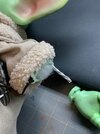
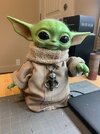
I also detailed the child tonight. I gave it a quick airbrush to add a little depth to the skin recesses and added a little more rosiness to the cheeks, lips and eyelids. I sealed it with a satin finish so it wasn't so flat looking. I hemmed the cloak so it won't unravel as it was just a raw edge and hit the bottom with some brown spray paint for accumulated dirt. I also weathered the pendant with black acrylic and hit the high spots with some rub n buff to give it a more metallic look.

IMG_1581.jpg


Thanks to my dog for the hair!
IMG_1579.jpg
 

Attachments

  • IMG_1578.jpg
    IMG_1578.jpg
    103.3 KB · Views: 147
So I am working on a few upgrades and will post here as I get farther along. I decided to make another helmet so purchased the Great Ape file and printed it. Pretty much same process as the first one I built but this time around I am using an SLA printer for the detail parts
 

Attachments

  • D358FC4A-2A75-4D39-966E-7B95F5CDFE1A.jpeg
    D358FC4A-2A75-4D39-966E-7B95F5CDFE1A.jpeg
    978.2 KB · Views: 167
I’ve also been bugging Thinkbox to make some parts available to the club and have a thread in the Cargo Hold with these offerings.
Here is the latest upgrade I added to my gauntlets, an aluminum calc pad. It comes in a nice blasted finish so all you need to do is give it a paint wash or dusting and then hit the high spots with a scotchbrite pad or fine sandpaper to let the aluminum show through and get some contrast.
This is a sharper look than what I produced on my FDM printer.
BF3C500A-DA88-46C8-9568-3AF3F1CE0334.jpeg
 

Attachments

  • 82AFC4DB-CDF4-4EEE-BE29-C652745987F2.jpeg
    82AFC4DB-CDF4-4EEE-BE29-C652745987F2.jpeg
    2.1 MB · Views: 164
I finally got around to 3D printing a blaster to stuff into my holster. This is the final revision from Straeker from Thingiverse. I think it is a little undersized but it fits the holster I made beforehand perfectly, so it will do. I tweaked a couple of small details and replaced the grips with some wood ones I whipped up this afternoon.
IMG_1641.jpg


IMG_1640.jpg


I wet formed the holster a bit to get the shape to conform to the blaster.

Grogu approves!

IMG_1642.jpg
 

Attachments

  • IMG_1639.jpg
    IMG_1639.jpg
    104.2 KB · Views: 156
  • IMG_1638.jpg
    IMG_1638.jpg
    79.2 KB · Views: 161
Last edited:
I decided to give Grogu some posable arms. I found some aluminum wire I had lying around the shop and twisted it together so it had some strength. I removed one hand, fed the wire through and re-attached with a zip tie. This took maybe a half hour to do but is totally worth it. I also worked on the paint a little more but am trying to keep it subtle so doesn't photograph as well as it looks in real life.

IMG_1645.jpg
IMG_1647.jpg
 

Attachments

  • IMG_1643.jpg
    IMG_1643.jpg
    55.4 KB · Views: 142
  • IMG_1644.jpg
    IMG_1644.jpg
    64.7 KB · Views: 143
Hello BKBT,
About the epoxy you’re using to smooth your 3D prints, specifically what kind of epoxy resin are you using? Bondo fibreglass resin? Artist resin? XTC-3D? I looked through your thread, but I didn’t see any mention of specifics.

I‘m printing the S2 Armor, and I’m wondering what kind and how much to purchase.

Your build is aspirational and inspirational, dude!
 
Thanks for the kind words. My goal was to document as much as possible to keep myself motivated and maybe provide some info along the way. I’m also a member of the R2 builders club and never did a build log. Took me 5 years and I am still not finished (just the electronics left).

The epoxy I am using is from West Systems and is pro grade. I purchased a litre kit and still have half left over and have done a couple of extra things. A little goes a long way. I am pretty sure it was less than the XTC which is really just the same thing.
 
I have had a couple of mannequin pieces in storage for years and finally got around to using them. These were purchased second hand fairly inexpensively, but the proportions did not match mine and the pose was not to my liking. I also had the problem of grafting two different mannequins and two different materials together and try and get a cohesive look.
After taking my measurements, I planned where I was going to make my cuts and the angles of the new pose. The legs were not too bad as I just had to add some plywood and screw the plastic legs to the fiberglass body. I don't have a pic but I further reinforced the joint after and smoothed out the transition with duct tape.
IMG_1728.jpgIMG_1731.jpg

I had to chop about 3" from the arms on the fiberglass body. A multi tool made quick work of this and I added some wood pieces inside so I could pose and secure the joint with wood screws. I then used 3 layers of fiberglass cloth to smooth out the transition and make the joint rock solid again. I wanted to flare out one arm to make it look like he is ready to go for his blaster, so I took out a wedge, heated up and bent the arm out, again securing with screws and fiberglass.
IMG_1730.jpgIMG_1729.jpgIMG_1737.jpg

Last step was to check my progress by stepping back and looking at the pose and standing next to it and mimicking it to see if it felt natural and balanced. This was hard to tell as it looks really rough but I know once it get clothed that the sins will be hidden. I took it home right away and set it up. I had to chop most of the front of the foot off in order to get the boots to fit and I added a padded stem on the neck to support the helmet. Other than that, this is all of the pieces I made and chronicled in this thread. The last thing I am going to do to this is add a custom themed base.
IMG_1742.jpgIMG_1743.jpgIMG_1744.jpg
IMG_1745.jpg
 
I started working on a base to keep Mando from getting knocked over. I decided to keep the footprint small so it measures about 24" x 18" and is made from MDF to add some weight. The rock section is just simple styrofoam that I shaped with a sander and some rasps. I didn't really have a plan, just figured it out as I went and let it form itself.
IMG_1747.jpg63113247245__724AF87B-D60F-468A-B76C-9C22C1BA1B5F.jpg

I epoxied the styrofoam for durability and painted with Drylok primer as it has a sanded texture to it. The base was sealed, primed and then sprayed a gun metal color and speckled with some black to break up the uniformity. The rock section was base coated with a yellow paint that I had lying around.
IMG_1758.jpgIMG_1760.jpgIMG_1761.jpg

Then it was on to detailing the rock. I spent about a half hour on this and it was just free form. I misted with Krylon orange and yellow and brown to break up the color and hit the highlights with the base yellow. Total cost for this project was $0 as I had all of the supplies and just used what I had on hand. The last thing I need to do is make the support post and then this project is done.

IMG_1762.jpg

IMG_1763.jpg
IMG_1764.jpg
 
That has to be the best mannequin and pose I have seen. Love this whole thread!! Thanks for all the info.

Also I used the elastic on the heel method to keep everything in place like you suggested in an earlier post and it keeps everything nice and tidy like you said with the boots and while walking.
 
It looks amazing BKBT. Would you be able to match the Montana paints to the RAL chart for those in Europe with no access to Montana's?
 
I haven’t been able to secure Montana paints where I live. The chart was someone else's that I reposted to answer my original question.
 
Last edited:
I just found there is a big montana paints store in my city... I feel dumb :lol:

You're build is the one to follow BKBT. Thank you for the "documentary".
 
This thread is more than 2 years old.

Your message may be considered spam for the following reasons:

  1. This thread hasn't been active in some time. A new post in this thread might not contribute constructively to this discussion after so long.
If you wish to reply despite these issues, check the box below before replying.
Be aware that malicious compliance may result in more severe penalties.
Back
Top