Superjedi's FPH-ESB for Grifter

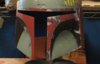
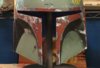
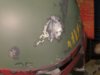
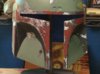
Beautiful. That has really nice continuity up into the dome and "cat scratch"...


Thanks a lot, guys! I appreciate it.

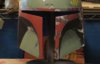
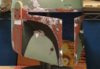
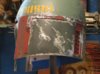
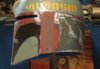
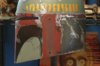
The brow is done now. I did the right half in a couple of sessions over the last 2 days. Lots of tiny chips and scratches.


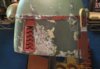
Just a couple of physical scratches left to add. There's also a bit of the pale contrasting gray in this section. I'll do that
at the end. I just find it easier to do it all at once.
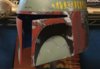
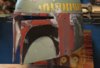


The mandibles are up next! :)
 
Been busy the past few days, but I managed to finally finish the left mandible. This is an area that requires careful
examination of the reference pics vs screen caps to determine what is "incidental" damage that happened after filming.

IMG_4153_zpsuxwqbwyx.jpg


Just the weathering pass remains on this part of the helmet. Here are another couple of angles.

IMG_4152_zpsvepaebpz.jpg


IMG_4154_zpsmwfvpv8e.jpg


So this leaves the right mandible as the only section left that needs the "basic" painting. But it's really complicated and I think
I'll just not do it. Think anyone will notice? :lol:
 

Attachments

  • IMG_4153_zpsuxwqbwyx.jpg
    IMG_4153_zpsuxwqbwyx.jpg
    111.5 KB · Views: 193
  • IMG_4152_zpsvepaebpz.jpg
    IMG_4152_zpsvepaebpz.jpg
    115.9 KB · Views: 174
  • IMG_4154_zpsmwfvpv8e.jpg
    IMG_4154_zpsmwfvpv8e.jpg
    127.9 KB · Views: 194
This is truly masterful work. The detail you put into your work is amazing. I am trying to paint my ESB and am almost done but I have no clue how to paint those fine scratches. How do you apply the very fine scratches onto the helmet?
 
Thanks, guys!

Filer, the base colors are airbrushed on, but all the damage is done with small detail brushes.

PRodd, depends which scratches you're referring to. If you mean the network of fine scratches on the rear of the dome, they're
actually physically scratched in with a sharp metal scribing tool. I scratch through the paint layers all the way to the gelcoat.
But many of the other fine scratches are done with various sizes of liner brushes. My most recent favorite is a Princeton Round 18/0.
 
I have a pertinet question! On the back of the helmet dome area, I see some yellow-ish smudge type thumbrint, perhaps overspray from a kill stripe type things. I can kinda see those in the screen caps or costume shots in the ESB galleries. But I didn't know if you use any different or better reference images to do those areas?

http://www.thedentedhelmet.com/f23/bobamaker-helmet-commission-55097/

Daz painted this one up and you can see what I mean about half way down on the pics or the rear of the helmet.

wht's the word on this rear yellow craziness?!
 
Last edited by a moderator:
Oh, those are what I call the "grease stains" because. . . that's what they look like. :lol:
They're pretty evident in the MoM and AoSW exhibit pics, but the helmet of course had suffered all kinds of incidental
damage since ESB, and it's extremely hard to determine whether those stains were present during filming. I like them
and think they add some grungy character to the helmet, so I tend to incorporate them into my paint-ups.

Here's a screen cap--not the clearest, eh?

back%20scratches%20crop_zpsyeoladmz.png


Are the stains there? Is it pixelation? Hard to say. But if you look above the last 4 or so killstripes, you can see
a sort of brownish horizontal stain. This is overspray from when the killstripes were painted on the helmet, and
that part of it is definitely part of the original paint job. The other stained areas have that same appearance in this
screen cap, so that is what makes me think they could have been there during filming.
 

Attachments

  • back%20scratches%20crop_zpsyeoladmz.png
    back%20scratches%20crop_zpsyeoladmz.png
    728.1 KB · Views: 179
I agree with you, that was the image I was looking at, and because of the location over the killstripes I thought it might be overspray, but then you have the discoloration that wraps around the back of the dome, beyond the kill stripes. Those are the ones that I don't see a "logical" explanation for. Did Joe Johnston do a little dry brushing with some orangy yellow for some breakup/dirt/grime/grease in those areas? I've just seen them done pretty "loud" on some lids and toned down or non-existant on others.
 
My "in universe" theory is that when Boba is piloting the Slave I, there's some kind of fluid pipe on the cockpit rear wall
above his head that has a leak in it and it drips on his helmet. I guess good mechanics are hard to come by! :lol:
 
My "in universe" theory is that when Boba is piloting the Slave I, there's some kind of fluid pipe on the cockpit rear wall
above his head that has a leak in it and it drips on his helmet. I guess good mechanics are hard to come by! :lol:


the thing that cracks me up is the difference between Jango and Boba as far as in universe. I mean, Jango kinda was clean and maintained, took care of his gear and ship. Lived in an all white apartment, with a kid and was able to keep that clean.

Kid grows up and turns into the Star Wars version of Dog, the Bounty Hunter! Can't keep a can of green rattle can paint to keep his armor painted and looking good. Slave 1's all beat up and got rust on it. Probably lives in a single wide with a TransAm up on blocks. Jango turning over in his headless grave!
 
PRodd, depends which scratches you're referring to. If you mean the network of fine scratches on the rear of the dome, they're
actually physically scratched in with a sharp metal scribing tool. I scratch through the paint layers all the way to the gelcoat.
But many of the other fine scratches are done with various sizes of liner brushes. My most recent favorite is a Princeton Round 18/0.

I thought this may have been the case, I was just too nervous to start digging into my helmet. But your work speaks for itself so I will definitely give this a try. Thanks for your help.
 
Been working on the right mandible the past few days in short sessions. Finally got it done a little while ago. :)
This is one of the most detail-heavy areas on the ESB bucket, and it takes several passes with each of the colors
to build up the tiny chips and dings.

Here's a shot of the entire "face" region.

IMG_4163_zpscjoysfdg.jpg


A couple of other things to note in these pics--I Dremeled out the cast in Borden in preparation for installing the machined metal
replica. I use a bullet shaped grinding bit to slowly widen the hole, checking carefully to make sure the metal part will just slip
through the hole. Once I've weathered the Borden, I'll fix it in place at the very end of the project. I also did the big scratch on the
right cheek, and the small red chip on the left mandible.

IMG_4165_zpsmkr50rb7.jpg


IMG_4168_zpseurghj5n.jpg


I can now begin the "effects" painting which consists of the pale contrasting gray, the fade below the killstripes, some pastel weathering, some small
detailing with colored pencils, and the spatter. I have already base coated the ear parts and I'm giving them a few days to really cure before I mask for
the black and white arches. Getting pretty close now!
 

Attachments

  • IMG_4163_zpscjoysfdg.jpg
    IMG_4163_zpscjoysfdg.jpg
    128.8 KB · Views: 192
  • IMG_4165_zpsmkr50rb7.jpg
    IMG_4165_zpsmkr50rb7.jpg
    133.9 KB · Views: 187
  • IMG_4168_zpseurghj5n.jpg
    IMG_4168_zpseurghj5n.jpg
    135.3 KB · Views: 176
Part one of effects painting--pale contrasting gray.
This is scattered over several portions of the helmet. Most noticeable on the right rear panel and in the dent, but there's
a bit on the left rear panel, the keyslot area, the red band above the keyslots, on the right mandible, the "brow" above
the visor opening, and even a couple of flecks in the cat scratch.

Here are a couple of overall shots.

IMG_4170_zpsvrkyt1ir.jpg


IMG_4173_zpsml6t3zur.jpg


It's more subtle in certain areas. The dent is tricky to photograph due to reflections, so here are two different angles.

IMG_4175_zpsk9j46gb9.jpg


IMG_4177_zpsaa5jqtt7.jpg


Next up will be the fade under the killstripes.
 

Attachments

  • IMG_4175_zpsk9j46gb9.jpg
    IMG_4175_zpsk9j46gb9.jpg
    113 KB · Views: 176
  • IMG_4170_zpsvrkyt1ir.jpg
    IMG_4170_zpsvrkyt1ir.jpg
    138.9 KB · Views: 168
  • IMG_4177_zpsaa5jqtt7.jpg
    IMG_4177_zpsaa5jqtt7.jpg
    114 KB · Views: 176
  • IMG_4173_zpsml6t3zur.jpg
    IMG_4173_zpsml6t3zur.jpg
    132.3 KB · Views: 173
Amazing work o' Super One.


Part one of effects painting--pale contrasting gray.
This is scattered over several portions of the helmet. Most noticeable on the right rear panel and in the dent, but there's
a bit on the left rear panel, the keyslot area, the red band above the keyslots, on the right mandible, the "brow" above
the visor opening, and even a couple of flecks in the cat scratch.

Here are a couple of overall shots.


It's more subtle in certain areas. The dent is tricky to photograph due to reflections, so here are two different angles.


Next up will be the fade under the killstripes.

- - - Updated - - -

J, are you taking notes here??? :D

Outstanding.
 
Thanks a lot, guys!

Stage two of effects painting--killstripe fade.

This is another of those odd ESB features. The "fade" is the result of tape pulling off some of the base green on the dome.
The area was overpainted, but the repair was thin and allowed some of the base silver to show through. It's subtle in spots,
and more pronounced in others, but it's in the screen grabs so it was definitely present during filming.

I try to replicate this by mixing some of my custom dome weathering mix with an acrylic silver. It's brushed on with a fine
detail brush to mimic the jagged patterns that are present. Here are a couple of shots that show it's pretty subtle from
certain angles. . .

IMG_4179_zpso25ijlli.jpg


IMG_4180_zpsy6qwfuoo.jpg


. . . however, when the lighting angle changes, it becomes more apparent.

IMG_4182_zpsd1tcgs1i.jpg


IMG_4183_zps87edgwot.jpg


Pretty weird! :) I think I'll work on the thumbprints next.
 

Attachments

  • IMG_4183_zps87edgwot.jpg
    IMG_4183_zps87edgwot.jpg
    137.7 KB · Views: 167
  • IMG_4182_zpsd1tcgs1i.jpg
    IMG_4182_zpsd1tcgs1i.jpg
    125.6 KB · Views: 178
  • IMG_4179_zpso25ijlli.jpg
    IMG_4179_zpso25ijlli.jpg
    126.2 KB · Views: 172
  • IMG_4180_zpsy6qwfuoo.jpg
    IMG_4180_zpsy6qwfuoo.jpg
    132.8 KB · Views: 186
This thread is more than 9 years old.

Your message may be considered spam for the following reasons:

  1. This thread hasn't been active in some time. A new post in this thread might not contribute constructively to this discussion after so long.
If you wish to reply despite these issues, check the box below before replying.
Be aware that malicious compliance may result in more severe penalties.
Back
Top