Superjedi's FPH-ESB for Grifter

I'm back from my work trip, and now I'm dealing with a bit of a cold. I think I picked up some airplane-itis on the way home. :(
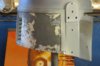
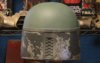
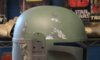
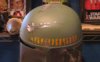
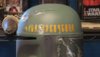
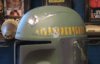
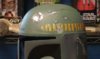
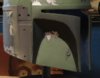
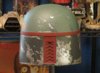
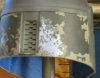
But I'm pressing on with the helmet and I've managed to get the big area on the right panel done.

IMG_4082_zpsbgbpakya.jpg


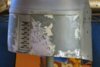
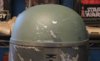
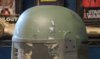
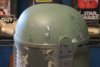
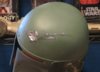
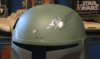
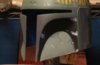
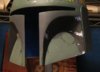
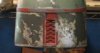
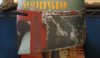
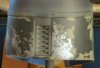
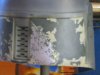
It's tricky to get a good shot of this as the silver covers a pretty large curved area, so here are a couple of other angles.

IMG_4084_zpstsm8lihk.jpg


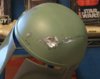
Apart from the right mandible, this is probably the most detail-dense area on the ESB helmet.

IMG_4086_zpscmllhmxs.jpg


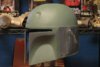
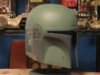
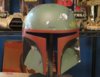
I'll continue working on the damage in the lower right and upper right sections next. Then it'll be time to lay down the
base color and first weathering pass on the dome and inner cheeks.
 

Attachments

  • IMG_4082_zpsbgbpakya.jpg
    IMG_4082_zpsbgbpakya.jpg
    125.7 KB · Views: 190
  • IMG_4086_zpscmllhmxs.jpg
    IMG_4086_zpscmllhmxs.jpg
    124.7 KB · Views: 191
  • IMG_4084_zpstsm8lihk.jpg
    IMG_4084_zpstsm8lihk.jpg
    142.9 KB · Views: 190
Thanks, guys. :)

I got the remainder of the right panel done late yesterday and here are a couple of angles.

IMG_4088_zpsg06jlzfw.jpg


The appearance isn't quite final yet. I still need to do the contrasting pale gray and a bit of pastel weathering.
But those steps will be completed at the end of the project.

IMG_4092_zpsu9hbbyts.jpg


The small physical scratches have been added as well. Today's plan is to mask off the rear panels and lay down the base color
for the dome and inner cheeks. If I have enough time I'll do the first weathering pass, too. I mix a new batch of my weathering shade
for each helmet that I do, so no two buckets are exactly alike in that respect. I try to mix a slightly lighter/grayer shade of the base
green and use it to break up the starkness of the dome and cheeks. Additional weathering passes will be completed near the end
of the paint up. We had a really weird cold snap here overnight, so hopefully it will warm up enough to spray paint out in my garage.
 

Attachments

  • IMG_4092_zpsu9hbbyts.jpg
    IMG_4092_zpsu9hbbyts.jpg
    126 KB · Views: 191
  • IMG_4088_zpsg06jlzfw.jpg
    IMG_4088_zpsg06jlzfw.jpg
    132.5 KB · Views: 194
Base green has been applied, and I did the first weathering pass, too. I airbrush the weathering tone on in cloudy
patterns to give some variation to that expanse of green and make it look a bit oxidized. Later weathering will also
change the tone of the green, but this breaks up the initial color application.

IMG_4093_zpsftym4td4.jpg


Once this dries, I'll begin the gray and silver damage on the dome.

IMG_4096_zpsgvjiacvx.jpg


IMG_4094_zpsl3cxj2mq.jpg


More to come!
 

Attachments

  • IMG_4094_zpsl3cxj2mq.jpg
    IMG_4094_zpsl3cxj2mq.jpg
    124.5 KB · Views: 185
  • IMG_4096_zpsgvjiacvx.jpg
    IMG_4096_zpsgvjiacvx.jpg
    126.8 KB · Views: 179
  • IMG_4093_zpsftym4td4.jpg
    IMG_4093_zpsftym4td4.jpg
    126.4 KB · Views: 199
Detailing has begun. To me, this is where the paint job gets fun. :) To start with a "blank" dome and add all the little details
that make it ESB. I always begin with the rear of the dome. Not sure why, I'm just a creature of habit I suppose.

IMG_4097_zpsja0943f1.jpg


There's a pretty big network of small physical scratches all over the rear of the dome. I add them using a combination of silver, applied with
a very fine brush, and a metal scribing tool to scratch down to the gelcoat. Depending on the light, the scratches fade or brighten.

IMG_4098_zpsuqwofoxa.jpg


There will be a few more outlying scratches, but I need to place some more gray and silver damage to use as landmarks.

IMG_4099_zpsqglkodzb.jpg


An odd illusion is that the base green appears to get slightly darker when the gray and silver damage is applied.

I'll continue around counter-clockwise, doing the "stacked" area behind the RF ear next. Then I'll jump across the ear platform
to do the cat scratch area. That's one of my favorite ESB features. :thumbsup:
 

Attachments

  • IMG_4097_zpsja0943f1.jpg
    IMG_4097_zpsja0943f1.jpg
    111.7 KB · Views: 181
  • IMG_4099_zpsqglkodzb.jpg
    IMG_4099_zpsqglkodzb.jpg
    102.8 KB · Views: 180
  • IMG_4098_zpsuqwofoxa.jpg
    IMG_4098_zpsuqwofoxa.jpg
    101.7 KB · Views: 188
Thanks. :)

Got a good amount done today. Had a day off from work so I put the time to good use.
I began with the stacked area behind the ear. I enjoy painting the damage on the rear of the dome for another reason that I didn't
mention before--it often gets overlooked! If you think about it, when you're trooping or taking pics with a great looking Fett at a Con,
people pretty much always focus on the front of the helmet and costume. But there's so much great detail on the back side, and
the smallest details are important to the overall look of the ESB.

IMG_4101_zpsrf1qg34y.jpg


You can probably see that there's some additional detail completed, too. So let's change the angle a little more toward the front of the lid.

IMG_4102_zpsjew91i6h.jpg


The cat scratch region begins to come into view. :) One of my favorite areas to paint. I always do the 3 sections together as the spacing between
them is just as important as all the small details within the cat scratch, the "hump," and the scrape above.

IMG_4104_zpsawtc6zww.jpg


Next up will be the area above and around the turn signals. Then it's on to the dent!
 

Attachments

  • IMG_4101_zpsrf1qg34y.jpg
    IMG_4101_zpsrf1qg34y.jpg
    107.1 KB · Views: 172
  • IMG_4102_zpsjew91i6h.jpg
    IMG_4102_zpsjew91i6h.jpg
    123.3 KB · Views: 177
  • IMG_4104_zpsawtc6zww.jpg
    IMG_4104_zpsawtc6zww.jpg
    107.4 KB · Views: 179
Afraid? Why?

Here's Saturday's progress. I got the small area around the turn signals done. This will receive a bit more weathering near the end
of the project, and I need to place a few physical scratches, too.

IMG_4107_zpszjly3wsq.jpg


This was followed by. . . the dent! :) I love doing the dent. It's the most recognizable feature of the helmet and there's so much
tasty detail to paint.

IMG_4108_zpsngtlucms.jpg


I do this in 2 sections: the dent itself, beginning with the silver, and then outlined with the gray. Then I do the "comet's tail" that streaks back
from the dent, beginning with gray, followed with silver.

IMG_4110_zps37l8jytm.jpg


These shots are tilted to avoid getting too much glare off the silver.

IMG_4111_zpse027ecg1.jpg


I'll work on the big scrape across the crown of the dome next.
 

Attachments

  • IMG_4107_zpszjly3wsq.jpg
    IMG_4107_zpszjly3wsq.jpg
    99.2 KB · Views: 174
  • IMG_4110_zps37l8jytm.jpg
    IMG_4110_zps37l8jytm.jpg
    132 KB · Views: 178
  • IMG_4108_zpsngtlucms.jpg
    IMG_4108_zpsngtlucms.jpg
    100.9 KB · Views: 181
  • IMG_4111_zpse027ecg1.jpg
    IMG_4111_zpse027ecg1.jpg
    118.8 KB · Views: 177
Yeah, sometimes I see gray and silver in my sleep. :) But here's another color to add into the mix. . .
Killstripes! I managed to get these done before the end of the weekend. Lots of masking with tape and with liquid mask.

IMG_4112_zpsxgywifbd.jpg


I did the majority of the tiny chips between the killstripes, too. There are a few more above the stripes and I'll finish those once
I place the final gray and silver damage area. It's the little area I call the "Scottie dog."

IMG_4113_zpszejunkwq.jpg


I forgot to get a clear shot of the big scrape on top of the dome, but you can see most of it in the next shot.

IMG_4114_zpsdxh4au8z.jpg


Just a little more to finish on the dome and then it's on to the cheeks.
 

Attachments

  • IMG_4114_zpsdxh4au8z.jpg
    IMG_4114_zpsdxh4au8z.jpg
    118.9 KB · Views: 174
  • IMG_4113_zpszejunkwq.jpg
    IMG_4113_zpszejunkwq.jpg
    111.7 KB · Views: 174
  • IMG_4112_zpsxgywifbd.jpg
    IMG_4112_zpsxgywifbd.jpg
    120.3 KB · Views: 167
The work continues!

I finished up the remaining (small) section on the dome above the killstripes. There will be just a bit more damage added
at the end of the project using pastels and some other media.

IMG_4116_zpsm6xjdf86.jpg


With the dome complete, I blocked in the dark color on the outer cheeks. I paint these areas by hand, just as the original
helmet was painted. Using a wide flat brush I'm able to cut a nice line at the cheek borders. I began the damage with the
right cheek. I'll save the left cheek until I have more time, as there's a bit more detail to do, and another custom color to mix.

IMG_4119_zps2gyijzg1.jpg


The cast-in Borden will be drilled out, by the way. Grifter is sending a machined replacement to install. It's a simple matter to cut
out the resin one, and the paint job won't be impacted at all.
 

Attachments

  • IMG_4116_zpsm6xjdf86.jpg
    IMG_4116_zpsm6xjdf86.jpg
    108.4 KB · Views: 167
  • IMG_4119_zps2gyijzg1.jpg
    IMG_4119_zps2gyijzg1.jpg
    120.4 KB · Views: 170
Thanks!

Today marks 4 weeks since I began Grifter's helmet and it looks like all the "basic" painting on the green parts is done. :)
I finished up the left cheek a little while ago. I really like the damage patterns in this section. They seem more angular or
something compared to other areas.

IMG_4120_zpsxm1sfyyn.jpg


The left cheek also has another custom mixed gray. The area along the outside edge (against the dark outer cheek) is a darker and
greener gray than the gray that's used elsewhere. I've studied reference pics for I don't know how many hours, and I believe this is the
only portion of the helmet where this gray appears. It's definitely a different tone, not an optical illusion!

IMG_4121_zpsl628aihf.jpg


With all of this complete, I can mask everything off and lay down the base red on the mandibles/band/ear platforms/keyslots.
It's maybe the most time consuming masking for the whole project. But again, thorough prep is a necessity for Fett!
 

Attachments

  • IMG_4120_zpsxm1sfyyn.jpg
    IMG_4120_zpsxm1sfyyn.jpg
    112.4 KB · Views: 163
  • IMG_4121_zpsl628aihf.jpg
    IMG_4121_zpsl628aihf.jpg
    123.3 KB · Views: 165
Now we're starting to look pretty Fett-y! Got the base red airbrushed on earlier. Once this is dry I can begin doing the damage.

IMG_4125_zpsrjvov27m.jpg


I took a little trip to the hobby shop just now to pick up some new detail brushes. If you live near a hobby shop that sells Princeton
brand brushes, I highly recommend them. They last a good while as long as you clean them well.

IMG_4127_zpsphdwydr7.jpg


I'll be starting the damage on the keyslot area, then working on the rear half of the red band.
 

Attachments

  • IMG_4125_zpsrjvov27m.jpg
    IMG_4125_zpsrjvov27m.jpg
    135.5 KB · Views: 164
  • IMG_4127_zpsphdwydr7.jpg
    IMG_4127_zpsphdwydr7.jpg
    141.5 KB · Views: 159
Thanks much!

Damage on the red sections is underway. I started yesterday with the keyslots. This is another phase of the paint up where I mix up
a custom color for the dark maroon/purple shade. I start with some Polly Scale PRR Maroon and add a few drops of Polly Scale BAR Blue
until it tips over into the purple range. It's a "dull" sort of purple. . . almost brownish. In the following pic you can see that I've also laid in
the gray in the center part of the red band.

IMG_4128_zpsgpxeqlwt.jpg


In this next series of pics I'll show the stages that I go through when painting an area topically. I don't know that I've really shown this before,
but it'll give you an idea of what's involved in building up the detail.

First, here's a tighter view of the red band above the keyslots. The gray is blocked in here. I don't worry about getting all of the edges of the gray
damage 100% spot on to the templates at this stage. The silver and maroon/purple are going to tweak the shapes as I go.

IMG_4129_zpskjkhzg0q.jpg


I always have a reference pic or two up on my laptop screen as I'm painting, and in this next shot I've laid in the silver with a very fine detail brush.
I'm using either a size 10/0 or an 18/0 depending on how fine the detail is.

IMG_4130_zps4cx0qx03.jpg


Next comes the maroon/purple. Again, it's added with a very fine liner brush.

IMG_4133_zpsi4x1i5g5.jpg


Once I'm done with the three main colors, I go back and add the last details. These consist of some tiny flecks of the base red and
some additional gray and silver flecks and scratches.

IMG_4135_zpssjjsxwh5.jpg


Hope that wasn't too boring! :)
Now that the center area is done I'll continue working on the left and right sections of the red band.
 

Attachments

  • IMG_4129_zpskjkhzg0q.jpg
    IMG_4129_zpskjkhzg0q.jpg
    53.4 KB · Views: 158
  • IMG_4128_zpsgpxeqlwt.jpg
    IMG_4128_zpsgpxeqlwt.jpg
    107.5 KB · Views: 191
  • IMG_4130_zps4cx0qx03.jpg
    IMG_4130_zps4cx0qx03.jpg
    54.7 KB · Views: 189
  • IMG_4135_zpssjjsxwh5.jpg
    IMG_4135_zpssjjsxwh5.jpg
    54.8 KB · Views: 156
  • IMG_4133_zpsi4x1i5g5.jpg
    IMG_4133_zpsi4x1i5g5.jpg
    54.6 KB · Views: 172
Well I don't know about that. Thanks, though!

OK, the next section is done. This portion of the band will change slightly in appearance during the final weathering when I add
the white thumbprints. There's some "whitewashing" that kind of streaks back from the bigger thumbprint and it will blend some
of the damage patterns.

IMG_4137_zpsbok1u3ta.jpg


The right section is up next.
 

Attachments

  • IMG_4137_zpsbok1u3ta.jpg
    IMG_4137_zpsbok1u3ta.jpg
    109 KB · Views: 159
This thread is more than 9 years old.

Your message may be considered spam for the following reasons:

  1. This thread hasn't been active in some time. A new post in this thread might not contribute constructively to this discussion after so long.
If you wish to reply despite these issues, check the box below before replying.
Be aware that malicious compliance may result in more severe penalties.
Back
Top