PinkFlamingos6
Active Hunter
Hello all!
While my ROTJ build is currently on hold for a little while, I have to say that I miss the hobby. After attending New York Comic Con this past October and seeing some really awesome costumes, it made me want to get back into it.
My main goal for this costume right now is just for fun. Out of all the newer Boba costumes, I have to say that the post sarlacc one is my favorite. I really like the mix of old and new parts of this costume and I think it'll be an interesting build.
While this build is for fun, I will be following along with the mandalorian mercs CRL and the 501st CRL draft. I already know that I'll be making some stylized choices and not everything will be 100% true to the show, but that's the way I want to do some things.
I've pretty much got all the pieces for this build accounted for. Just waiting on some orders but in the meantime I'll be starting work with what I've got so far.
I also have to give a huge huge thanks to BH-51512 or Neo Fett! He's helped me so much in getting this build going. Between vendor recommendations and his site, How to Boba, he's been a really great help!
First off, I got a pair of the Nortiv 8 boots off of Amazon. Unfortunately I wasn't able to order the slip on version, so I ended up with the zipper pair.

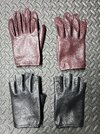
Next up the gloves. These are the Patrol X gloves purchased on Amazon thru Stompers Gloves. I ordered a pair of the chestnut gloves true to size, and a pair of black gloves one size larger. I cut the finger tips off of the black pair and wear them on top of the chestnut gloves. I think in the future I may cut the black gloves a little shorter.


For the armor, I went with the Post sarlacc Fett/Cobb Vanth armor kit from Neo Fett. This is a great set with all the pieces I needed, the armor is .060 thick ABS. I was able to get all the pieces trimmed and cleaned up this weekend.

And for the jetpack I went with a 7CS post sarlacc kit. A beautiful kit from Darth Voorhees and I can't wait to start working on it.

Thank you for viewing and stay tuned for more!
While my ROTJ build is currently on hold for a little while, I have to say that I miss the hobby. After attending New York Comic Con this past October and seeing some really awesome costumes, it made me want to get back into it.
My main goal for this costume right now is just for fun. Out of all the newer Boba costumes, I have to say that the post sarlacc one is my favorite. I really like the mix of old and new parts of this costume and I think it'll be an interesting build.
While this build is for fun, I will be following along with the mandalorian mercs CRL and the 501st CRL draft. I already know that I'll be making some stylized choices and not everything will be 100% true to the show, but that's the way I want to do some things.
I've pretty much got all the pieces for this build accounted for. Just waiting on some orders but in the meantime I'll be starting work with what I've got so far.
I also have to give a huge huge thanks to BH-51512 or Neo Fett! He's helped me so much in getting this build going. Between vendor recommendations and his site, How to Boba, he's been a really great help!
First off, I got a pair of the Nortiv 8 boots off of Amazon. Unfortunately I wasn't able to order the slip on version, so I ended up with the zipper pair.
Next up the gloves. These are the Patrol X gloves purchased on Amazon thru Stompers Gloves. I ordered a pair of the chestnut gloves true to size, and a pair of black gloves one size larger. I cut the finger tips off of the black pair and wear them on top of the chestnut gloves. I think in the future I may cut the black gloves a little shorter.
For the armor, I went with the Post sarlacc Fett/Cobb Vanth armor kit from Neo Fett. This is a great set with all the pieces I needed, the armor is .060 thick ABS. I was able to get all the pieces trimmed and cleaned up this weekend.
And for the jetpack I went with a 7CS post sarlacc kit. A beautiful kit from Darth Voorhees and I can't wait to start working on it.
Thank you for viewing and stay tuned for more!

 So I went in and glued elastic to one side of it and added another pair of magnets but it still doesn't want to stay closed. My shirt keeps getting pinched in the way and when I can get it closed, I can still flex it open pretty easily.