NEW BOBA FETT ROTJ BUILD

B0B4F3TT
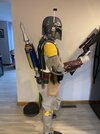
mjwierzb is right, the airbrush paints will cost some, especially if you have to mix (i.e. buying two paints or more to get what you want) For the ROTJ Armor - I was an airbrush guy. I went with Tamiya's XF-26 Deep Green and used a dash of X-2 White to lighten it up just a touch. All my armor is from Boba Maker and I commissioned him to paint up the Chest Armor (As well as the Knees and Shoulders).

Boba Maker - Paint Commissions.jpg


He did an amazing job with it - but I had to find a way to match his paint. He informed me he mixes a little and uses Tamiya acrylics paints. What I used (if you're looking to go Airbrush) and got good reception on was:
ManufacturerPaint Number/ColorNotes
Tamiya Color - Acrylic PaintX-11 / Chrome SilverOn nearly everything as a base
Tamiya Color - Acrylic PaintXF-26 / Deep GreenPut in airbrush cup and mixed witha drop or two of White.
Tamiya Color - Acrylic PaintX-2 / WhiteUsed only a drop or two to mix with Deep Green for Armor.
Tamiya Color - Acrylic PaintXF-60 / Dark YellowTopically applied this around various parts

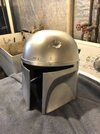
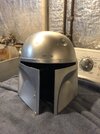
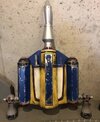
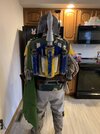
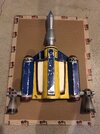
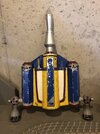
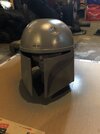
Here is my painted armor with Boba Maker's (I did the Back, Cod/Kidney and Collar Armor), again I was told by multiple folks that I achieved a good match....
Armor.jpg


Just wanted to give you some perspective. Whatever you decide to do, have fun with it!

Thanks,
-Iron
 
4/8 - another update! Busy with work and life have brought this build to a slow crawl but that is ok! Here I have my ROTJ jet pack. Now this pack is a temporary place holder, as I have another kit in hand that is way more accurate. This kit is decent for beginners, it’s not perfectly sized and the shape isn’t super accurate but it looks pretty good. I’ve been working on this guy for so long and ran into multiple issues over the course of the process. But, I am pretty happy with how it looks and don’t want to spend any more time on it LOL. It’s not 100% accurate or perfect, nor does it matter cause as i said this is a place holder. I still will do work on the missile and go over everything with my airbrush but I’m happy the bulk of this guy is finished!
 

Attachments

  • 93918EA7-5D3B-4FC3-B01B-D8204119EC3C.jpeg
    93918EA7-5D3B-4FC3-B01B-D8204119EC3C.jpeg
    1.8 MB · Views: 134
  • D45DA88C-9C24-46C7-96C2-17DBC5A058FF.jpeg
    D45DA88C-9C24-46C7-96C2-17DBC5A058FF.jpeg
    1.7 MB · Views: 129
4/10 - Started work on my helmet today! Had to run to Harbor Freight to get a nice pair scissors to cut the visor out. It was a lot of work but got it done! Also added the primer on as well. We are in the home stretch!
 

Attachments

  • 15DB7A5E-C5B6-4AA7-AFD6-F7DBA7F6C85F.jpeg
    15DB7A5E-C5B6-4AA7-AFD6-F7DBA7F6C85F.jpeg
    1.6 MB · Views: 124
  • 38DD9F19-0BE5-4449-83A7-E11342BBD52B.jpeg
    38DD9F19-0BE5-4449-83A7-E11342BBD52B.jpeg
    1.7 MB · Views: 129
  • 0C2B187D-0417-4C81-8F8D-00C6B3D46062.jpeg
    0C2B187D-0417-4C81-8F8D-00C6B3D46062.jpeg
    1.5 MB · Views: 124
  • 0578006D-0018-479E-9B78-0B33FEC2FE58.jpeg
    0578006D-0018-479E-9B78-0B33FEC2FE58.jpeg
    1.5 MB · Views: 120
Scissors, shears, call them what you will! LOL pic posted of what I used. The material was actually quite tough to cut through. Had to use a little elbow grease on it!
 

Attachments

  • image.jpg
    image.jpg
    2 MB · Views: 105
4/12 - got my first layer of silver down! It’s going to need another coat for sure. Multiple coats are better than 1 large coat! The silver I used was a Rustoleum Metallic Aluminum, spray can of course.
 

Attachments

  • 723ECB1C-EE1D-484E-990C-B4FA372C7A50.jpeg
    723ECB1C-EE1D-484E-990C-B4FA372C7A50.jpeg
    1.6 MB · Views: 106
  • 9EF80ADC-B090-4B67-9617-F678AB054F99.jpeg
    9EF80ADC-B090-4B67-9617-F678AB054F99.jpeg
    1.5 MB · Views: 103
4/16 - Happy Fett Friday! Here is my weathered jet pack (obviously still have to work on the missile). Just used my airbrush to add that burnt effect. I’m pretty pleased of the way it looks. Also need to add a couple decals to the jet pack as well. Again, this is a temporary pack as it’s quite small. You can see in the photos just how small it is. I also need to move the hooks quite a bit but wanted to test fit to see how it felt! I am also missing a few other parts (3rd gauntlet hose, shoulder decal, helmet). I am planning to start my helmet this weekend!
 

Attachments

  • 870FC7B1-9CDC-4802-B2BF-7881A579AD1E.jpeg
    870FC7B1-9CDC-4802-B2BF-7881A579AD1E.jpeg
    916.3 KB · Views: 153
  • F3B237C4-A7DD-4F9F-8C83-7FEB41EECDF9.jpeg
    F3B237C4-A7DD-4F9F-8C83-7FEB41EECDF9.jpeg
    221.1 KB · Views: 146
  • C37376D0-56FC-439B-B2EF-428FCF9E602E.jpeg
    C37376D0-56FC-439B-B2EF-428FCF9E602E.jpeg
    1.2 MB · Views: 141
Last edited:
4/18 - Started my bucket this afternoon! I’m going to go in with my airbrush to get the grey variation over the silver. I’ve been trying to use multiple references for the right damage. For ROTJ, there seems to be less as far as the helmet goes, especially the back.
 

Attachments

  • 41502602-43EE-4DD5-9697-C4BE26D50251.jpeg
    41502602-43EE-4DD5-9697-C4BE26D50251.jpeg
    1.2 MB · Views: 107
  • 8DDADBC8-4BBC-435E-BE86-8B76DB5EE1A6.jpeg
    8DDADBC8-4BBC-435E-BE86-8B76DB5EE1A6.jpeg
    1.2 MB · Views: 108
  • 5C1539CB-A4B4-4989-9B6A-B7555B06D553.jpeg
    5C1539CB-A4B4-4989-9B6A-B7555B06D553.jpeg
    1.1 MB · Views: 109
4/18 - Started my bucket this afternoon! I’m going to go in with my airbrush to get the grey variation over the silver. I’ve been trying to use multiple references for the right damage. For ROTJ, there seems to be less as far as the helmet goes, especially the back.
That liquid mask is fantastic isnt it. You can get some great layered effects
 
This thread is more than 2 years old.

Your message may be considered spam for the following reasons:

  1. This thread hasn't been active in some time. A new post in this thread might not contribute constructively to this discussion after so long.
If you wish to reply despite these issues, check the box below before replying.
Be aware that malicious compliance may result in more severe penalties.
Back
Top