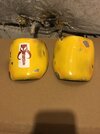
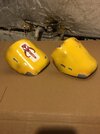
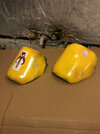
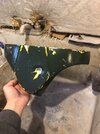
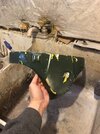
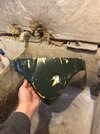
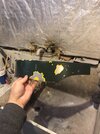
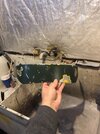
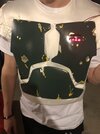
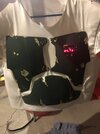
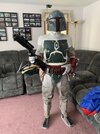
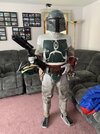
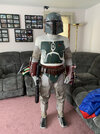
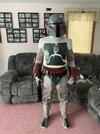
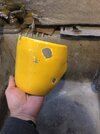
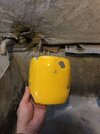
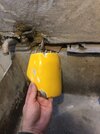
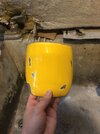
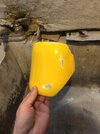
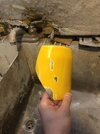
NEW BOBA FETT ROTJ BUILD

2/11 - Hello there pretty happy with how these turned out! Still going to add some more detailing with the airbrush but overall, the majority of the work is done!
Cod and kidney pieces as well!
 

Attachments

  • 15A5FA11-7370-45EB-AB08-1531543D68A3.jpeg
    15A5FA11-7370-45EB-AB08-1531543D68A3.jpeg
    1.4 MB · Views: 138
  • 109A2D36-BFB8-4E73-8EA0-36269A6C95FC.jpeg
    109A2D36-BFB8-4E73-8EA0-36269A6C95FC.jpeg
    1.6 MB · Views: 130
  • 0D5774E6-395D-4323-BF13-F259956521B5.jpeg
    0D5774E6-395D-4323-BF13-F259956521B5.jpeg
    1.6 MB · Views: 121
  • 9C9BFB3F-1068-4A75-BB84-BC52B3ECC8CE.jpeg
    9C9BFB3F-1068-4A75-BB84-BC52B3ECC8CE.jpeg
    1.8 MB · Views: 130
  • 3E1A94EF-BF91-41FC-BAE9-A752EBDFA7A8.jpeg
    3E1A94EF-BF91-41FC-BAE9-A752EBDFA7A8.jpeg
    1.6 MB · Views: 114
  • 4F761998-33F9-439F-80CB-EFF54CC29DB2.jpeg
    4F761998-33F9-439F-80CB-EFF54CC29DB2.jpeg
    1.7 MB · Views: 128
mjwierzb

Ha! That's what you think! ;)
Just kiddin', you're work looks awesome! (y)

Remind me again, who is that armor from?

Thanks,
-Iron

**UPDATE**
Nevermind, I read that it's from MinuteFett. ;)
mjwierzb

Ha! That's what you think! ;)
Just kiddin', you're work looks awesome! (y)

Remind me again, who is that armor from?

Thanks,
-Iron

**UPDATE**
Nevermind, I read that it's from MinuteFett. ;)
Thank you for the kind words! I was just about to reply with who the armor is from but you found it LOL!
 
2/11 - Did some test fitting of the chest armor. Lucky for me, I have a twin brother so we are roughly the same size (I might be a little thicker LOL). I got the chest display velcroed to the vest as well!
 

Attachments

  • 73A055A1-CEF9-4765-92AF-DFE5254F332C.jpeg
    73A055A1-CEF9-4765-92AF-DFE5254F332C.jpeg
    1.2 MB · Views: 125
  • E8ACD4D6-5990-466D-9CA7-A70230230B35.jpeg
    E8ACD4D6-5990-466D-9CA7-A70230230B35.jpeg
    1.2 MB · Views: 137
2/12 - Thought I’d do a little suit up for Fett Friday! This is my progress so far. There is still much to do (finish shoulders, knees, back plate, jet pack, helmet, cape) among other details. I finally used my airbrush to subtly added some black weathering to the body armor and gauntlets, it was fun and easy to use! And of course I had to use a Boba helmet for the photos, it’s the ESB black series helmet. I’m mad nervous to do my own helmet!
 

Attachments

  • A6A853BE-2F4E-4ACE-8BB8-33CB30C4D623.jpeg
    A6A853BE-2F4E-4ACE-8BB8-33CB30C4D623.jpeg
    2 MB · Views: 172
  • 5E4430C1-6618-4F6E-8C53-5EDA6D9D1212.jpeg
    5E4430C1-6618-4F6E-8C53-5EDA6D9D1212.jpeg
    2 MB · Views: 155
  • 4E70ECDE-95CB-4D40-B126-3ED574A4A467.jpeg
    4E70ECDE-95CB-4D40-B126-3ED574A4A467.jpeg
    2 MB · Views: 153
  • 99545560-B5FF-471A-B4EB-0E689D239804.jpeg
    99545560-B5FF-471A-B4EB-0E689D239804.jpeg
    2 MB · Views: 165
Happy Friday to ya!
Lookin' good! Only thing I would potentially be worried about is the "Collar" Piece. Do you think there is enough room? But being that you're using velcro it should be an easy re-arranging of the armor pieces.
(y)

Thanks,
-Iron
 
Happy Friday to ya!
Lookin' good! Only thing I would potentially be worried about is the "Collar" Piece. Do you think there is enough room? But being that you're using velcro it should be an easy re-arranging of the armor pieces.
(y)

Thanks,
-Iron
Thanks Iron! I did do a rough spacing of the armor with the collar and it should fit. I am using Velcro so if it looks off, it’ll be an easy fix! I didn’t want to include the collar in the pictures because it has to overlap the back plate so once I get that done I’ll be able to have a better idea of where the collar will be and how much room I’ll have/if the armor needs to be adjusted.
 
2/15 - Here’s the 90% completed shoulder bells! Still have to add some weathering. Pleased with the colors and how they turned out!
 

Attachments

  • 62003F22-3C1C-4307-BDE9-92C6D78DB373.jpeg
    62003F22-3C1C-4307-BDE9-92C6D78DB373.jpeg
    1.5 MB · Views: 110
  • 976C3BE3-FE68-4F86-B3A5-1A4A1136966C.jpeg
    976C3BE3-FE68-4F86-B3A5-1A4A1136966C.jpeg
    1.2 MB · Views: 114
  • AA9C132D-54C6-45AE-95F7-09DD986CA465.jpeg
    AA9C132D-54C6-45AE-95F7-09DD986CA465.jpeg
    1.9 MB · Views: 120
  • F8CEEC6F-76B0-4FE6-9FD2-B9D1CF17A067.jpeg
    F8CEEC6F-76B0-4FE6-9FD2-B9D1CF17A067.jpeg
    1.5 MB · Views: 110
  • 72E7BF94-45A6-4F12-A4F4-9E829F17BB7D.jpeg
    72E7BF94-45A6-4F12-A4F4-9E829F17BB7D.jpeg
    1.3 MB · Views: 106
  • 5A0AB5BB-98B5-42E5-9C4C-B15BBA72CB60.jpeg
    5A0AB5BB-98B5-42E5-9C4C-B15BBA72CB60.jpeg
    1.4 MB · Views: 99
  • E09ED7F3-7F85-4F89-A32A-64583563E795.jpeg
    E09ED7F3-7F85-4F89-A32A-64583563E795.jpeg
    1.3 MB · Views: 117
2/16 - I think these shoulders are done! Much like the body armor, I used my airbrush to paint the black and orange weathering onto the shoulders. I ended up “decanting” a can of orange spray paint to use in my airbrush. Pretty simple process; I know that could’ve just bought some airbrush paint but I already had the orange in spray paint form so I decided to use that and save some money :)
 

Attachments

  • 714FA2BA-8DF8-44B9-96DB-30B44C1E6CF6.jpeg
    714FA2BA-8DF8-44B9-96DB-30B44C1E6CF6.jpeg
    1.5 MB · Views: 130
  • 09824F13-4AF0-4C8A-B513-4DDE9EF1E942.jpeg
    09824F13-4AF0-4C8A-B513-4DDE9EF1E942.jpeg
    1.3 MB · Views: 136
  • 52CE7EE5-8E54-4AED-914A-8BDB51D9FA93.jpeg
    52CE7EE5-8E54-4AED-914A-8BDB51D9FA93.jpeg
    1.7 MB · Views: 128
mjwierzb
It might be the lighting but they appear to be a bit glossy would be my only critique. Otherwise that’s some great work.

if it is glossy I think that can be toned down some via a coat of Testors Dullcote. It can be obtained via Rattlecan or bottle for an airbrush.

-Iron
 
Question about your masking, I’m thinking of cutting out the exact markings for when I paint my green and stuff. Is that what you did to get as close as possible to the actual suit?
 
mjwierzb
It might be the lighting but they appear to be a bit glossy would be my only critique. Otherwise that’s some great work.

if it is glossy I think that can be toned down some via a coat of Testors Dullcote. It can be obtained via Rattlecan or bottle for an airbrush.

-Iron
Thank you! Yes the yellow I did use is a gloss paint. I think it looks glossier due to lighting, as it is dark out and my basement is a cave LOL. As I said, it is a gloss paint so I may take your suggestion and get that Dullcote anyways just to be safe!
 
Question about your masking, I’m thinking of cutting out the exact markings for when I paint my green and stuff. Is that what you did to get as close as possible to the actual suit?
Hey! I essentially looked at film photos and free handed the masking fluid onto the armor. I used a very fine paint brush, tooth picks, and also a pencil to apply the masking fluid onto the armor. You could use a stencil and trace the shapes onto your armor, that may give you a more accurate result. Me personally it’s easier to free hand it and flow through it!
 
2/16 - Started work on the knee pads. I masked off the silver and applied the light yellow coat. I’m using the same colors I used for the shoulder bells. I also weathered my cape a bit. Might do some more tattering at the bottom. I got this fabric from Hobby Lobby and had it cut to the correct size.
 

Attachments

  • F703AB31-508E-4D7C-9AD5-DCC12BB3D313.jpeg
    F703AB31-508E-4D7C-9AD5-DCC12BB3D313.jpeg
    4.7 MB · Views: 97
mjwierzb
Not bad! (y)
I had also thought of doing material at Hobby Lobby too. But in the end opt'd for the US Army Half Shelter. I was luck enough to find one on eBay for $15.00 and had my alterations gal put on the correct stitching and thread color. I also cut it to the appropriate length too. The 501st states....
501st - ROTJ Cape.jpg


One thing I learned was to mist both sides of the cape with the black. As you can see here with the pic of me and my daughter, I didn't.....and it looked a little off.
Boba Fett and Spider-Gwen.jpg


My two cents anyways.

-Iron
 
mjwierzb
Not bad! (y)
I had also thought of doing material at Hobby Lobby too. But in the end opt'd for the US Army Half Shelter. I was luck enough to find one on eBay for $15.00 and had my alterations gal put on the correct stitching and thread color. I also cut it to the appropriate length too. The 501st states....
View attachment 207541

One thing I learned was to mist both sides of the cape with the black. As you can see here with the pic of me and my daughter, I didn't.....and it looked a little off.
View attachment 207542

My two cents anyways.

-Iron
Thanks! It was more convenient for me just to go to Hobby Lobby and get the fabric I needed there. As I was working on it last night, I had it hung up to dry and had the revelation to spray the other side. So I went ahead and did that LOL. As I’m looking at your photo, what did you put in your flight suit pockets and hip pounces to fill them? I was thinking foam.
 
Yes indeed! I used foam, I got a 2” thick square sheet and cut off what I needed. I may try to re-form it in a way as I’ve been told that mine seems too square and it should a little more inconsistent.
 
Yes indeed! I used foam, I got a 2” thick square sheet and cut off what I needed. I may try to re-form it in a way as I’ve been told that mine seems too square and it should a little more inconsistent.
Got it! I figured foam was probably the preferred method for most Fett’s. I though about using plastic bags or paper towels.
 
This thread is more than 2 years old.

Your message may be considered spam for the following reasons:

  1. This thread hasn't been active in some time. A new post in this thread might not contribute constructively to this discussion after so long.
If you wish to reply despite these issues, check the box below before replying.
Be aware that malicious compliance may result in more severe penalties.
Back
Top