You are using an out of date browser. It may not display this or other websites correctly.
You should upgrade or use an alternative browser.
You should upgrade or use an alternative browser.
Mina Fetts - ROTJ WIP Build Thread
- Thread starter MinaFett
- Start date
MinaFett
Active Hunter
The braids go in the space between the shoulder bell and collar. Will try to find my reference picture and edit post.So the braids attached under the shoulder part of the vest?
Everything looks great
Love doing the masking, especially pulling it off.
Edit - photo attached.

Last edited:
MinaFett
Active Hunter
Gotcha. I wrapped the fishing line around the group of braids to hold them together. This also gave room for the pin to be fed through from the underside. Hope that clarifies.Sorry, my bad typing. I mean, where do you attach them to with the fishing line?
")


MinaFett
Active Hunter
Some more updates.
Flight suit now has straps with Velcro.


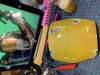
Box lid painting completed.

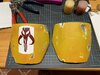
Shoulder bell base paint done. Waiting to dry so can peel off mask and then do highlights. First bit I have airbrushed rather than rattle can/hand painted.


Been working on a CRL check list to help with checking details. Over coming week will photograph bits to add to checklist.
Flight suit now has straps with Velcro.
Box lid painting completed.
Shoulder bell base paint done. Waiting to dry so can peel off mask and then do highlights. First bit I have airbrushed rather than rattle can/hand painted.
Been working on a CRL check list to help with checking details. Over coming week will photograph bits to add to checklist.
Last edited:
RamSkirata
Active Hunter
The RotJ Mytho is my favourite itteration (Maybe Jaster Mereels decal is better still, but thats from the Expanded Universe obviously)! One of my favourite details on the RotJ!Outlines and mustard stripping done. Decal on and will be weathered once other paints dried.
Lazerjock You're right, there seems to be a RotJ craze right now. Barely any ESB or SE WIPs that I noticed. ESB is still my favourite, but the more I see of the RotJ stuff, the more I appretiate it, to be honest. I do like the somewhat darker shade of green. My dream Fett though would probably an ESB base with RotJ Jetpack and SE helmet. Obviously the RotJ shoulder decal

MinaFett I like your progress! The shade of yello looks good to my untrained eyes.
Lazerjock
Active Hunter
Lazerjock You're right, there seems to be a RotJ craze right now. Barely any ESB or SE WIPs that I noticed. ESB is still my favourite, but the more I see of the RotJ stuff, the more I appretiate it, to be honest. I do like the somewhat darker shade of green. My dream Fett though would probably an ESB base with RotJ Jetpack and SE helmet. Obviously the RotJ shoulder decal
I personally like the ESB helmet the best. Something about the taper it has. I wonder if anyone ever did a mix mash costume with all of their favorite pieces. It wouldn't make sense to anyone but the owner, but who cares.
I guess some of the cheap Halloween costumes are like that, but that is more ignorance I think.
MinaFett
Active Hunter
For me I love the colour scheme and mythosaur for ROTJ. Also ROTJ has always been my favourite from the original trilogy. Brings back fond family memories of sitting and watching the film on Beta.
I sanded back my collar piece and shall re prime it tomorrow. 2 and a half hours of sanding here.


Also working on the FP rubber knees. I need to sand and repaint as the paint is peeling and to match my new bells. I can see this going to take a while lol.

I sanded back my collar piece and shall re prime it tomorrow. 2 and a half hours of sanding here.
Also working on the FP rubber knees. I need to sand and repaint as the paint is peeling and to match my new bells. I can see this going to take a while lol.
FettHam
Hunter
I guess some of the cheap Halloween costumes are like that, but that is more ignorance I think.
Just wait for mine to be completed


Hi MinaFett
First off excellent job on your build! I'm also doing up a ROTJ Fett myself!")
I seen your comment on my WIP thread concerning 3D printers on it, (When I asked what a CR10 was) thanks for the info! Again, nice job on your build thus far, but one point of critique if I may....and that is regarding your "Anti-Security Blade". I only point it out because I'm working on mine right now too. But your metal stem rods seem to be backwards......take a look below.

I know you had said you were on the fence about redoing this, and even had some weathering to do to it too. Here is what I would do.
1) Fix the metal rods so they appear more in line with the reference pics.
2) Give the handle a respray of a darker gray (The light grey you have on it now would probably be good for the scratched/wear effects).
3) Give the red stripe a bit of wear on either ends (e.g. Humbrol Maskol).
4) Give the metal rods a bit of rusting effects.
5) Locate a "Matte" finish of tape to add (I found a 1" Gaffers Tape that I intend to use, pictured below).

I'm working with MoW resin versions (One of my first purchases in my ROTJ Fett journey) It looked good to me at first but then I realized that his molds only really let you put the tools in one way and there was no detailing on the back side. And then quickly realized that these were specifically meant for an ESB Build. Had I been a bit wiser, I'd a opt'd for the Patterson Squeege and Machine Craft Shin Tool Rods. Which woulda been about $20.00 more. A little buyers remorse, but not that bad as I'm not going for 501st approval. It does bother me something fierce though and I will be buying the Patterson and Machine Craft Parts though. But I'll just finish and use these for now.
-Iron
First off excellent job on your build! I'm also doing up a ROTJ Fett myself!
I seen your comment on my WIP thread concerning 3D printers on it, (When I asked what a CR10 was) thanks for the info! Again, nice job on your build thus far, but one point of critique if I may....and that is regarding your "Anti-Security Blade". I only point it out because I'm working on mine right now too. But your metal stem rods seem to be backwards......take a look below.
I know you had said you were on the fence about redoing this, and even had some weathering to do to it too. Here is what I would do.
1) Fix the metal rods so they appear more in line with the reference pics.
2) Give the handle a respray of a darker gray (The light grey you have on it now would probably be good for the scratched/wear effects).
3) Give the red stripe a bit of wear on either ends (e.g. Humbrol Maskol).
4) Give the metal rods a bit of rusting effects.
5) Locate a "Matte" finish of tape to add (I found a 1" Gaffers Tape that I intend to use, pictured below).
I'm working with MoW resin versions (One of my first purchases in my ROTJ Fett journey) It looked good to me at first but then I realized that his molds only really let you put the tools in one way and there was no detailing on the back side. And then quickly realized that these were specifically meant for an ESB Build. Had I been a bit wiser, I'd a opt'd for the Patterson Squeege and Machine Craft Shin Tool Rods. Which woulda been about $20.00 more. A little buyers remorse, but not that bad as I'm not going for 501st approval. It does bother me something fierce though and I will be buying the Patterson and Machine Craft Parts though. But I'll just finish and use these for now.
-Iron
Last edited:
MinaFett
Active Hunter
Hi MinaFett
First off excellent job on your build! I'm also doing up a ROTJ Fett myself!
I seen your comment on my WIP thread concerning 3D printers on it, (When I asked what a CR10 was) thanks the the info! Again, nice job on your build thus far, but one point of critique if I may....and that is regarding your "Anti-Security Blade". I only point it out because I'm working on mine right now too. But your metal stem rods seem to be backwards......take a look below.
View attachment 196520
I know you had said you were on the fence about redoing this, and even had some weathering to do to it too. Here is what I would do.
1) Fix the metal rods so they appear more in line with the reference pics.
2) Give the handle a respray of a darker gray (The light grey you have on it now would probably be good for the scratched/wear effects).
3) Give the red stripe a bit of wear on either ends (e.g. Humbrol Maskol).
4) Give the metal rods a bit of rusting effects.
5) Locate a "Matte" finish of tape to add (I found a 1" Gaffers Tape that I intend to use, pictured below).
View attachment 196523
I'm working with MoW resin versions (One of my first purchases in my ROTJ Fett journey) It looked good to me at first but then I realized that his molds only really let you put the tools in one way and there was no detailing on the back side. And then quickly realized that these were specifically meant for an ESB Build. Had I been a bit wiser, I'd a opt'd for the Patterson Squeege and Machine Craft Shin Tool Rods. Which woulda been about $20.00 more. A little buyers remorse, but not that bad as I'm not going for 501st approval. It does bother me something fierce though and I will be buying the Patterson and Machine Craft Parts though. But I'll just finish and use these for now.
-Iron
Hey Iron
Thanks for the tip about the tape. Been looking for some less shinny gaffers tape. Tried electrical tape and was not a fan. Shall have a look and see if I can get the tape you mentioned locally. Or something like it.
Looks like I didn’t update my shin tool pictures here (oops). About 7 months ago I weathered the shin tool rods and moved the rod placement. I have not done the wash spray as yet. I was hoping to get better with air brush before trying. They look like this at the moment.
Nice! If I may ask, about how thick is the spot where the black piece goes? I 'm curious if a shaped piece of Plexiglass would do the trick?
-Iron
....I actually grabbed this stuff.....
Not too bad for $17.75. Since we have a Grainger here locally, I went into Seattle to pick it up. I tried a little bit of it out and it looks the part! I'm going to attempt to finish them up this week along with my Gauntlets.
-Iron
Not too bad for $17.75. Since we have a Grainger here locally, I went into Seattle to pick it up. I tried a little bit of it out and it looks the part!
I'm going to attempt to finish them up this week along with my Gauntlets.-Iron
MinaFett
Active Hunter
Measurements as follows:Nice! If I may ask, about how thick is the spot where the black piece goes? I 'm curious if a shaped piece of Plexiglass would do the trick?
-Iron
The squeegee outer is 10m
Thickness of black rectangle is 5m
I’ve attached pictures with measurements. Little hard to do the inner measurement as I’ve fastened everything in. Hopefully pictures with other measurements help.
I printed mine. This was after I had tried wood and some plexiglass. The wood kind of worked but did not give the finished I’d hoped for.


Similar threads
- Replies
- 15
- Views
- 462
- Replies
- 102
- Views
- 25,443