Is a template-free paint job possible?

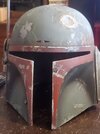
I’m in the midst of an ESB helmet build. I have a BM lid on order but having never used an airbrush, I figured I’d pick up a reasonable priced 3D printed one to work on whilst I wait for my BM helmet and get my first airbrush paint job under my belt.

It’s going well for the most part, taking my time to sand, fill, sand, fill again, sand again e.t.c to get the best possible surface to paint on.

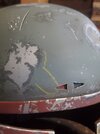
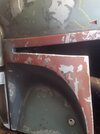
Last night I figured I’d have a go at scaling some templates to fit the helmet. This is where I ran into issues.

I followed SuperJedi’s template sizing tutorial, making sure proportions weren’t linked so that I could make it wider or taller but just could not get the templates to scale up properly. Here’s an example:

A1CEA8CD-D358-437C-AE26-A47F170924A0.jpeg

This is lined up with the bottom of the trim and the side of the key slot panel. But…

CB6484C9-F76E-42D5-88C0-B4418DCAAEE4.jpeg

This makes this side waaaaay out of whack and it also look like the whole template is too long so it needs to be shortened

A636073A-183B-4F72-A63C-27EA2C296D5B.jpeg


…but this side is already too short.

I’d need to warp the overall shape of each template which I can do but it results in quite a distorted final image and I’m not confident I’d be able to see the layers clearly. I think it’s probably just a case of it not being a terribly accurate helmet

So…

I’m now thinking about drawing the layers on to the helmet freehand, using the colour separated templates as reference. Im aware that this will take a long time but I can’t see any other option.

What I want to know is - is this something that can or has been done? Is there any reason I can’t do it this way?

I should also mention that this helmet is not for trooping or 501 clearance, it’s to keep me busy while I wait for my Bobamaker helmet, to practice the painting and will ultimately end up as a display piece so accuracy isn’t paramount but obviously I still want to do as good a job as I can.
 
I would say yes. It is however much harder. I ( out of sheer laziness) did not use a template for my PrePro2 ( attached are some pictures). What I did do however was use s soft lead pencil( like a 6b) to draw on the rough design and placement of the damage and then used my silicone wedge brushes( found on amazon) to apply the maskol.
This is a bit harder as you have to keep checking the templates and really focus on making the damage smaller than your brain wants too( this is because mapping out a design onto a curve, from a template that is flattened out, distorts the proportion. Think of it like the flat maps of the world, they are accurate in thier shape but not thier size, this is due to taking an image from a compound curve and flattening it).
So yeah, you don't have to use templates as a stencil, but it takes more skill and patience.
Please note that the best helmet painters on this forum( jayvee, superseding, famous fett, ect) use the templates and transfer paper to map their damage, what they do is cut the templates up and align the damage like that. So they print multiple stencils of the same area and cut out the part or damage they want to map and line up that one. They then find a reference spot to align the rest and then do the smaller chips by hand. I hope that helps and I hope I didn't misunderstand your inquiry.
This is all just my two cents as a humble amateur playing in the Fett game.
 

Attachments

  • 20220127_124340.jpg
    20220127_124340.jpg
    1.1 MB · Views: 118
  • 20220127_124359.jpg
    20220127_124359.jpg
    1.2 MB · Views: 121
  • 20220127_124404.jpg
    20220127_124404.jpg
    716.2 KB · Views: 113
Oh and also check out Rafelfett's "ultimate ESB template "thread. He re did the templates and resized them to work on the lineage helmets. You still may need to print multiple stencils of the same area and cut them up to work but that should help( unless that's what you already have lol).
 
Oh and also check out Rafelfett's "ultimate ESB template "thread. He re did the templates and resized them to work on the lineage helmets. You still may need to print multiple stencils of the same area and cut them up to work but that should help( unless that's what you already have lol).
I’ll have to double check as I’m not sure which ones I used. I managed to get the rear panels to line up by stretch/distorting them and I think they’re easier to get right because they’re a simpler shape overall but when I got to the mandible I basically rage quit haha.

I didn’t realise people cut the templates up, that would make things a lot easier and I guess it makes sense to do that. I’m really hoping this’ll be easier with my Bobamaker helmet and I guess it should be as it’s a more reputable lid and more accurate in terms of size and dimensions. As I say, this one I’m working on now is just an Etsy print so God knows what it’s based on.
 
Unless a template is made for a specific helmet you'll have to make adjustments yourself.

While it's possible you're not going to get results that look as crisp and accurate.
 
Unless a template is made for a specific helmet you'll have to make adjustments yourself.

While it's possible you're not going to get results that look as crisp and accurate.
Oh yea, I completely understand that but these won’t fit mine without actually skewing and distorting them side by side. Most people seem to only need to adjust the height and width but for me, the shape itself is off.
 
It's a practice helmet, correct? Do your best with adjusting the templates, it'll be good to get all the bugs out before your Boba Maker arrives.
 
It's a practice helmet, correct? Do your best with adjusting the templates, it'll be good to get all the bugs out before your Boba Maker arrives.
Yea, I do have to keep reminding myself that it’s only a practice run! Haha

Did some more work on it today, almost ready to move on to painting:

E6863DDD-501B-42A2-8430-8B4B41CE48EA.jpeg


Filled in the indicator marks at the front and then re-sculpted them because there was no way I was going to get in there to sand the print lines.

CFF8C445-9305-4BD6-B489-6E1D0C08D922.jpeg


I also added the physical damage:

6D9D20E6-D44B-4079-9D0A-8198216910EA.jpeg
 
It's a practice helmet, correct? Do your best with adjusting the templates, it'll be good to get all the bugs out before your Boba Maker arrives.
I've found a method that I think is going to work.

It started with converting the PDF files of the templates to PNG which gave me a MUCH sharper image to work with.

From there, I follow SuperJedi's tutorial and re-size it to get it as close to my templates as possible, then distort each corner independently until I'm happy with the shape.
 
This thread is more than 2 years old.

Your message may be considered spam for the following reasons:

  1. This thread hasn't been active in some time. A new post in this thread might not contribute constructively to this discussion after so long.
If you wish to reply despite these issues, check the box below before replying.
Be aware that malicious compliance may result in more severe penalties.
Back
Top