You are using an out of date browser. It may not display this or other websites correctly.
You should upgrade or use an alternative browser.
You should upgrade or use an alternative browser.
Iron's ROTJ WIP
- Thread starter Irongladiator
- Start date
ShortFuse
Well-Known Hunter
I believe he had to epoxy some machine screws to the inside of the vent, if I’m not mistaken.Curious to how that bottom vent is installed? Did it have screws that you had to fit in order to have it installed?
**JETPACK UPDATE**
For my full time job as a Sales Engineer I had my hands pretty full in September, so I didn't have too much time to spend on my Boba Maker Jetpack. Also it was the end of Q3 too - end of quarters are also a super busy time for us! And here we are in October and I have not done anything to my Jetpack since the last post.....

I had an issue that needed to be dealt with before I proceeded with painting - and that issue was the Rocket. As you may recall, I sanded off the Boba Maker Jetpack Collar to make way for the MCR Collar I have!

Here's a small recap of that endeavor....

....the things we do to get Metal parts to fit, huh? (Remember my Boba Maker Gauntlets and MCR Flamethrower Nozzles?)

So, in that picture above (The one in the Lower-Right hand corner), Gravity is the only thing holding that together. Obviously, I needed something more permanent. And therein lies the issue. How to get them all to fit together and hold snugly? I thought on this pretty heavily and landed on a solution that I thought would work well! tennantlim has this exact setup (Boba Maker JP and the MCR Metal Rocket Collar) and in his thread (Tennantlim's Thread) he posts that he used JB Weld to hold them all together. I will also use JB Weld, but only a half-measure. My idea will improve upon this design and hold it so that the only real way it comes off is by a great deal of sheer force. Last thing I want, is for the rocket to get caught on something and snap off! Which would be not only embarrassing, but also heart breaking at the same time. Here's the idea.....
Embed and use a toggle bolt!

One of the caveats is, is that the Toggle Bolt must have a pan head on it - which emulates a small washer. Here is what I did!
1) First thing I did, was file down my Dremel cutting wheel by continuously cutting off the ends of a spare Steel Bolt I had - the idea of this was to be slightly bigger than the pan head of the Toggle Bolt.

2) Using the Dremel Cutting Wheel to also lop off either end of the Toggle bolt wings...

3) Next thing was to notch out the space on the rocket - easy enough to do with my Dremel and drill bit that also acted as a cutting bit.

4) Then using the "Small Cutting Wheel" on my Dremel, begin to cut out the space where I'll slide in the Toggle Bolt.

5) It fits!!!! Woo-Hoo!

6) And now to test fit it together. My intention (Which hasn't been done, yet) is to epoxy the bolt to the top rocket and then like tennantlim - use JB Weld on the MCR Collar on either end to attach both rocket pieces. But here it is assembled (With no Epoxy or JB Weld)
....As you can see I can hold it horizontally and it holds with no issue.

And then here it is on my Jetpack...

I'm not sure there has been a documented process on this, for those of us who have a Boba Maker Jetpack and an MCR Collar - till now. But here ya go!
Painting to commence this week and next! I took PTO ALL next week to hopefully bring my Jetpack closer to the finish line!
Regards,
-Iron
For my full time job as a Sales Engineer I had my hands pretty full in September, so I didn't have too much time to spend on my Boba Maker Jetpack. Also it was the end of Q3 too - end of quarters are also a super busy time for us! And here we are in October and I have not done anything to my Jetpack since the last post.....
I had an issue that needed to be dealt with before I proceeded with painting - and that issue was the Rocket. As you may recall, I sanded off the Boba Maker Jetpack Collar to make way for the MCR Collar I have!
Here's a small recap of that endeavor....
....the things we do to get Metal parts to fit, huh? (Remember my Boba Maker Gauntlets and MCR Flamethrower Nozzles?)
So, in that picture above (The one in the Lower-Right hand corner), Gravity is the only thing holding that together. Obviously, I needed something more permanent. And therein lies the issue. How to get them all to fit together and hold snugly? I thought on this pretty heavily and landed on a solution that I thought would work well! tennantlim has this exact setup (Boba Maker JP and the MCR Metal Rocket Collar) and in his thread (Tennantlim's Thread) he posts that he used JB Weld to hold them all together. I will also use JB Weld, but only a half-measure. My idea will improve upon this design and hold it so that the only real way it comes off is by a great deal of sheer force. Last thing I want, is for the rocket to get caught on something and snap off! Which would be not only embarrassing, but also heart breaking at the same time. Here's the idea.....
Embed and use a toggle bolt!
One of the caveats is, is that the Toggle Bolt must have a pan head on it - which emulates a small washer. Here is what I did!
1) First thing I did, was file down my Dremel cutting wheel by continuously cutting off the ends of a spare Steel Bolt I had - the idea of this was to be slightly bigger than the pan head of the Toggle Bolt.
2) Using the Dremel Cutting Wheel to also lop off either end of the Toggle bolt wings...
3) Next thing was to notch out the space on the rocket - easy enough to do with my Dremel and drill bit that also acted as a cutting bit.
4) Then using the "Small Cutting Wheel" on my Dremel, begin to cut out the space where I'll slide in the Toggle Bolt.
5) It fits!!!! Woo-Hoo!
6) And now to test fit it together. My intention (Which hasn't been done, yet) is to epoxy the bolt to the top rocket and then like tennantlim - use JB Weld on the MCR Collar on either end to attach both rocket pieces. But here it is assembled (With no Epoxy or JB Weld)
....As you can see I can hold it horizontally and it holds with no issue.
And then here it is on my Jetpack...
I'm not sure there has been a documented process on this, for those of us who have a Boba Maker Jetpack and an MCR Collar - till now. But here ya go!
Painting to commence this week and next! I took PTO ALL next week to hopefully bring my Jetpack closer to the finish line!
Regards,
-Iron
Last edited:
**Jetpack Update**
A slight setback happened today, but for the better in my opinion. So as I said in the above post that the Rocket would most likely have to endure a great deal of sheer force to come undone....turns out that the amount of torque I applied to my wing nut solution was enough to snap off the threaded part of the rocket where the modification for the bolt was made. <Sigh>

Back to the drawing board. So for those who ever wanted an in-depth look at the anatomy of a Boba Maker Rocket - Here we go. So when Boba Maker assembles his Jetpack, he does so in a way that it nearly impossible to undo and for good reason. I liked my idea of using a bolt method. But I did find that you could remove the bottom part of the bottom half of the rocket....

That's one issue solved. Now I don't have to use a janky wingnut. I can use a proper Fender Washer, Lock Washer and Nut!


Now for the top portion. How to get that bolt inside and god willing, with a washer too. I was able to pop off the very tippy top of the rocket! I gotta say forcefully trying to do so made me so nervous. But here are the fruits of that labor! …And yes, this took about 2 hours of using my hand to pull this thing apart - getting angry, taking a break and going back to it!

...And what does it look like on the inside? Well as it turns out I'm able to put in a 1/4 Washer (Which JUST fit - perfectly, I might add!) with my Pan Head bolt and I was back in business.


Also if there is some concern that the torque will cause this to break again. Well....I can tell you it is solid resin from point A to B....

I'm supremely confident now that the only way this comes apart again is if it breaks.

I mean geez la weez, such an ordeal, but it had to be dealt with! And I like the improved design to boot!

Here is the product now!

I mixed up some JB Weld Plastic Bonder and Secure the Machine Craft Replicas Jetpack Collar to the Bottom part of the Rocket and let it sit over night. Then come tomorrow secure the other half with the bolt and then seal up both ends! At THAT point I should be able to call it good!

Till tomorrow guys!
-Iron
A slight setback happened today, but for the better in my opinion. So as I said in the above post that the Rocket would most likely have to endure a great deal of sheer force to come undone....turns out that the amount of torque I applied to my wing nut solution was enough to snap off the threaded part of the rocket where the modification for the bolt was made. <Sigh>
Back to the drawing board. So for those who ever wanted an in-depth look at the anatomy of a Boba Maker Rocket - Here we go. So when Boba Maker assembles his Jetpack, he does so in a way that it nearly impossible to undo and for good reason. I liked my idea of using a bolt method. But I did find that you could remove the bottom part of the bottom half of the rocket....
That's one issue solved. Now I don't have to use a janky wingnut. I can use a proper Fender Washer, Lock Washer and Nut!
Now for the top portion. How to get that bolt inside and god willing, with a washer too. I was able to pop off the very tippy top of the rocket! I gotta say forcefully trying to do so made me so nervous. But here are the fruits of that labor! …And yes, this took about 2 hours of using my hand to pull this thing apart - getting angry, taking a break and going back to it!
...And what does it look like on the inside? Well as it turns out I'm able to put in a 1/4 Washer (Which JUST fit - perfectly, I might add!) with my Pan Head bolt and I was back in business.
Also if there is some concern that the torque will cause this to break again. Well....I can tell you it is solid resin from point A to B....
I'm supremely confident now that the only way this comes apart again is if it breaks.
I mean geez la weez, such an ordeal, but it had to be dealt with! And I like the improved design to boot!
Here is the product now!
I mixed up some JB Weld Plastic Bonder and Secure the Machine Craft Replicas Jetpack Collar to the Bottom part of the Rocket and let it sit over night. Then come tomorrow secure the other half with the bolt and then seal up both ends! At THAT point I should be able to call it good!
Till tomorrow guys!
-Iron
Attachments
Last edited:
**Small Jetpack Update**
This morning I got my Upper Rocket attached with JB Weld Plastic Bonder And once dried I was finally able to toss some Tamiya Chrome/Silver (X-11) on the Jetpack, after which I sealed it. I'm gonna give it the night before I liquid mask it then apply my Royal Blue.


-Iron
This morning I got my Upper Rocket attached with JB Weld Plastic Bonder And once dried I was finally able to toss some Tamiya Chrome/Silver (X-11) on the Jetpack, after which I sealed it. I'm gonna give it the night before I liquid mask it then apply my Royal Blue.
-Iron
So, I took a pause on the Jetpack but will continue painting this week!
See.....this is the kinda stuff that gets me me into trouble.....pocketbook wise.

And one of the reasons why my current spend on this ROTJ Fett went from a budget of $1500 to well over $5k now. This is just another example in that there are way too many cool and awesome things I simply couldn't say "No" to.
So, I got in touch with BH-51512 to inquire about his Range Finder Servo setup, and I ended up getting from him:
a) Machine Craft Replica's - Metal Hollow Stalk
b) Topper
c) Hand Cut Acrylic Block
d) 2 Red LEDs for the Topper
e) 1 White LED for the Acrylic Block.
f) Glove Button with Transmitter and a 2X CR2032 Power Supply
g) Servo with Receiver and 4X AA Power Supply
You too can get in on this awesome kit, the link is: Wireless Rangefinder Servos - Brandon allowed me to customize this kit, I got the upgraded Stalk and glove button. It is a really a nice kit and Brandon has gotten high praise from many here on TDH. So I ordered one. It took a bit of modification to prep it, but I got er' installed!


I just need to get the button installed onto a glove. Thankfully the "Happy Trooper" over on YouTube has given me an idea of where to go with that. (I only need to find a spot for ONE button)


And since we really don't see Boba Fett engage his Rangefinder in ROTJ, I figure I'll just hit the button with my ring finger and like in the Mandalorian take my thumb up to the ear cap, like this....

But I'm pretty stoked in how it all turned out!

Thanks again BH-51512 !
Best,
-Iron
See.....this is the kinda stuff that gets me me into trouble.....pocketbook wise.
And one of the reasons why my current spend on this ROTJ Fett went from a budget of $1500 to well over $5k now. This is just another example in that there are way too many cool and awesome things I simply couldn't say "No" to.
So, I got in touch with BH-51512 to inquire about his Range Finder Servo setup, and I ended up getting from him:
a) Machine Craft Replica's - Metal Hollow Stalk
b) Topper
c) Hand Cut Acrylic Block
d) 2 Red LEDs for the Topper
e) 1 White LED for the Acrylic Block.
f) Glove Button with Transmitter and a 2X CR2032 Power Supply
g) Servo with Receiver and 4X AA Power Supply
You too can get in on this awesome kit, the link is: Wireless Rangefinder Servos - Brandon allowed me to customize this kit, I got the upgraded Stalk and glove button. It is a really a nice kit and Brandon has gotten high praise from many here on TDH. So I ordered one. It took a bit of modification to prep it, but I got er' installed!
I just need to get the button installed onto a glove. Thankfully the "Happy Trooper" over on YouTube has given me an idea of where to go with that. (I only need to find a spot for ONE button)
And since we really don't see Boba Fett engage his Rangefinder in ROTJ, I figure I'll just hit the button with my ring finger and like in the Mandalorian take my thumb up to the ear cap, like this....
But I'm pretty stoked in how it all turned out!
Thanks again BH-51512 !
Best,
-Iron
**Small Update**
This is something I thought about doing last year, but couldn't due to the interaction restrictions that we had due to COVID. But the idea I had was to use the hip/thigh pouches and Ammo Belt pouches as a way to hold treats for the youngsters. And I don't mean candy... So for this year I'm going to do just that!
I have 8 of these, but here is what will be tucked inside each of my ammo pouches (1 per pouch)

(Too bad that my Lego Store didn't have any Boba Fett Keychains)
And then I'll have 2 of these in each Hip Pouch....

Again, too bad that I couldn't find any Boba Fett ones. But as a bonus, two of these fit perfectly inside of my hip pouches too - hahaha!

And then a grand prize of just this one - Which sadly, didn't fit inside of my Thigh Pouch.....

These will be handed out to the best looking Star Wars costumes at Boba's discretion! So 13 total winners!
One does wonder how long it'll take for word to be out that the Boba Fett has prizes?

God willing we have great weather Halloween night!
-Iron
This is something I thought about doing last year, but couldn't due to the interaction restrictions that we had due to COVID. But the idea I had was to use the hip/thigh pouches and Ammo Belt pouches as a way to hold treats for the youngsters. And I don't mean candy... So for this year I'm going to do just that!
I have 8 of these, but here is what will be tucked inside each of my ammo pouches (1 per pouch)
(Too bad that my Lego Store didn't have any Boba Fett Keychains)
And then I'll have 2 of these in each Hip Pouch....
Again, too bad that I couldn't find any Boba Fett ones. But as a bonus, two of these fit perfectly inside of my hip pouches too - hahaha!
And then a grand prize of just this one - Which sadly, didn't fit inside of my Thigh Pouch.....
These will be handed out to the best looking Star Wars costumes at Boba's discretion! So 13 total winners!
One does wonder how long it'll take for word to be out that the Boba Fett has prizes?
God willing we have great weather Halloween night!
-Iron
sutt_hero_rotj
Active Hunter
Interesting !**Jetpack Update**
A slight setback happened today, but for the better in my opinion. So as I said in the above post that the Rocket would most likely have to endure a great deal of sheer force to come undone....turns out that the amount of torque I applied to my wing nut solution was enough to snap off the threaded part of the rocket where the modification for the bolt was made. <Sigh>
View attachment 216260
Back to the drawing board. So for those who ever wanted an in-depth look at the anatomy of a Boba Maker Rocket - Here we go. So when Boba Maker assembles his Jetpack, he does so in a way that it nearly impossible to undo and for good reason. I liked my idea of using a bolt method. But I did find that you could remove the bottom part of the bottom half of the rocket....
View attachment 216261
That's one issue solved. Now I don't have to use a janky wingnut. I can use a proper Fender Washer, Lock Washer and Nut!
View attachment 216262
View attachment 216263
Now for the top portion. How to get that bolt inside and god willing, with a washer too. I was able to pop off the very tippy top of the rocket! I gotta say forcefully trying to do so made me so nervous. But here are the fruits of that labor! …And yes, this took about 2 hours of using my hand to pull this thing apart - getting angry, taking a break and going back to it!
View attachment 216264
...And what does it look like on the inside? Well as it turns out I'm able to put in a 1/4 Washer (Which JUST fit - perfectly, I might add!) with my Pan Head bolt and I was back in business.
View attachment 216266
View attachment 216267
View attachment 216268
Also if there is some concern that the torque will cause this to break again. Well....I can tell you it is solid resin from point A to B....
View attachment 216269
I'm supremely confident now that the only way this comes apart again is if it breaks.
View attachment 216270
I mean geez la weez, such an ordeal, but it had to be dealt with! And I like the improved design to boot!
View attachment 216271
Here is the product now!
View attachment 216273
I mixed up some JB Weld Plastic Bonder and Secure the Machine Craft Replicas Jetpack Collar to the Bottom part of the Rocket and let it sit over night. Then come tomorrow secure the other half with the bolt and then seal up both ends! At THAT point I should be able to call it good!
View attachment 216274
Till tomorrow guys!
-Iron
**Jetpack Update**
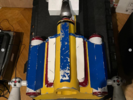
I was able to get my Royal Blue and Gold Yellow on. I forgot how much time it takes to tape that bad boy off. (Nearly 3 hours)

I have to say I have some concerns that this will not be done on time (for this Sunday), but I'll keep plugging away!
More to come.
-Iron
I was able to get my Royal Blue and Gold Yellow on. I forgot how much time it takes to tape that bad boy off. (Nearly 3 hours)
I have to say I have some concerns that this will not be done on time (for this Sunday), but I'll keep plugging away!
More to come.
-Iron
Last edited:
spicy fett
Active Hunter
That work on the jetpack is amazing! I love the way you got everything attached I definitely need to take some notes lol I can’t wait to see how it turns out!
TweakerRay
New Hunter
Hi ! Very Cool...I followed this build for some time... And I also used a few techniques from this build... So thank you for your awesome skills... I colored my hoses with your coffee technique... for my gauntlets. I also started to make a ROTJ Boba Fett Costume (Upgraded from a cheap skyccosplay costume) and I am right now also building my jetpack...
I colored it today in yellow") So we might be on the same stage somehow... This is my first project with Boba Fett... I totally underestimated it.
So we might be on the same stage somehow... This is my first project with Boba Fett... I totally underestimated it.
But Its fun... Even while I never will be 501 conform... It already looks so much better... So again Thanks for the awesome build and your tipps and pictures ! It helped me a lot ! THIS IS THE WAY ;-) (If you like to check out my build i have some pictures at Login • Instagram )
Keep up the cool work ! Can't wait how your jetpack will look... Mine looks like this at the moment... still a lot to do.
I colored it today in yellow
So we might be on the same stage somehow... This is my first project with Boba Fett... I totally underestimated it.But Its fun... Even while I never will be 501 conform... It already looks so much better... So again Thanks for the awesome build and your tipps and pictures ! It helped me a lot ! THIS IS THE WAY ;-) (If you like to check out my build i have some pictures at Login • Instagram )
Keep up the cool work ! Can't wait how your jetpack will look... Mine looks like this at the moment... still a lot to do.
Attachments
Hello my fellow Fett's!
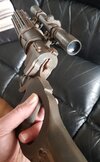
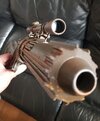
It's been a few months since I've posted anything on my WIP. But I did receive word from Sidewinder that my EE-3 is ready. He was even so kind as to send me a couple pics of it!

Looks so awesome! I even paid him a little extra to fit in a couple lenses at either end of the scope! I can't wait to get my hand on this!

")
In other news, I was having some issues with my BH-51512 Range finder kit. And this guy is so awesome to work with. We identified the issue as very likely just a battery issue (CR2032) but I wanted to take it a bit further and attempted to do my own battery modification. Long story short.....I messed it up. I reached out to BH-51512 and he got back to me very quickly and we made arrangements for me to send the transmitter part back for him to repair. Of course, I'll be paying for those repairs, which is not a problem whatsoever - but this shows me that he stands by his customer and is willing to help out! Thanks again BH-51512 !
Also, I plan to get back to my Boba Maker Jetpack here soon and wrap up the painting.
-Iron
It's been a few months since I've posted anything on my WIP. But I did receive word from Sidewinder that my EE-3 is ready. He was even so kind as to send me a couple pics of it!
Looks so awesome! I even paid him a little extra to fit in a couple lenses at either end of the scope! I can't wait to get my hand on this!
In other news, I was having some issues with my BH-51512 Range finder kit. And this guy is so awesome to work with. We identified the issue as very likely just a battery issue (CR2032) but I wanted to take it a bit further and attempted to do my own battery modification. Long story short.....I messed it up. I reached out to BH-51512 and he got back to me very quickly and we made arrangements for me to send the transmitter part back for him to repair. Of course, I'll be paying for those repairs, which is not a problem whatsoever - but this shows me that he stands by his customer and is willing to help out! Thanks again BH-51512 !
Also, I plan to get back to my Boba Maker Jetpack here soon and wrap up the painting.
-Iron
Last edited:
B0B4F3TT
Hunter
Sidewinder always does an amazing job. My first EE-3 was a Sidewinder.
Jimbo
Hunter
Good morning all, this is the first post I've seen about adding lenses to the EE3. What or where are you finding and using as lenses?That blaster looks brilliant, yeah u gotta have glass lenses, it finishes the scope off nicely. Mines just an old toy that I modified and painted and doesn't compare to that new blaster of yours.
B0B4F3TT
Hunter
I bought a few different scopes from ebay etc and kinda fashioned my own scope out of different parts but the lenses were already inside. I guess its something that could be added later as Irons post touches on but I couldn't advise anybody where to get it done.Good morning all, this is the first post I've seen about adding lenses to the EE3. What or where are you finding and using as lenses?
Similar threads
- Replies
- 102
- Views
- 25,459
- Replies
- 15
- Views
- 475