You are using an out of date browser. It may not display this or other websites correctly.
You should upgrade or use an alternative browser.
You should upgrade or use an alternative browser.
Hydra's Armorer Build
- Thread starter Hydra
- Start date
Hydra
Active Hunter
Holy cow, so a lot has happened in the world since starting this project/build thread. My deadline, Megacon (Orlando, FL) has been delayed (if not outright canceled) . Not a big deal, more time to work, right? Then, Disney+ announced the Disney Gallery show... I'm hoping that the Gallery episodes will reveal some natural/brighter light views of the Armorer. Until I can confirm or deny detail reveals, I'll be holding off on final paint and soft part weathering.
Some passive updates:

Acquired back, chest, belt greeblies and boot armor from T&A as well thanks to a trade.

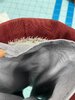
I was also fed up with my attempt at tinting/dying shorter pile sheep skin, so I acquired a new one from Etsy. The store is "Exclusive Rugs" shipping from Poland. I am SO happy with the fur length and color of this skin, from what I can tell thus far, it'll be perfect.
Some passive updates:
Acquired back, chest, belt greeblies and boot armor from T&A as well thanks to a trade.
I was also fed up with my attempt at tinting/dying shorter pile sheep skin, so I acquired a new one from Etsy. The store is "Exclusive Rugs" shipping from Poland. I am SO happy with the fur length and color of this skin, from what I can tell thus far, it'll be perfect.
bucketheadprops
Hunter
Great progress! I'm always in awe of makers who can just seem to whip up something in fabric so easily!
Captainlonestar
Jr Hunter
How did you 3D scan your head?
Mythos Fenn
Active Hunter
Looking awesome so far!
Also that front grab of the armorers costume (where you are laying out your own dimensions) the bucket definitely looks too big for the person wearing it. Where did you find that, if its just from a visual guide and not the show that would make sense. The size of yours helmet on your 3D head looks spot on
Also that front grab of the armorers costume (where you are laying out your own dimensions) the bucket definitely looks too big for the person wearing it. Where did you find that, if its just from a visual guide and not the show that would make sense. The size of yours helmet on your 3D head looks spot on
Hydra
Active Hunter
How did you 3D scan your head?
With a handheld 3D scanner, an Afinia EinScan Pro 2X I believe.
Hydra
Active Hunter
Also that front grab of the armorers costume (where you are laying out your own dimensions) the bucket definitely looks too big for the person wearing it. Where did you find that, if its just from a visual guide and not the show that would make sense. The size of yours helmet on your 3D head looks spot on
To answer your question:
The image from the first page is a shot of Emily Swallow in costume (more specifically the cardboard standee). If you watch her scenes the helmet is big on her. From what I understand the character may have originally been a male, the helmet may have been built to that proportion.
To delve into this issue further:
When the show first premiered, I was especially tiffed about the bobble-head appearance and photoshopped this image (smaller helmet, and a neck!):
The design of the character is great, the sizing on the actress is not. Correct helmet sizing is a huge pet peeve of mine in Mandalorian kits.
In concept art for the armorer, you can see that her character originally started with someone decidedly not as small as Emily Swallow, note the helmet proportions are maintained correctly by the artist:
Mythos Fenn
Active Hunter
Oh snap yeah haha I didn't even notice that you had photoshopped that picture well done. But yeah, your photoshopped proportions are way better. Unfortunately it seems that the costume department skipped or overlooked a decent amount of important aspects of said costumes - like just reusing stormtrooper/shore trooper armor and just painting it a different color and calling it "beskar". it's a shame really but overall all can't complain too much with the show outside of the non-Mando but "Mando" armor lol
Whistlingbird
Hunter
I agree 100 percent with Hydra's helmet proportion statement. A lot of what is available out there is just way too big... that's why I chose to scratch build my Mando helmet.
Hydra
Active Hunter
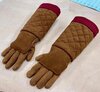
Long time no update! Got a set of gloves/gauntlets done.
Fabrics:
-medium weight 2-way stretch faux suede
-thick batting for the forearm section
-cotton lining
-soft minky fabric for the inner glove to give it a padded look, but it's very stretchy so movement is unimpaired


I think I'll want to remake these in real suede if/when I buy a leather sewing machine I have my eyes on.

Here you can see the lining.

Tried to match the correct number of rows of quilting vs. screenshots, etc.

All layers were stay-stitched for durability.
These of course will get weathered/airbrushed when I get all the fabric pieces done.
Fabrics:
-medium weight 2-way stretch faux suede
-thick batting for the forearm section
-cotton lining
-soft minky fabric for the inner glove to give it a padded look, but it's very stretchy so movement is unimpaired
I think I'll want to remake these in real suede if/when I buy a leather sewing machine I have my eyes on.
Here you can see the lining.
Tried to match the correct number of rows of quilting vs. screenshots, etc.
All layers were stay-stitched for durability.
These of course will get weathered/airbrushed when I get all the fabric pieces done.
Attachments


Last edited:
")
Hydra
Active Hunter
I feel like this build is unfurling like a slow burn, but I've holding out for more information on details or new images of this gal. I've seen a lot of color, tone and detail variance with other builders so far - hard to dial things in compared to Din when his armor has gone on actual display. Looks like the Mercs and Rebel Legion will be picking her up from a CRL perspective.
But, lo and behold, a little bird let me know about this studio-lit shot of the Armorer. At last! I know there's the cardboard standee out there, but this lone image gives a better sense of depth, and her arms aren't covering details:

Additionally, Tamashii Nations has posted up the product page for the newly announced The Mandalorian – The Armorer S.H. Figuarts 6" figure. This figure is BEAUTIFUL. The 6" Black Series Armorer figure looks pretty, simple, in comparison.

Some new observations:
-The chest armor is more copper than red.
-There is piping (?) on the leg detail. Evidence of 2 hemmed flaps on either side of an opening/layer.
-Lack of topstitching on the skirt.
-Inner leg seams for the boot covers.
As for my build itself, I'll be seam-ripping the red sleeve details out of my flightsuit and dying it a little deeper grey. Looks like I'll probably be gutting the leg details as well to add in the piping (?).
I will also be gathering some leather to tackle her skirt, boot covers, belt and gloves more appropriately because I picked up this beast, the Sailrite Stitch Master leather sewing machine:

I haven't sewn leather extensively before, but I do know it's laborious, and I just don't have the time to hand sew. Since I'm tackling Din/The Mandalorian next, this will most certainly come in handy too.
But, lo and behold, a little bird let me know about this studio-lit shot of the Armorer. At last! I know there's the cardboard standee out there, but this lone image gives a better sense of depth, and her arms aren't covering details:
Additionally, Tamashii Nations has posted up the product page for the newly announced The Mandalorian – The Armorer S.H. Figuarts 6" figure. This figure is BEAUTIFUL. The 6" Black Series Armorer figure looks pretty, simple, in comparison.
Some new observations:
-The chest armor is more copper than red.
-There is piping (?) on the leg detail. Evidence of 2 hemmed flaps on either side of an opening/layer.
-Lack of topstitching on the skirt.
-Inner leg seams for the boot covers.
As for my build itself, I'll be seam-ripping the red sleeve details out of my flightsuit and dying it a little deeper grey. Looks like I'll probably be gutting the leg details as well to add in the piping (?).
I will also be gathering some leather to tackle her skirt, boot covers, belt and gloves more appropriately because I picked up this beast, the Sailrite Stitch Master leather sewing machine:
I haven't sewn leather extensively before, but I do know it's laborious, and I just don't have the time to hand sew. Since I'm tackling Din/The Mandalorian next, this will most certainly come in handy too.
Last edited:
Hydra
Active Hunter
The slow burn continues. Between grad school and work I’m literally sneaking in minutes at a time until I take a few weeks off over the holidays.

Mockup of the skirt is done. I am in the process of seam ripping the flight suit (red sleeve accents) to dye the green base darker and add piping on the leg details.
Under good authority the Legacy studio shot is fairly close to true colors, so I’ll be basing the final color pallet closely to it.
But in all honesty, need to wrap this project up so I can start a Bo Katan from season 2. Haha.
"This is the way!"
Outstanding job on this though! Can't wait to see the final product.
-Iron
Outstanding job on this though! Can't wait to see the final product.
-Iron
Hydra
Active Hunter
Happy slow burn update! A big hurdle I've had recently is my shiny new Sailrite sewing machine actually shipped to me with a flaw that somehow missed quality control. We are in the process of sending the unit back to Sailrite for repaires which means no top stitching for leather products any time soon. Darn.
Until then, a couple of other updates:
I was still bothered by the color of the flight suit, the cut of the collar and ultimately it being a one piece verses a two piece. So I seam ripped out the zipper, and sleeve cuffs. Once the garment was prepared, I proceeded to dunk it into a nice steamy polyester dye bath. I used iDye Poly in 462 Silver Grey and it boiled for about 20 minutes. My goal was to add some deepness to the green and cut the yellow qualities of the fabric. The screen used flight suit color is described as: "greyish green." In fact, Emily Swallow herself aided me in this one:

I test swatched several scrap pieces before dying the flight suit itself, I definitely don't recommend attempting to dye fabrics unless you know their fabric composition and its ability to take dye.

Flight suit soup.

The swatch sitting on the flight suit is the original color. You can see the tone a little more true to (real life) color in the skirt photos below.
For the skirt, after mocking it up in muslin, I moved onto leather. The tiered layers are cut from a 3oz hide, and the binding is cut from calfskin. My methodology is a little unique for this skirt. The hide is a chrome tan hide, so the urethane layer was removed from the tiered levels after sewing the binding down.

The binding is sewn down.

The binding was glued down and then glued again under each piece since there is no visible topstitching on each tier of the skirt.

The urethane topcoat was stripped with acetone. Proper respirators and ventilation is absolutely essential when working with solvents.

I then used Tandy Eco-Flo waterstain, touching up areas as needed with Angelus leather paint.

After staining, painting and sealing the leather, I sewed down each tier onto a cotton-stretch underskirt. The pieces move well together between the stretch of the underskirt and the 3oz leather. I will need to wait until my Sailrite sewing machine is repaired in order to work on the tabard portions on the back of the skirt.

I may lighten up the brown tones at a later date, but I'll see how weathering the rest of the costume goes next.
Thanks for following along, until next time.
Until then, a couple of other updates:
I was still bothered by the color of the flight suit, the cut of the collar and ultimately it being a one piece verses a two piece. So I seam ripped out the zipper, and sleeve cuffs. Once the garment was prepared, I proceeded to dunk it into a nice steamy polyester dye bath. I used iDye Poly in 462 Silver Grey and it boiled for about 20 minutes. My goal was to add some deepness to the green and cut the yellow qualities of the fabric. The screen used flight suit color is described as: "greyish green." In fact, Emily Swallow herself aided me in this one:
Flight suit soup.
The swatch sitting on the flight suit is the original color. You can see the tone a little more true to (real life) color in the skirt photos below.
For the skirt, after mocking it up in muslin, I moved onto leather. The tiered layers are cut from a 3oz hide, and the binding is cut from calfskin. My methodology is a little unique for this skirt. The hide is a chrome tan hide, so the urethane layer was removed from the tiered levels after sewing the binding down.
The binding is sewn down.
The binding was glued down and then glued again under each piece since there is no visible topstitching on each tier of the skirt.
The urethane topcoat was stripped with acetone. Proper respirators and ventilation is absolutely essential when working with solvents.
I then used Tandy Eco-Flo waterstain, touching up areas as needed with Angelus leather paint.
After staining, painting and sealing the leather, I sewed down each tier onto a cotton-stretch underskirt. The pieces move well together between the stretch of the underskirt and the 3oz leather. I will need to wait until my Sailrite sewing machine is repaired in order to work on the tabard portions on the back of the skirt.
I may lighten up the brown tones at a later date, but I'll see how weathering the rest of the costume goes next.
Thanks for following along, until next time.
jens
New Hunter
Oh, no! It's like reading a good book and the last page is just a big cliff hanger! Did you ever manage to finish this build? It looks great so far. Of course, now we have a ton of fresh screen material to look at, so I guess half of the builders out there screams and starts over...