HawkFett
Active Hunter
Edit to original beginning post. I completed this build and was approved by the 501st Legion on May 1st. Which also happens to be 501st Legion day. This build took me 3 years and 6 months and I learned a lot. I am still learning a lot from the best Fetts in the galaxy. This thread chronicles the beginning of my build to the end and every mistak in between. I replaced and repainted everything that I started with. If you are reading this thread and want to build a Fett, go the extra mile at the beginning and buy the good stuff. You will have spent too much time on it to give it anything less than a quality helmet and set of armor. That was my biggest regret starting this build. I have compiled a list of vendors that helped complete my build. This build was assembled and painted by me, but I had a ton of guidance from this community. I can't emphasize enough to reach out and ask questions if you have them. This is a great community to lean on.
Vendor/Parts List
Helmet: Viva Fett Fugly (Instagram)
Helmet Ear dry rub transfers: superjedi (On Instagram)
Visor T-Visor.com (Out of business)
Fans: Henry's Helmet Fans/Amazon power cell
Armor: Viva Fett (Instagram)
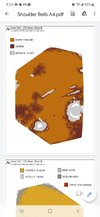
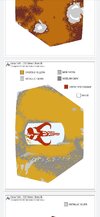
Armor Stencils/Paint Coach: Jurassic_Fett
Jetpack: Viva Fett (Instagram)
Jetpack light kit: Jc27
Jetpack harness: Bigdane
Wookie Braids: JojoFett95
Cape: JojoFett95
Gloves: Clothears
EE-3: 3D printed by @woodtecharmory (Instagram)
EE-3 Leather Sling: ConvergenceProp
Belt: woodman
Nemrod Holster: Cargo hold/Actual production Nemrod Holster
Pulce 40 Blaster: Wasted Fett
Flighsuit and Flak Vest: Arkady
Boots/Spikes: Sparrow Fett (Instagram)
Starting my rattle can ESB build thread here. I've been working at this since around December 2020. I have been a Star Wars fan most all of my life. Boba Fett has always been my favorite. I never gravitated towards the good guys. I've always been that way ha. Boba Fett to me was awesome. And a very under used character to have so much detail put into him. But maybe that's just it. The little that we saw was enough to draw us in forever. This build isn't all for me. Although, selfishly I love the OG Star Wars, my main intent is to use it to tour children's hospitals. There is a St. Jude near my station in Memphis that I want to visit in full Boba Fett dress. That is the vision. I'm sure I will use it other times as well, but I want to do charity work with it. I feel like I don't do enough in that regard. And this will be my vessel. Thanks for following along Fetts. Comments and critiques are welcomed.
Vendor/Parts List
Helmet: Viva Fett Fugly (Instagram)
Helmet Ear dry rub transfers: superjedi (On Instagram)
Visor T-Visor.com (Out of business)
Fans: Henry's Helmet Fans/Amazon power cell
Armor: Viva Fett (Instagram)
Armor Stencils/Paint Coach: Jurassic_Fett
Jetpack: Viva Fett (Instagram)
Jetpack light kit: Jc27
Jetpack harness: Bigdane
Wookie Braids: JojoFett95
Cape: JojoFett95
Gloves: Clothears
EE-3: 3D printed by @woodtecharmory (Instagram)
EE-3 Leather Sling: ConvergenceProp
Belt: woodman
Nemrod Holster: Cargo hold/Actual production Nemrod Holster
Pulce 40 Blaster: Wasted Fett
Flighsuit and Flak Vest: Arkady
Boots/Spikes: Sparrow Fett (Instagram)
Starting my rattle can ESB build thread here. I've been working at this since around December 2020. I have been a Star Wars fan most all of my life. Boba Fett has always been my favorite. I never gravitated towards the good guys. I've always been that way ha. Boba Fett to me was awesome. And a very under used character to have so much detail put into him. But maybe that's just it. The little that we saw was enough to draw us in forever. This build isn't all for me. Although, selfishly I love the OG Star Wars, my main intent is to use it to tour children's hospitals. There is a St. Jude near my station in Memphis that I want to visit in full Boba Fett dress. That is the vision. I'm sure I will use it other times as well, but I want to do charity work with it. I feel like I don't do enough in that regard. And this will be my vessel. Thanks for following along Fetts. Comments and critiques are welcomed.
Last edited:
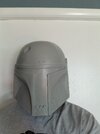
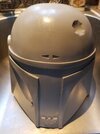
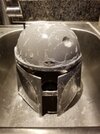
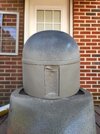
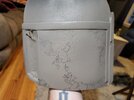
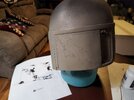
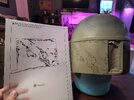
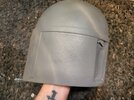
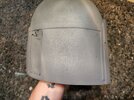
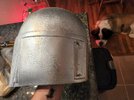
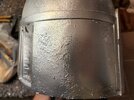
") All imperfections in the cast were filled with spot putty from an auto parts store also suggested by Buda which worked perfectly. It comes in a tube, not the big can like you would use for bigger sections on 3D armor. I left the bridge between the visor as it was also suggested to keep the shape and to avoid warping of any kind in the visor area. I just wanted to provide this info because this is my first cast helmet paint job and I didn't know any of this before starting.
All imperfections in the cast were filled with spot putty from an auto parts store also suggested by Buda which worked perfectly. It comes in a tube, not the big can like you would use for bigger sections on 3D armor. I left the bridge between the visor as it was also suggested to keep the shape and to avoid warping of any kind in the visor area. I just wanted to provide this info because this is my first cast helmet paint job and I didn't know any of this before starting.