Eythor20
Hunter
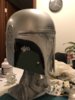
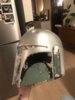
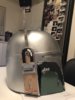
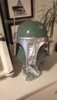
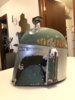
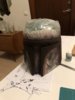
Hello there! In light of the premiere of the mandalorian i wanted to share with you my first attempt at a boba fett paint up!
The colors i used are deka acrylic colors ( White, black, olive green, tiefrod red, creme, orange, yellow ) i also used liquitex matt black, Rustoleum metallic silver and some humbrol brown/rust color... and a weathering powder.
Almost every color is a mix because out of the box none of the deka colors are close enough.
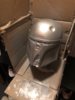
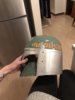
I started by priming the helmet and spraying the rustoleum silver on the whole helmet.

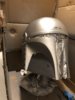
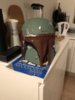
After that i masked off the silver damage on the lower cheeks and sprayed on my “reefer gray” mix and reefer gray weathered.

Repeated the process and painted the olive green mixed with a little bit of white


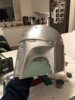
The next step was pretty exciting because it started to look more and more like boba fett with every step. I masked off the silver damage, painted with “reefer gray”, masked off reefer, painted “base gray” and then finally masked base gray and painted matt black.


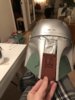
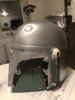
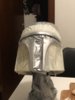
Then i moved on to the ears and rangefinder, here i hit a major f*** up. I had painted the entire ear piece, then cut out the stencil in tape for the white detail on the left ear piece and went to airbrush it on but mixed the white paint way to thin so it ran everywhere. I tried to fix it but it ended up having a horrible texture i might end up repainting it someday but for now i’ll live with it.


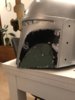
I went on to the dome and holy cow that took alot of time... about 8 hours and most of that time was masking. But again really starts looking like boba now!


The kill stripes could have been better i mixed the colors a little bit to bright in my opinion, i tried to save it with a very thin black wash, but again after all that work on the dome i don’t want to sand and start again so I’ll live with it for now


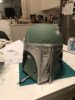
And now the most time consuming part.... the mandibles... Took me 9 hours to finish this and again mostly masking that took so long but this really made the helmet look like boba... before i took of the masking i thought i had fudged it up because the color didn’t look quite right but then when the masking was off i was happy! I still have to paint in some tiny details with a brush but the mandibles are mostly finished.


After almost every part i was sure i had messed up the helmet but in the end I’m pretty happy with the outcome so far") i still have to paint the back plate and seal it with a matt clear.
i still have to paint the back plate and seal it with a matt clear.
The helmet is a kit from Uhbif a user here i highly recommend it, i love it and he was awesome to deal with!
Thank you for reading and have a great day
The colors i used are deka acrylic colors ( White, black, olive green, tiefrod red, creme, orange, yellow ) i also used liquitex matt black, Rustoleum metallic silver and some humbrol brown/rust color... and a weathering powder.
Almost every color is a mix because out of the box none of the deka colors are close enough.
I started by priming the helmet and spraying the rustoleum silver on the whole helmet.
After that i masked off the silver damage on the lower cheeks and sprayed on my “reefer gray” mix and reefer gray weathered.
Repeated the process and painted the olive green mixed with a little bit of white
The next step was pretty exciting because it started to look more and more like boba fett with every step. I masked off the silver damage, painted with “reefer gray”, masked off reefer, painted “base gray” and then finally masked base gray and painted matt black.
Then i moved on to the ears and rangefinder, here i hit a major f*** up. I had painted the entire ear piece, then cut out the stencil in tape for the white detail on the left ear piece and went to airbrush it on but mixed the white paint way to thin so it ran everywhere. I tried to fix it but it ended up having a horrible texture
i might end up repainting it someday but for now i’ll live with it.I went on to the dome and holy cow that took alot of time... about 8 hours and most of that time was masking. But again really starts looking like boba now!
The kill stripes could have been better i mixed the colors a little bit to bright in my opinion, i tried to save it with a very thin black wash, but again after all that work on the dome i don’t want to sand and start again so I’ll live with it for now
And now the most time consuming part.... the mandibles... Took me 9 hours to finish this and again mostly masking that took so long but this really made the helmet look like boba... before i took of the masking i thought i had fudged it up because the color didn’t look quite right but then when the masking was off i was happy! I still have to paint in some tiny details with a brush but the mandibles are mostly finished.
After almost every part i was sure i had messed up the helmet but in the end I’m pretty happy with the outcome so far
i still have to paint the back plate and seal it with a matt clear.The helmet is a kit from Uhbif a user here
i highly recommend it, i love it and he was awesome to deal with!Thank you for reading and have a great day
Attachments
-
 1996CFA5-81FB-4CE6-8FEE-FA6836DA5B46.jpeg1.4 MB · Views: 359
 -
 089E519F-6C29-4F24-A57B-9D939628275E.jpeg1.4 MB · Views: 916
 -
 1B4D72EB-AB00-4F97-9636-95F7D7BE316B.jpeg1.4 MB · Views: 358
 -
 4A252BFD-C04F-40AE-9F18-00FDB3A90D0A.jpeg1.4 MB · Views: 372
 -
 AE42C26A-7811-4AFB-BDD2-D24310818295.jpeg1.4 MB · Views: 381
 -
 32CB3951-5F5F-431D-9C15-D29F445D52F3.jpeg1 MB · Views: 338
 -
 5B073E50-7DDE-46F8-80AC-21E4B42577C4.jpeg1.2 MB · Views: 345
 -
 96D34333-97E6-41EE-B16C-EC7F59A2A6F1.jpeg1 MB · Views: 353
 -
 C4A1ADF5-4709-4248-8450-A42374BA4FA2.jpeg1.5 MB · Views: 354
 -
 5A6044D2-1855-4220-B6DC-D58FD45E27B0.jpeg1.4 MB · Views: 362
 -
 8BC860C9-503A-43CE-98DA-DCDC5E69DB09.jpeg1.4 MB · Views: 363
 -
 668919D4-27E3-4EA6-B11A-EA25E6E8581E.jpeg1,008.5 KB · Views: 439
 -
 63974DEB-EDB5-4550-B2BC-50190CB66A17.jpeg1.1 MB · Views: 330
 -
 8076E8DE-806F-4648-8410-A9B00F71EBEA.jpeg1.5 MB · Views: 432
 -
 6E19B3A9-F26C-4837-955D-246DF503CDAF.jpeg1.3 MB · Views: 358
 -
 E5FD94E9-FEC3-4A9A-920D-BF888F34640A.jpeg966.1 KB · Views: 340
 -
 486BF275-ED2C-4E19-8191-75229D5F5A7F.jpeg1.2 MB · Views: 384
 -
 BEBBB069-B700-426F-B9CF-B02E67F80555.jpeg1.1 MB · Views: 357
 -
 983A3D68-E733-4D11-9234-DE538E8AD712.jpeg1.5 MB · Views: 390
Last edited:
