You are using an out of date browser. It may not display this or other websites correctly.
You should upgrade or use an alternative browser.
You should upgrade or use an alternative browser.
General ConvergenceProps - ESB Build thread - Found Part heavy
- Thread starter ConvergenceProp
- Start date
ConvergenceProp
Active Hunter
Here's a copy of a write-up I just did of this Pulce 40 conversion I made for TheRPF that I wanted to make sure got posted here for Fett costume research purposes too. Again, BIG thank you to Markus for helping me get this one, and to Keegan for his help excellent consulting on the paint job.
Boba Fett Sidearm Pulce 40 Conversion Write-up
So in the years since I got my first Pulce 40 I've unfortunately become far more of a filthy purist like some of you guys in wanting to recreate the film props in the same way the film makers did with the hero props, so I really wanted to try and figure out how they did this dumb speargun back for Bobas Side arm while filming ESB. Kinda difficult to do when the only photos that really exist of the damn thing are either the few well known photos of it in the holster, and Art Andrews gorgeous example painted by Keegan which he shared with us that revealed new info about the cut off front receiver band from a photo in a private collection.


So I did the usual stuff with it such as filling in the bottom of the hollow grip, cutting off the front band and sanding off the logos, but one subject that's always been a question with this prop for me was "Just how much effort they really put into it?". Some bits like the filled in grip, sanded logos and such make it look like someones pet project, like so many things on Boba. Still others like the thin paintjob showing the bondo in the grip that make it look like a total hack job, as if they threw it together as fast as they could.
And one big question that's always remained was did they take apart and remove the small stainless steel rod that extends below barrel or did they cut it off.

So with that I hope to help maybe bring an answer to that question.
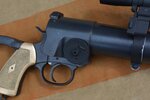
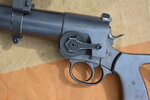
I bring your attention to this closeup of one of the photos above...
Notice the shine from the nickel plated trigger at the top of the split trigger guard?
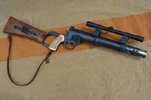
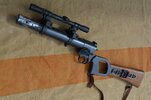
Then take a look at these comparison shots I made of my personal build. The first photo is with the Pulce 40's trigger in its normal Non-Pulled state, and the second photo is with the trigger in the Pulled state..


As you can see, the ESB Boba Fett Hero Sidearm's trigger is in the pulled state in these Cloud City Hallway shots. Whether it stays that way throughout filming is unknown, and unimportant, but the fact that it's in the pulled state in these photos is actually very revealing to how the prop was probably made.
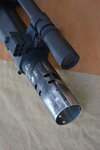
If one completely disassembles a Technisub Pulce 40, this is what you will find inside. A stainless steel 3mm rod attached to the trigger and a sealed tube with an internal system of tubes and springs on the inside. It's really surprisingly not that complex at all, and surprisingly easy to disassemble


But this is why the trigger being pulled is important. If you completely remove that 3mm Stainless Steel rod from the trigger block, then Gravity works against the trigger and forces the trigger into the Non-Pulled state when in the Nemrod holster..
BUT if you leave that rod inside of the Pulce 40, then the natural drag created between that rod and the 5mm x 4mm SS pipe inside the tube that it rides within will keep the trigger up.
So that means its almost certain that this 3mm SS rod still is inside the Hero Boba Fett Sidearm. This is true regardless of what material the trigger block is made of, be it plastic or metal. I've both examples here and they behave exactly the same with the rod removed. Nothing creates the necessary drag needed save for that which exists between the internal rod and the internal tube
The length of the remaining rod inside the Hero Pulce 40 is certainly up for debate, but I am of the mind that if they cut and left this rod inside of the Pulce 40 instead of doing the incredibly simple task of punching out a couple pins and taking the nut off the trigger block, then its likely they never actually took this thing apart, and so likely cut the rod right at the end of where it sticks out.
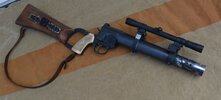
So with that, this is what I went with for this build as its what I would do if I were the prop maker under the gun to get this ready for filming. The rod moves back and forth 5mm when pulled, so theoretically upwards of 5mm of rod could stick out of the Pulce 40 when the trigger is not pulled, or it could be cut somewhere inside if they did take it apart... but I suspect that probably this isn't the case...
I think the prop guy who made the Hero prop probably cut it off right at the end of where it sticks out fully assembled with the trigger in the non pulled state, and so that's what I went with. I unfortunately don't have a set of verniers in my box longer than 10" and had to use a ruler but I think I ended up with a total rod length of 10.8125" long give or take. It just barely sticks out past the end when fully Non-Pulled, and retreats 5mm inside the tube when Pulled. The saw cut end just helps add to the natural friction present and keeps it pulled even when swung around hahaha


I then masked the appropriate areas and painted the speargun while fully assembled with a fairly thin coat of Floquil: Zinc Chromate Primer for the grip, leaving lots of general handling wear on high edges and such showing the original Pulce 40 grey plastic through in places. And then followed with Floquil: Old Silver for the tube giving it a dusty silvery grey all over that just looks bomb.. But there is no paint on the inside surfaces of the tube and grip. Then I sealed the whole thing with a few coats of satin clear cause the paint job is actually super fragile on these without one since there is no primer coat first involved by the looks of it.
Anyway I hope all this ranting helps for some of you OCD guys concerning this enigma of a prop.. I know lots of people like to do springing trigger conversions on these, and I honestly like that too. Its what I did with my first Pulce 40. TBH though I think the prop actually looks a little sexier in the pulled state as weird as it is hahaha "
Boba Fett Sidearm Pulce 40 Conversion Write-up
So in the years since I got my first Pulce 40 I've unfortunately become far more of a filthy purist like some of you guys in wanting to recreate the film props in the same way the film makers did with the hero props, so I really wanted to try and figure out how they did this dumb speargun back for Bobas Side arm while filming ESB. Kinda difficult to do when the only photos that really exist of the damn thing are either the few well known photos of it in the holster, and Art Andrews gorgeous example painted by Keegan which he shared with us that revealed new info about the cut off front receiver band from a photo in a private collection.
So I did the usual stuff with it such as filling in the bottom of the hollow grip, cutting off the front band and sanding off the logos, but one subject that's always been a question with this prop for me was "Just how much effort they really put into it?". Some bits like the filled in grip, sanded logos and such make it look like someones pet project, like so many things on Boba. Still others like the thin paintjob showing the bondo in the grip that make it look like a total hack job, as if they threw it together as fast as they could.
And one big question that's always remained was did they take apart and remove the small stainless steel rod that extends below barrel or did they cut it off.
So with that I hope to help maybe bring an answer to that question.
I bring your attention to this closeup of one of the photos above...
Notice the shine from the nickel plated trigger at the top of the split trigger guard?
Then take a look at these comparison shots I made of my personal build. The first photo is with the Pulce 40's trigger in its normal Non-Pulled state, and the second photo is with the trigger in the Pulled state..
As you can see, the ESB Boba Fett Hero Sidearm's trigger is in the pulled state in these Cloud City Hallway shots. Whether it stays that way throughout filming is unknown, and unimportant, but the fact that it's in the pulled state in these photos is actually very revealing to how the prop was probably made.
If one completely disassembles a Technisub Pulce 40, this is what you will find inside. A stainless steel 3mm rod attached to the trigger and a sealed tube with an internal system of tubes and springs on the inside. It's really surprisingly not that complex at all, and surprisingly easy to disassemble
But this is why the trigger being pulled is important. If you completely remove that 3mm Stainless Steel rod from the trigger block, then Gravity works against the trigger and forces the trigger into the Non-Pulled state when in the Nemrod holster..
BUT if you leave that rod inside of the Pulce 40, then the natural drag created between that rod and the 5mm x 4mm SS pipe inside the tube that it rides within will keep the trigger up.
So that means its almost certain that this 3mm SS rod still is inside the Hero Boba Fett Sidearm. This is true regardless of what material the trigger block is made of, be it plastic or metal. I've both examples here and they behave exactly the same with the rod removed. Nothing creates the necessary drag needed save for that which exists between the internal rod and the internal tube
The length of the remaining rod inside the Hero Pulce 40 is certainly up for debate, but I am of the mind that if they cut and left this rod inside of the Pulce 40 instead of doing the incredibly simple task of punching out a couple pins and taking the nut off the trigger block, then its likely they never actually took this thing apart, and so likely cut the rod right at the end of where it sticks out.
So with that, this is what I went with for this build as its what I would do if I were the prop maker under the gun to get this ready for filming. The rod moves back and forth 5mm when pulled, so theoretically upwards of 5mm of rod could stick out of the Pulce 40 when the trigger is not pulled, or it could be cut somewhere inside if they did take it apart... but I suspect that probably this isn't the case...
I think the prop guy who made the Hero prop probably cut it off right at the end of where it sticks out fully assembled with the trigger in the non pulled state, and so that's what I went with. I unfortunately don't have a set of verniers in my box longer than 10" and had to use a ruler but I think I ended up with a total rod length of 10.8125" long give or take. It just barely sticks out past the end when fully Non-Pulled, and retreats 5mm inside the tube when Pulled. The saw cut end just helps add to the natural friction present and keeps it pulled even when swung around hahaha
I then masked the appropriate areas and painted the speargun while fully assembled with a fairly thin coat of Floquil: Zinc Chromate Primer for the grip, leaving lots of general handling wear on high edges and such showing the original Pulce 40 grey plastic through in places. And then followed with Floquil: Old Silver for the tube giving it a dusty silvery grey all over that just looks bomb.. But there is no paint on the inside surfaces of the tube and grip. Then I sealed the whole thing with a few coats of satin clear cause the paint job is actually super fragile on these without one since there is no primer coat first involved by the looks of it.
Anyway I hope all this ranting helps for some of you OCD guys concerning this enigma of a prop.. I know lots of people like to do springing trigger conversions on these, and I honestly like that too. Its what I did with my first Pulce 40. TBH though I think the prop actually looks a little sexier in the pulled state as weird as it is hahaha "
Last edited:
ConvergenceProp
Active Hunter
Got something really cool in the mail the other day and been fine tuning my modified WF shells. I’m happy to be able to share with you one of the first of the new Elstree Precision SuperTrooper/Boba Fett gauntlet lasers.
This thing is just... WOW . This thing truly nails the exact look and dimensions of the original wrist laser parts!
John and the guys at Elstree working on this project really hit this one right out of the park! Congrats on the phenomenal job guys! Gauntlets never get enough attention


For painting it (ignore my half ass gaunt paint job) I decided to go with a semi-gloss black from MM with no primer layer for the body and tip as I don’t think they primed on the original lasers given how beat up they are today. I also think its a slightly different deeper black than the other accents on the gauntlet
Id modified my WF shells around the laser cradle and under keypad by adding material and reshaping (can post more on these mods later), while using my own gauntlet rocket redesign prototype as a guide, and only needed to remove a hair of that added material on the top in order to match the new Elstree Precision SuperTrooper laset


Still have a lot of work left to do on these shells but this thing just gave me a whole new motivation to get working on finishing them as well as getting to work on that flamethrower unit
This thing is just... WOW
. This thing truly nails the exact look and dimensions of the original wrist laser parts!John and the guys at Elstree working on this project really hit this one right out of the park! Congrats on the phenomenal job guys! Gauntlets never get enough attention
For painting it (ignore my half ass gaunt paint job) I decided to go with a semi-gloss black from MM with no primer layer for the body and tip as I don’t think they primed on the original lasers given how beat up they are today. I also think its a slightly different deeper black than the other accents on the gauntlet
Id modified my WF shells around the laser cradle and under keypad by adding material and reshaping (can post more on these mods later), while using my own gauntlet rocket redesign prototype as a guide, and only needed to remove a hair of that added material on the top in order to match the new Elstree Precision SuperTrooper laset
Still have a lot of work left to do on these shells but this thing just gave me a whole new motivation to get working on finishing them as well as getting to work on that flamethrower unit
sutt_hero_rotj
Active Hunter
Strong work man as usual!
boba87fett
Active Hunter
such a great thread
ConvergenceProp
Active Hunter
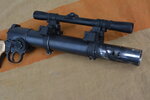
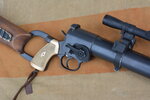
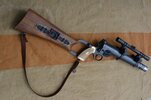
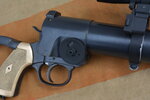
Upgrades to my Boba ESB EE-3 Foundparts build. (because im trash and will never finish this prop)
1.) Added Romans gorgeous new MPP replica and swapped out my Parks tube.
2.) Finally finished V4 of my new ConvergenceProps: Repositionable Breech Disks kits, intended for Early Filming vs Later Filming configurations . Super happy with how these came out after all the work that went into them. (These ones are Type "B")
I might still pick up one of Fieldmarshalls stocks eventually to replace my India made replica, but idk yet. Pretty happy with it atm though.
Obligatory broken off molex photo from flipping it around taking photos (Carbonite Freezing chamber and “Put Captain Solo into the Cargo Hold” config)
Parts list:
Found Parts:
Real 1917 webley
4x AM aerial split plugs
2x vintage Unimax switch
4x Molex connectors
1977 V8 rods
A.S.I 4x20 scope
Replica Parts:
Leather Sling - Designed and made by me
Scope mounts and brackets- Designed and made by me
Breech Disks - Designed and made by me
Flash tube - Roman Props MPP Replica
Attachments
-
 DSC_1415.JPG9.2 MB · Views: 258
 -
 DSC_1417.JPG8.5 MB · Views: 253
 -
 DSC_1432.JPG11.7 MB · Views: 254
 -
 DSC_1421.JPG3.8 MB · Views: 257
 -
 DSC_1422.JPG8.3 MB · Views: 258
 -
 DSC_1423.JPG2.2 MB · Views: 250
 -
 DSC_1424.JPG3.5 MB · Views: 251
 -
 DSC_1427.JPG2.4 MB · Views: 247
 -
 DSC_1430.JPG9.5 MB · Views: 269
 -
 DSC_1431.JPG8.5 MB · Views: 251
 -
 DSC_1399.JPG2.4 MB · Views: 250
 -
 DSC_1436.JPG2 MB · Views: 255
Last edited:
Similar threads
- Replies
- 2
- Views
- 1,774
- Replies
- 603
- Views
- 155,188
- Replies
- 46
- Views
- 21,536