General Budget Jango Costume Build

Fiddled with the holes in the brackets a bit more, still a teeny bit crooked but a bit better. Glued them in, as well as the other support brackets and the flamethrower tips on the dowels.
36E5A962-1E66-41D8-BBC3-A59FC008DB44.jpeg
944B0A3D-67AD-40D0-A9DF-674FB9E6EAF3.jpeg
 
Got some pleather for the vest. It’s a nice color.

1FCAB488-0B5E-48AC-9D88-F2910E1B6609.jpeg
I traced the cut-up shirt onto the back of it, as well as shoulder templates based on templates from TheMandoWay.
D46278CF-97A8-4EE4-80E4-0431706DA2C9.jpeg

And cut them out. Next up is sewing.
252DFC6A-BBF5-41CD-88E5-C1B0D288B9AD.jpeg

Also trimmed down the shoulders to better match Jango’s shoulder shape

6035BEE7-712D-4D3F-80A2-359694B37246.jpeg
 
Sewed one of the shoulder flaps.
19F7AAA1-0457-4156-ADD6-0DEE8C1C2B37.jpeg
750CCE38-3131-4869-8974-B0D7E96D091C.jpeg


And here’s a pic of my not so great sewing skills
F210D85C-9504-4F4F-8E48-4DF72939A622.jpeg


Accidentally trimmed the shoulder on the right a little more than the one on the left. Oh well, it’s not too noticeable.
1C702E5C-7261-4E9E-8182-BDE069786287.jpeg
 
Last edited:
My new gloves came in. Then fit really well, and the cuff is longer so there’s no chance of my wrist showing.
64946A1F-530B-4C13-AAAF-E3497AF5B33F.jpeg
FE02386D-0A07-453E-A39D-F1A80D3961E4.jpeg


I ordered navy blue too but they looked a little too light in the pics so I thought I’d get black too just in case they do end up too light.
 
Got a replacement 3d printed rangefinder on Etsy that’s longer from Makerbak3d. Much better
E0EC0D8B-6D2C-4A8A-A0B0-7388553747DB.jpeg


Here’s the old one
7045DEE4-ADAE-414C-A45C-089875273787.jpeg


Vs new one
6BC4738F-D777-4D09-84D8-B784C05AE097.jpeg

However it still feels ever so slightly too short, so I’ll still pull the rangefinder cap out farther, like so:
5A0594D0-EF91-4FAC-B0DF-0F86E013946D.jpeg

Shouldn’t be much sanding at all to get it smooth. Gotta take the magnets from the old one and put them in this one.
 
The weather was finally nice today, so I took a fine sanding sponge to the helmet and bondoed the divots along the T frame.
0B338A67-56B2-4888-BFEF-734ACBDCB62D.jpeg
58245D9E-BA29-42ED-906A-3D162FD5B4D0.jpeg


Then I filed the 3d printed rangefinder flat and covered it with spot putty.

E8A7094E-AE63-4765-AB28-292FA5095667.jpeg
 
Last edited:
Helmet, blasters and rangefinder sanded. Added the magnets to the rangefinder. Might just slap some primer on everything just to see where they are right now.
 

Attachments

  • D74D3E96-C3E8-4294-9C5D-D0D7E81D39BC.jpeg
    D74D3E96-C3E8-4294-9C5D-D0D7E81D39BC.jpeg
    1.6 MB · Views: 64
  • 0348BB86-4EB5-490E-96E3-8457C484F802.jpeg
    0348BB86-4EB5-490E-96E3-8457C484F802.jpeg
    1.7 MB · Views: 64
  • D607AE70-1C8D-4E4A-A08E-8381ABD1F65B.jpeg
    D607AE70-1C8D-4E4A-A08E-8381ABD1F65B.jpeg
    1.3 MB · Views: 64
  • 13E7AAA7-CDAC-41C4-8117-FA56AB65B8AC.jpeg
    13E7AAA7-CDAC-41C4-8117-FA56AB65B8AC.jpeg
    1.2 MB · Views: 67
  • 9448E3FE-F7AE-4AA2-8C60-09F6A255AA1B.jpeg
    9448E3FE-F7AE-4AA2-8C60-09F6A255AA1B.jpeg
    1.2 MB · Views: 64
Used masking tape and pins for a quick test fit with one shoulder piece
AC3905B3-D89F-4CA1-B386-7DE4CFC9A999.jpeg
61E03562-F876-4B36-A2E5-0F83BED3C563.jpeg


I had drawn sharpie on the inside of the shoulder pieces to help line it up with the vest so it lays as flat as possible. I think it’s pretty good so far
ECA76C98-343F-48BA-9D2A-97102A23F998.jpeg
F31A08BE-8FCB-49DA-882F-106EE1775E47.jpeg
 
So I decided to get myself a Disney parks boba Jetpack to repaint as Jango’s.
C706C84B-5E35-4407-B517-5C2F1A7297A4.jpeg


5C40BEE6-F693-442A-A251-03C533EB6BB6.jpeg
78030820-9142-4B07-B40E-FD6187E99B09.jpeg

While it is a little small, the major selling point for me was definitely the lights, sounds and ACTUALLY FIRING ROCKET!!!


This thing is so cool honestly. Love it. The only thing I’m worried about is the squishy, hollow rubber rocket not taking paint well, but we’ll see about it.

Some pics for fun.
1AAFDC99-365C-40FD-9EF4-137E12D480C9.jpeg
72535990-06BC-41B1-9962-E98E673C12E0.jpeg

BC0DB116-A504-4920-B337-156BED8B9C09.jpeg


Also finished up sewing the vest. Really happy with it, but the left shoulder does splay out a little more. I’ll figure it out once all the armor gets fitted.

256E1D49-52FA-42E1-9B00-A1FD1188BCEA.jpeg
F1917DAE-321B-42D4-820D-1E404AB8892B.jpeg


With shoulder armor
864CC54D-0B40-4271-B822-95B3B80CD393.jpeg

Side and shoulder zippers
1A7B3260-6F0D-4F0D-ACD9-4DBA8C8B1074.jpeg
7A7ED2EB-1827-43FA-B135-FB959EFB1F81.jpeg


I also removed the unnecessary pockets on the coveralls.
Before
4EB2E2C0-0895-4844-86F4-4F7EAE904C4F.jpeg

1F4D4AD4-67A9-4744-8340-62AD69373BEA.jpeg


After
30F49E94-AD5C-4E11-9C1F-E844B24124A9.jpeg
42A671DE-273F-4A1C-B458-70A2090FBAB5.jpeg

Much better.
Still gotta sew these closed just so the white doesn’t show.

627C5588-63C4-4659-8AB0-5C551EF8C00E.jpeg
 
Sewed those pockets closed
29F5F000-187D-4FF6-9CBE-7465DABA1961.jpeg

And sewed in the fake double sleeves. Tried to make both of them as equal as possible. I had to color the thread I used with sharpie to get it to match the suit better since the original color was a bit too light.
FCFB8738-64CF-41FE-A57B-D5DF90344EF1.jpeg
8947A354-3729-4C85-B5BA-EA474FAD8857.jpeg

Here’s the nearly finished flight suit.
3B3EFEA2-0F99-409A-A25F-9CBC4498A952.jpeg

The right sleeve’s double sleeve turned out a little scrunched and not as nice as the left one. Will be re-doing it.
0789C757-945A-47A8-A65C-B0F729D039EA.jpeg


With the flak vest
007F6D93-F87F-4443-B78F-DBB7BBB28EF4.jpeg
 
Hey all, I’m back. Haven’t been able to work on the costume much cause we moved, but finally getting back at it. Decided that constant updates are a bit repetitive so I waited till I made some significant progress to post. I finished fitting the greeblies into the gauntlets. They are ready for primer and paint.

E7B501D8-8E27-4BA8-8663-B8B8261EEFB7.jpeg
17298A71-DB69-4857-904B-FDEF576F5D2E.jpeg


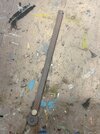
The darts and whipcord hook are 3d printed by me. Models by josiff and lukekjedi on thingiverse.
I got a new wrist rocket, 3d printed by SwiftcloudDesign on Etsy. It’s already printed in metallic plastic so no need to paint. Right gauntlet switches and flamer buttons from FairpriceProps on Etsy. Left gauntlet embedded switch I fabricated with some scraps. LED indicator light from Amazon by Alpinetech.

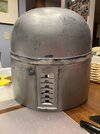
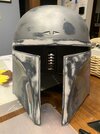
After a few more rounds of filler, sanding, and primer I think the helmet, earcaps, and rangefinder are nearly ready for paint too. Also 3d printed the holster belt loop/tube/bracket by stormtrooperguy on thingiverse that’s also nearly finished.

85A5AC71-B04C-4AD4-AD89-39C2E13C2714.jpeg
AF272FF9-6EFB-41F0-BB78-A2E3272535F2.jpeg
F4076FFD-BAA0-43C9-9F7B-10B0DA942CE1.jpeg


I added an upside-down V shaped cut in the back of the flak vest to tighten the fit around my waist so it doesn’t crinkle up under the belt. E-6000’d velcro down to hold it together, which allows it to be taken off easier.
9E849B6A-9F86-4ED9-B7F2-F7CF612176FF.jpeg

63FD101A-BC11-48F6-B3BC-896C5F9C4D71.jpeg
27A180BB-D330-4E19-8651-EA9B2A11EA3D.jpeg
2D3B39A6-E489-46FE-A90F-86ABB673D700.jpeg


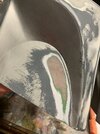
I decided the Disney parks Boba fett Jetpack was a bit too small for my liking, so I ordered a 3d printed large sized Z-6 from 3dcauldron/thepartsgirl.
B6B60675-409F-4477-AC32-75E83E6E12C9.jpeg
B293912D-A492-42E5-A822-E9383D004553.jpeg
E049FDD8-11BB-4614-9649-AB52F9F6A39D.jpeg
D9DCCF9E-A150-4CA8-BA38-7807E294F91A.jpeg


The print quality is really nice. I plan on using UV resin to fill the lines.

669D226F-AC10-44AF-8CC9-8E676926ED36.jpeg


I’m not too sure how to attach a harness to the Jetpack. There is no method of attachment on the kit, I don’t think I can really drill into a fdm print, and I’m not sure if or what glue would be strong enough to hold a bracket or straps. Any advice?
 
Last edited:
Helmet and gauntlets sanded and wet sanded. The helmet is ready for paint and the gauntlets are ready for primer.
E00D7A9E-A90C-4624-B82A-AB35B47D8731.jpeg
C0C4A015-E8CB-4987-9F27-751855BA3849.jpeg

I’ll be priming the gauntlet darts, homemade switch, flamethrower dowels, and cod loop in black since I’ll be spraying them silver. I might use rub n buff on the cod loop after silver paint.
C471A918-0A61-4024-B322-4C69EFC7A33B.jpeg


Ordered a pair of 3d printed westar’s from galacticarmory to replace the Rubie’s. So much nicer.
6B1C1ACE-9562-4AF7-8C40-3E312B97503F.jpeg


I tried to twirl them like Jango… didn’t work

Yeah I broke one…easy fix

2618EFCE-F4A4-4502-BEAB-EA06CD01CE31.jpeg
 
Roughly masked off the exterior and holes in the helmet and blacked out the inside.
E614EB46-9B2B-4A41-997B-0BDCC13F6BC2.jpeg
0DFEF600-0053-4716-A00A-8A985D719113.jpeg
8842AC38-55FE-43B9-8437-ABF5BAB56CB7.jpeg


Peeled the tape off, looks great. Not clean and perfect but it doesn’t need to be for me.
44AB997F-15BA-4620-ABA3-A37BFDA1D742.jpeg
 
Primed gauntlets and little stuff.
60B64E39-308D-4AA8-AFE0-37E29611C87C.jpeg


Glued the rangefinder together with epoxy. The new stalk still felt a bit too short so I didn’t insert it fully into the cap when gluing to lengthen it.

D976F7E4-ABD3-4649-91ED-C30C3EB806BD.jpeg


I’ll sand down the epoxy then prune it black to paint it silver.
71E410CB-325A-416E-8809-E454AB6AA2F1.jpeg


Masked off painted areas, and helmet rub n buffed. Planning to use MAAS metal polish to shiny it up even more.
A64287E1-EF95-479D-A004-5103D4B174EA.jpeg

19DE6706-73FF-4ECC-8F48-19FCB3A99A24.jpeg

EC5B0EE9-D3DA-4511-BCB3-750EE5D2B4EB.jpeg

B2CF14AE-4831-42AE-BF0D-B3994445EB44.jpeg
 
Finished rub n buff on the helmet and gauntlets. This stuff is a little bit tricky but I’m pretty happy with it, still rubs off slightly but not too much. The metal polish I ordered earlier ended up being a bit too strong and took the rub n buff off, so I’ll leave it as it is.
F175BEC4-2DBC-4F49-A114-5DE4E0B42B8A.jpeg


Painted ear caps. I laid it on a little too thick the first time and it dripped a little, so I had to sand it and repaint once. Cleaned up rangefinder epoxy and painted it silver too. Also painted the wrist rocket.
2EB5A653-BC03-49BE-8DD6-17BA4F7C0061.jpeg


Had to do some extreme masking for the rocket lol. Turned out great though.
CF57E737-FFAF-4993-BCEA-83BB5000F2ED.jpeg

32018F80-651E-4122-82F2-D48E4476CD29.jpeg
C44E96BC-8C45-4680-AA93-D155AB533049.jpeg

Forgot to mention I cut holes in the sides of the helmet and a slit in the left earcap for better hearing since I am deaf in my left ear.
EBC61232-CC23-418D-A0F2-5CD2354D063F.jpeg
CD8584C6-00C4-4C56-A67D-CD352FB11883.jpeg

589F9F4D-7DA2-4960-9F15-FDF4369DB135.jpeg

Sprayed the little bits silver.
9E4E722E-8286-4856-B9D2-F511FAC06565.jpeg


And started on the girth belt, a strip of thin eva foam with velcro e-6000’d on. I’ll e-6000 the ropes on too.
BC4DDA7C-3D3E-4075-B871-967F625A07F3.jpeg

6EBB5680-FE45-4D32-AFC6-33C372A765AD.jpeg
 
This thread is more than 7 months old.

Your message may be considered spam for the following reasons:

  1. This thread hasn't been active in some time. A new post in this thread might not contribute constructively to this discussion after so long.
If you wish to reply despite these issues, check the box below before replying.
Be aware that malicious compliance may result in more severe penalties.
Back
Top