General Budget Jango Costume Build

jangobobango

New Hunter
hello,
I am new to this forum. I have a very early WIP jango costume I am working on. The bucket is a rubie's target boba fett I am modding and the blasters are also rubie's. I will be back with pics soon...
 
thanks joe... although the way you describe it as "the madness" makes me a little intimidated lol.
anyways, here are some pics. I disassembled the blasters and took out the electronics.

I also bought some thin 2mm brown foam for the belt/holster/girth belt.

and for the currently very messy helmet. I had repainted it awhile ago for a boba Halloween costume... and it sucked.
so I wet-sanded the helmet, cut out the visor, and have done bondo about thrice already.
IMG_1028.jpg
IMG_1029.jpg
IMG_1027.jpg
IMG_1032.jpg
IMG_1031.jpg
IMG_1030.jpg


I also need some help. does anyone have some ideas on how I can lengthen the rangefinder? thanks.
 
Rust-Oleum Chrome doesn't even come close to the natural metallic finish you get with properly applied Rub 'n Buff.
No Comparison, ''Silver Leaf'' Rub 'n Buff is what you want.
 
alright, so I brush painted the inside of the blasters with acrylic black paint while they were apart, and glued them together with superglue. I also made a start on the girth belt.
IMG_1033.jpg
IMG_1034.jpg
 
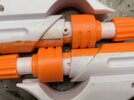
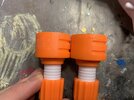
Once upon a two years ago, I had decided to make a custom mando instead of jango. So I bought some stuff and…it went pretty much nowhere. I have now returned to continue this as a jango build.

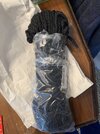
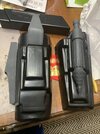
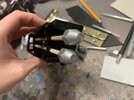
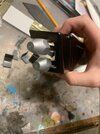
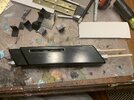
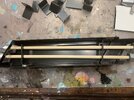
I bought a mando vacuum formed armor set from DHPFX that’s been sitting around for two years that I will be using. It has all the standard jango armor pieces. I did a lot on the helmet, and posted all that progress on mandalorian mercs. I will be redoing the helmet however. There’s still extra mods I need to do to make it more jango accurate and better looking.

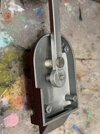
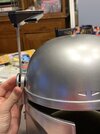
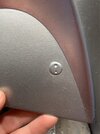
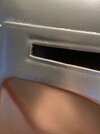
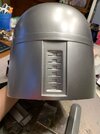
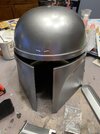
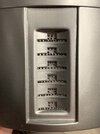
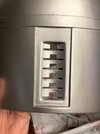
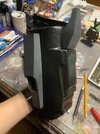
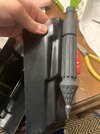
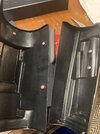
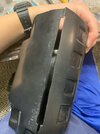
The helmet has been finished and spray painted silver. I’m going to fill some weird divits, the boba cheek greeblie, hollow out the back vents, and sand and redo with rub n buff. I’ve added magnets in the rangefinder stalk to keep it from falling down. Instead of lengthening the stalk, I’ve decided to just pull the end cap off farther and reglue to make it appear longer. Hoping to finish this by Halloween.
 

Attachments

  • 855C1CE2-6D43-4F9C-8823-81E3329085CA.jpeg
    855C1CE2-6D43-4F9C-8823-81E3329085CA.jpeg
    1.2 MB · Views: 92
  • 5BA1E7BE-083C-4F1D-B025-FC431AFDC5C7.jpeg
    5BA1E7BE-083C-4F1D-B025-FC431AFDC5C7.jpeg
    1 MB · Views: 87
  • 982E1A15-E557-4736-841A-179F319B6E38.jpeg
    982E1A15-E557-4736-841A-179F319B6E38.jpeg
    982.3 KB · Views: 88
  • 0477F852-0327-4BAE-BBD0-3069FA39FF71.jpeg
    0477F852-0327-4BAE-BBD0-3069FA39FF71.jpeg
    1.3 MB · Views: 87
  • 571CB488-ADDB-4DAF-BA0A-7CC48DC5083B.jpeg
    571CB488-ADDB-4DAF-BA0A-7CC48DC5083B.jpeg
    1.3 MB · Views: 83
  • 42D6E91A-286F-4E77-BEC2-61843B17AE8D.jpeg
    42D6E91A-286F-4E77-BEC2-61843B17AE8D.jpeg
    1.2 MB · Views: 79
  • 9102D7A0-3E9F-4AEB-A791-4CC1459B7BAF.jpeg
    9102D7A0-3E9F-4AEB-A791-4CC1459B7BAF.jpeg
    1.5 MB · Views: 87
  • 1B712D80-B549-4DAF-999F-636E591776C9.jpeg
    1B712D80-B549-4DAF-999F-636E591776C9.jpeg
    1.2 MB · Views: 92
Cut out helmet vents. Drilled holes, cut with exacto knife and used needle files.

Did some sanding and filing on the blasters and cut off this weird protruding screw hole on it. I haven’t really touched these blasters since the last time I posted them either.

I also changed the setup of the rangefinder magnets so the magnets themselves are touching allowing a stronger hold.
 

Attachments

  • CDB4E675-9AF6-4709-ACF0-523B6AF8761B.jpeg
    CDB4E675-9AF6-4709-ACF0-523B6AF8761B.jpeg
    1.4 MB · Views: 78
  • 59088D48-2058-45C1-99BA-E036BA547E94.jpeg
    59088D48-2058-45C1-99BA-E036BA547E94.jpeg
    1.5 MB · Views: 84
  • AF1DA657-A1F3-4C72-B11F-35AA47756A6A.jpeg
    AF1DA657-A1F3-4C72-B11F-35AA47756A6A.jpeg
    1.8 MB · Views: 81
  • 619148AD-E054-474F-900D-55A16728ED6E.jpeg
    619148AD-E054-474F-900D-55A16728ED6E.jpeg
    1.8 MB · Views: 77
  • EBEA40A9-2D2D-4A04-A450-9DBD8E263360.jpeg
    EBEA40A9-2D2D-4A04-A450-9DBD8E263360.jpeg
    1.2 MB · Views: 79
  • 52A99FE6-C04E-40CB-B660-72D837C8D9F9.jpeg
    52A99FE6-C04E-40CB-B660-72D837C8D9F9.jpeg
    1.2 MB · Views: 82
Got my rope for the girth belt and gloves in. I’m using a cotton rope that I’ll paint. The gloves were too big so gonna return and get a smaller size. Added even more magnets in the rangefinder
 

Attachments

  • 36BA7528-DDD3-4838-AA4C-A152EEA122C0.jpeg
    36BA7528-DDD3-4838-AA4C-A152EEA122C0.jpeg
    1 MB · Views: 74
  • BBF30757-278F-44EC-93CE-E0F5CC6BA3B0.jpeg
    BBF30757-278F-44EC-93CE-E0F5CC6BA3B0.jpeg
    1.6 MB · Views: 76
  • E4E43FA5-4625-42BE-93A4-079B30BF8345.jpeg
    E4E43FA5-4625-42BE-93A4-079B30BF8345.jpeg
    455.8 KB · Views: 76
Did the trimming and test fitting for the gauntlet kits. The right gauntlet attachments were resin casted, they were pretty messy originally and I did alot of filling and sanding since then. The rocket was 3d printed. Both still need some work. Need to get some wooden dowels for the left gauntlet flamethrower box. It’s unfortunately snowy outside, enough so that school has been cancelled for two days straight. Which is good cause I can work on this instead of school but bad cause I can’t go out and sand or paint.
 

Attachments

  • 41B043DB-FA58-4CF8-8BDD-399915A72594.jpeg
    41B043DB-FA58-4CF8-8BDD-399915A72594.jpeg
    1.4 MB · Views: 93
  • 1AE327A0-F253-4D42-B02B-BAA8B59B77DB.jpeg
    1AE327A0-F253-4D42-B02B-BAA8B59B77DB.jpeg
    1.3 MB · Views: 84
  • C6C14F06-7F2A-44DD-821E-33C224F83FB8.jpeg
    C6C14F06-7F2A-44DD-821E-33C224F83FB8.jpeg
    1.3 MB · Views: 85
  • 929702E5-1533-4681-A3AE-25C8486B9CFF.jpeg
    929702E5-1533-4681-A3AE-25C8486B9CFF.jpeg
    1.2 MB · Views: 109
  • B4B637CF-3D31-4BA5-B465-4681285FF340.jpeg
    B4B637CF-3D31-4BA5-B465-4681285FF340.jpeg
    1.3 MB · Views: 84
  • 3B17DC1D-F2E7-44AC-AF1D-D996F0A61A4F.jpeg
    3B17DC1D-F2E7-44AC-AF1D-D996F0A61A4F.jpeg
    1.1 MB · Views: 85
Nice work! Love seeing builds on a budget!

Thanks!
Got my coveralls I’ll be modding in.
E8BC9B36-F4B4-475E-B915-869A5FF48005.jpeg

I like the color a lot. It fits well.
0FD11AB1-D833-42D4-9E35-3CA40B0FB598.jpeg

For the double sleeve look, I’ll fold the sleeve over on itself then sew it down, like so
CF529E5A-ECA1-4576-9512-2554D0FEC7C9.jpeg

The smaller sized gloves arrived as well, but we’re still too big. I’m gonna keep looking for different glove options.

And now, a few questions. How is jango’s thigh armor attached? Is it like the knee and shins, with elastic feeding through holes in the suit or is it directly attached to the suit? And I’m planning on either using Velcro or plastic buckles for the leg armors, what would you guys recommend?
7B630DEF-81B5-4220-AAEB-25C7B136FCFE.jpeg
 
Did some test fitting for the gauntlet box. The wooden dowels are kinda crooked in the box…I doubt it would be easy to tell once it’s closed up but I might try to make a new bracket and redo it anyway, not sure.
426FBCFA-970C-4080-9963-67D44B46F85F.jpeg
 

Attachments

  • 6E46ABFB-ABD9-4CF0-A24D-9EEBB689284D.jpeg
    6E46ABFB-ABD9-4CF0-A24D-9EEBB689284D.jpeg
    1.7 MB · Views: 72
  • FEED88AE-24DD-4A9D-9BA8-BA070AD209D3.jpeg
    FEED88AE-24DD-4A9D-9BA8-BA070AD209D3.jpeg
    971.2 KB · Views: 86
  • 716AB7EB-2748-4A43-B23A-CFC05D2E4D27.jpeg
    716AB7EB-2748-4A43-B23A-CFC05D2E4D27.jpeg
    1.1 MB · Views: 75
  • E61A283B-1949-4C23-98AD-582B822D18D2.jpeg
    E61A283B-1949-4C23-98AD-582B822D18D2.jpeg
    3.2 MB · Views: 68
  • 9E073536-502D-4316-9D2C-F378BCF28558.jpeg
    9E073536-502D-4316-9D2C-F378BCF28558.jpeg
    3.1 MB · Views: 66
Last edited:
This thread is more than 7 months old.

Your message may be considered spam for the following reasons:

  1. This thread hasn't been active in some time. A new post in this thread might not contribute constructively to this discussion after so long.
If you wish to reply despite these issues, check the box below before replying.
Be aware that malicious compliance may result in more severe penalties.
Back
Top