Boushh Build by TFett

Tfett40

Active Hunter
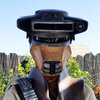
Over a year ago, I picked up a completed Boushh Helmet (Todd's cast and paint up by alvomedia) and was blown away by it.
image1 (5).jpeg


The paint up that Alvomedia is absolutely stunning. Todd's mold is equally as sharp. The helmet inspired me to go forward with building a complete Boushh costume for my wife....well maybe more for me, but for her to to wear for me!

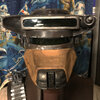
I reached out to Dark Shadow (Scott) who does limited Boushh armor kit runs and placed my order for the armor, tank and bandoliers kits with him. After patiently waiting for almost a year, his kit was ready for shipment and I received the below in the mail.
IMG_7064.JPG IMG_7077.JPG IMG_7080.JPG IMG_7081.JPG
IMG_7088.JPG


Armed with my reference book, reference images and armor...it was time to go to work.
 
The first thing I tackled was the armor. Scott's kit comes in 3 pieces and requires bonding. I overlapped the front collar pieces over the rear panel to my liking and used gaffers tape to hold them together.

IMG_7089.JPG IMG_7090.JPG IMG_7091.JPG IMG_7092.JPG

Next, I used repair putty, which bonds hard and solid to hold the pieces together.
IMG_7119.JPG IMG_7120.JPG

Once that dried solid. I started the processing sanding the edges and smoothing out the putty. In addition, I used bondo in some areas to help cover over the rough areas. I attempted to sand down the shoulder curve as much as could, so it would sit lower on the shoulders and allow more space so the helmet could fit properly around the neck.
IMG_7150.JPG IMG_7151.JPG IMG_7152.JPG IMG_7153.JPG

Next came the test fitting with the helmet on.

IMG_7174.JPG IMG_7175.JPG IMG_7176.JPG

Scott, when designing his armor had hands on opportunity to measure the actual prop worn by Carrie Fisher. Therefore, this armor is definitely made for a small petite frame. My wife got it on without issue, but no way I could get it on my bigger frame. If I would of forced it on, I likely would of cracked the bond.

The armor mold already has some intended imperfections and damage grooves, but I personally wanted a few more and added them. Once that was done I went to sanding and priming.
damage.jpg IMG_7397.JPG

After priming, I wanted to nail down the alignment for the tank and backing before I went onto final painting. So I actually had to start getting the tank semi built in order to do this (I will get into that build later) did some quick measuring, spacing and hole drilling to make sure everything would sit properly once assembled.
IMG_7281.JPG IMG_7283.JPG


For the base paint. I opted for Tamiya Linoleum Deck Brown TS-69 Spray. For bigger area coverage, I just prefer the Tamiya or Model Masters spray cans. They apply evenly and smoothly. Yes they are more expensive then the paint for airbrushes, but lets me honest...I'm just lazy and hate cleaning up the air brush equipment and mess I make.
IMG_7402.JPG IMG_7420.JPG IMG_7419.JPG

Lastly, for the finishing touches on the armor, I added the weathering details with an airbrush. I used a mix of deck brown with black to create a darker brown and a black wash mist. Once dried I gave it a semi-gloss clear coat to match the screen used reference.

IMG_7673.jpg IMG_7669.jpg IMG_7670 (1).jpg IMG_7672.jpg IMG_7671.jpg
 
Last edited:
In putting together the tank kit, 22ssplt t build really helped get me going:
Boushh - Boussh Tank build

The kit is essentially a 3 & 4 inch PVC pipe base with resin caps and greeblies.
IMG_7099.JPG
And from that...the goal is to get to this:
IMG_7102.JPG

Using some reference photos, I glued the greeblies together and cut out the areas needed on the left tank using a dremel and drill.
IMG_7116.JPG IMG_7147.JPG IMG_7148.JPG
Next, I glued the greeblies inside the cut out slots and used simple nuts and bolts to attach the right and left tanks and backing together.
IMG_7124.JPG IMG_7280.JPG IMG_7278.JPG

I continued with gluing the U rod together , marking it and screwing it into both the tanks. I did not get the curve correct and needed to use some putty to help fill in the gaps.
IMG_7271.JPG IMG_7306.JPG IMG_7308.JPG IMG_7309.JPG IMG_7310.JPG IMG_7311.JPG IMG_7313.JPG

I wanted it to be noted that I have avoided putting on the tank caps for the simple reason that I need to be able to access the interior to secure the bolts and nuts, particularly to the armor.

Once I got most of the tank built, I pre-drilled the holes and aligned it with the armor.
IMG_7281.JPG IMG_7283.JPG IMG_7284.JPG

For the leather strap that attaches on the upper collar, I realized that is not weight barring and just simply for appearance. I just glued it to the backer board and drilled holes to attach it.

IMG_7344.JPG IMG_7345.JPG IMG_7346.JPG IMG_7347.JPG

Once I got everything were I wanted. I glued the top tank tops on, but still leaving the bottom open to access the nuts. I spray painted it with primer. While taking a look at the reference photos, I observed there is green damage to the U Bar on the tanks. After primer, I used some green spray paint to color this area and mask it off.
bo3.jpg IMG_7370.JPG IMG_7371.JPG
 
Last edited:
Although my post are several days aparts, the building process so far has been about 3-4 weeks. Having to cut, research, screw, let the glue and paint dry and life just getting in the way. So I am basically just playing catch up on this build documentation. Anyways, continuing on with the tank. After the primer dried and looking at the metallic silver on the tank from the references, it closely resembled the Tamiya Gun Metal TS-38 Spray that I used on the Han Solo in Carbonite build, so I went with that option.
IMG_7406.JPG Tank.jpg IMG_7424.JPG

I let the paint dry for a few days and I took a sanding pad and started to lightly wear down the areas on the tank that had scour marks.
scour1.jpg scour2.jpg scour3.jpg

Taking a look at the reference images, I started to tape of areas of the tank and paint the areas needed. I used an airbrush to paint on plain blue to the smaller cylinder greeblie and a green mixed with white to paint the panel green and top of the tanks a faded light green.
bo3.jpg scour4.jpg scour5.jpg scour6.jpg

The next challenge I had was creating the symbols that go on the left tanks. I knew trying to free hand was going to be a mess. To do this, I pulled up the best reference images could find and I created the symbol on photoshop. The symbols were designed to be a 4x4 inches. However that size was too big, but with the assistance of my wife, we printed the symbols to about 3x3 using her vinyl sticker printer.

de1.JPG de2.JPG de3.jpg de4.jpg

After applying the decal, I airbrushed a thin layer of white, in hopes it would help create the white boarder and when I lightly sand the top colors, it will be revealed. While the paint on the stencils were drying, I decided to add some weathering touches on the tanks using black and brown washes and misting it on in certain areas to give a dirty look.

I then used red and brown airbrush paint to color in the appropriate symbols.
de5.jpg de8.jpg de6.jpg de7.jpg

If, you would like the way the stencil came out. Here are the template I designed for you to use.
BOUSHHLTTANKPRINT.jpg BoushhRightTankPrint.jpg
 
Continuing with the tanks. I used both a soft sanding block and sanding sticks to get the distressed lettering and markings. Once I got everything to my liking, I used socket screws to secure the tanks to the back of the armor plates. Once they were secured, I used E600 to glue on the bottom tank caps.

t1.jpg t1.jpg t2.jpg t3.jpg t4.jpg t5.jpg t6.jpg t7.jpg t8.jpg t9.jpg t10.jpg

Taking a look at the reference images, the armor had inner padding. To create this, I used 1/2 foam and picked up a light tan suede like material from Joann's fabric for $7.00. I then cut the foam to form around the armor and cut the fabric to match as well. Using hot glue and E6000, I glued the fabric to the foam. I then added velcro to the armor and foam backing. Lastly, I weathered it with brown and black paint to darken it.
IMG_7102.JPG p1.jpg p2.jpg p3.jpg p4.jpg p5.jpg p6.jpg p7.jpg

Here is my semi finished tank and armor. I think I will add a bit more weathering and I also still need to attach the front strap and greeblie to the armor, but the hard part of this piece is done.
SMP_8653.JPG SMP_8654.JPG SMP_8661.JPG
SMP_8655.JPG
SMP_8658.JPG
SMP_8660.JPG


SMP_8656.JPG
 
Looks like I took a huge break from documenting this build. Mainly because sourcing some of these parts were difficult and I was a bit unsure how to proceed forward. But around September of 2019, I got inspired to finish up this build and started making progress with ordering more parts, so I will now work on catching up.

My bandolier kit was from Dark Shadow. Using his instructions on how to assemble and using reference photos, I began measuring out the straping to fit my wife size and marking where the stitching goes. Once I was confident, I took the strapping to my tailor to sew it together. While the strapping was away at the tailors I prepped and painted the greeblies using the same gun metal paint as the tanks.
Bandokit.jpg


SMP_9193.JPG


SMP_9197.JPG


SMP_9198.JPG


ban9.jpg

ban3.jpg


ban1.jpg


ban2.jpg


ban4.jpg


ban5.jpg

ban8.jpg

ban6.jpg


Once everything was attached, I test fitted it and was satified. Moving forward to the tunic, cape, gloves and spats.
ban11.jpg
ban10.jpg
 
During this whole process, alvomedia or also known as Boushh Build on FB/Instagram, began taking commisions for soft parts and I could not be happier. At the time, she was only offering cape, tunic, gloves and spats, but that was good enough for me. She had a fairly good turnaround time and I can tell you that the quality and work she put into them were amazing. I was really thankful she was able to complete it for me.
IMG_6483.jpg

IMG_6481.jpg
IMG_6506.jpg
IMG_6507.jpg


For my weathing process on these pieces, I actually started by using a black tea bag bath, to add natural dirty weather look. Once I let it soak for about 1 hour, threw it in the dryer to set the stain color. I did this process 1 additional time and then finished off the weathering by airbrusing a mix of black, brown and tan.
IMG_6484.jpg


IMG_6519.jpg
IMG_6518.jpg
IMG_6522.jpg
IMG_6525.jpg


To finish off the spats, I picked up the greeblie disk from Shapeways using Toolguy's 3d file. I affixed a snap to the spat and disk with a bit of E300 and its good to go. For the boots we opted for the Skechers Woman's Lasso Caravel Short Zip ankle. My wife found them comfortable to wear and they have the right look.
IMG_6683.jpg
IMG_6691.jpg
IMG_6688.jpg
IMG_6690.jpg
,
 
The last remaining soft parts I needed to get commissioned were the most difficult, the pants and girth belt. I finally, opted to go with Clothears after seeing their promotional photos. I placed my order back in April of 2019 and waited patiently.
band2.jpg
boushh30.jpg
boushh29.jpg
armour1.jpg


This week, our order finally arrived. The final pieces to completing this 3 year build.

IMG_3162.jpg
IMG_3163.jpg


Okay, I have to admit, I was really excited about this! 3 years and this build is done. (Almost). In my excitement, I did not take any photos of how the pieces looked when they arrived. But trust me the quality and craftsmanship, totally worth the wait.

As soon as the wife got home, we had to do a test fitting. The pieces by Clothears were a perfect fit, zero alterations needed.

However, my only complaint is the pants. In sunny day light, the pants looked to light in color for my preference and I thought the black paint stood out oddly. To fix this, I used paint thinner to lighten/remove some of the black paint and created a more smeared natural looked. Additionally, I airbrushed it with dark brown and black paint to darken it up significantly. I also added a bit more weathering detail to the tunic, belt and spats.

IMG_3166.JPG


IMG_3175.JPG

IMG_3184.jpg


In regards to the other accessories such as the staff. I actually created a staff using PVC pipes and created a thread for that. I did not really add or change it much aside from paint and it is what we are using. Here is the link.

As for the thermal detonator. I have a Disney Parks Hot Potato one that I purchased back in 2015 or so at Disneyland. It is light weight, the same size as the Master Replica edition and makes the perfect sound. I am in the process of re-painting it weathered chrome and will share the results when I am done.


IMG_3261.jpg


With that, we are done.

IMG_3192.jpg
 

Attachments

  • IMG_3164.JPG
    IMG_3164.JPG
    1.5 MB · Views: 415
  • IMG_3259.JPG
    IMG_3259.JPG
    3 MB · Views: 419
Last edited:
This thread is more than 2 years old.

Your message may be considered spam for the following reasons:

  1. This thread hasn't been active in some time. A new post in this thread might not contribute constructively to this discussion after so long.
If you wish to reply despite these issues, check the box below before replying.
Be aware that malicious compliance may result in more severe penalties.
Back
Top