Boochman
Active Hunter
Well, I've asked questions, purchased items, commented on others' threads here and there; who am I kidding, I've been lurking around on this forum for a LONG time! Today tho, today is the day that I am starting my own WIP! There are many individuals here that have inspired my build - I remember sitting down and reading through DeathProof 's WIP and thinking "yup, this is how I'm tackling this". Then recently, following tennantlim 's build and I'm thinking "yup, this is how I'm tackling this"...hahahaha!
Truth be told, these guys are a reflection of this great community; very accessible, so incredibly knowledgeable, and happy to help. I thank you both, and everyone else that I've badgered with questions throughout my lurking stages.
So, where do I begin? How about my goal!?! My goal is to become 501st certified for my ROTJ Hero Build. I have always enjoyed making costumes (I put a lot of effort into my family's Halloween costumes every year), and I also enjoy community involvement, volunteer efforts and mentoring our youth. I am a licensed Architect, and have volunteered for a mentoring organization in my free time for the last 8 years; so doing this build was a win-win-win for me! Now, having 2 daughters of my own; I look forward to being their Boba Fett!
I'm going to be honest, what kick-started my build again, was the receipt of my long awaited order from Fettpride. I do NOT want this to turn into a burn session about Chris, but a few things that I think are important to mention here. I paid in full for my complete ROTJ package (Armor, Gaunts, Helmet & Jetpack) in December of 2015, and I just received the armor this week - the helmet will be here next week (the Jetpack is TBD). The armor and gauntlets are art. What these people do is create art (how, I don't know), but the individuals making these pieces are artists, and they come in different forms. From hard parts, to soft goods, to electronics, to machined aluminum parts - people have perfected a craft, and it shows in the pieces I received from vendors (artists) over the years. The parts I received from Fettpride are absolutely no exception.
Speaking of Artists, here is a breakdown of my gear:
ROTJ FPH2 Helmet (Fettpride)
Armor, Gauntlets, Jetpack (Fettpride)
Flightsuit, Flak, Pouches & Spats (Arkady )
Gloves (Major )
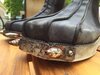
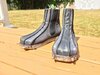
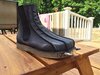
Boots (Man of War Studios )
Ammo Belt (Man of War Studios )
Cape, Girth Belt, Wookie Braids (woodman )
Jetpack Harness (Bigdane )
Jetpack hooks & clips (full metal fett )
All aluminum upgrades known to man (MachineCraft )
Chestlights (Fettronics )
Rubber chin cup (Darth Voorhees )
Dental files (01Hawk )
Blaster w/ eFX (Sidewinder )
Rangefinder Electronics & Jetpack Beacon Light (Jc27 )
Flamethrower Electronics (crumdum )
*I also picked up the Aker MR1505 speaker for a voice changer, as well as found parts for the shin tools & calculator!
You all ROCK, and your professionalism is highly appreciated!
Having said that, the unfortunate part is the logistics of "starting a build" 3 years ago. I purchased ALOT of items right when I placed my order with Fettpride. Now, artists have changed what they offer to simplify installations, or advance their technologies. I will have my work cut out for me moving forward, but like I said; I am excited to officially begin my journey with all of you! Sorry for the long-winded first post, but I've had a lot to say for a long time, and many thanks to give as well. On with the show...
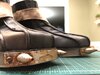
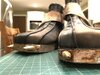
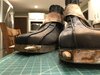
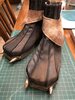
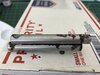
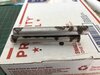
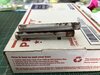
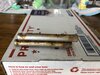
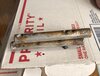
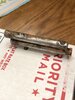
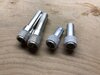
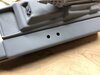
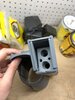
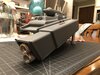
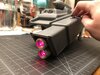
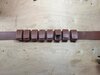
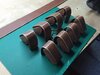
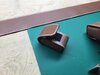
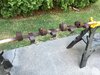
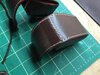
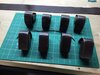
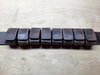
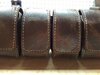
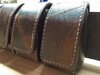
Below are images of my Armor from Fettpride. First bunch of photos were taken by him when our discussions lead to him sending me some images last month, second small group are in my house (ready for Easter in the dining room), haha! If you are curious, yes - Chris provided specific pieces in cold-cast aluminum. These are really slick, but as mentioned above - I have the aluminum upgrades as well as the found parts; so now I have to replace things here and there:
Truth be told, these guys are a reflection of this great community; very accessible, so incredibly knowledgeable, and happy to help. I thank you both, and everyone else that I've badgered with questions throughout my lurking stages.
So, where do I begin? How about my goal!?! My goal is to become 501st certified for my ROTJ Hero Build. I have always enjoyed making costumes (I put a lot of effort into my family's Halloween costumes every year), and I also enjoy community involvement, volunteer efforts and mentoring our youth. I am a licensed Architect, and have volunteered for a mentoring organization in my free time for the last 8 years; so doing this build was a win-win-win for me! Now, having 2 daughters of my own; I look forward to being their Boba Fett!
I'm going to be honest, what kick-started my build again, was the receipt of my long awaited order from Fettpride. I do NOT want this to turn into a burn session about Chris, but a few things that I think are important to mention here. I paid in full for my complete ROTJ package (Armor, Gaunts, Helmet & Jetpack) in December of 2015, and I just received the armor this week - the helmet will be here next week (the Jetpack is TBD). The armor and gauntlets are art. What these people do is create art (how, I don't know), but the individuals making these pieces are artists, and they come in different forms. From hard parts, to soft goods, to electronics, to machined aluminum parts - people have perfected a craft, and it shows in the pieces I received from vendors (artists) over the years. The parts I received from Fettpride are absolutely no exception.
Speaking of Artists, here is a breakdown of my gear:
ROTJ FPH2 Helmet (Fettpride)
Armor, Gauntlets, Jetpack (Fettpride)
Flightsuit, Flak, Pouches & Spats (Arkady )
Gloves (Major )
Boots (Man of War Studios )
Ammo Belt (Man of War Studios )
Cape, Girth Belt, Wookie Braids (woodman )
Jetpack Harness (Bigdane )
Jetpack hooks & clips (full metal fett )
All aluminum upgrades known to man (MachineCraft )
Chestlights (Fettronics )
Rubber chin cup (Darth Voorhees )
Dental files (01Hawk )
Blaster w/ eFX (Sidewinder )
Rangefinder Electronics & Jetpack Beacon Light (Jc27 )
Flamethrower Electronics (crumdum )
*I also picked up the Aker MR1505 speaker for a voice changer, as well as found parts for the shin tools & calculator!
You all ROCK, and your professionalism is highly appreciated!
Having said that, the unfortunate part is the logistics of "starting a build" 3 years ago. I purchased ALOT of items right when I placed my order with Fettpride. Now, artists have changed what they offer to simplify installations, or advance their technologies. I will have my work cut out for me moving forward, but like I said; I am excited to officially begin my journey with all of you! Sorry for the long-winded first post, but I've had a lot to say for a long time, and many thanks to give as well. On with the show...
Below are images of my Armor from Fettpride. First bunch of photos were taken by him when our discussions lead to him sending me some images last month, second small group are in my house (ready for Easter in the dining room), haha! If you are curious, yes - Chris provided specific pieces in cold-cast aluminum. These are really slick, but as mentioned above - I have the aluminum upgrades as well as the found parts; so now I have to replace things here and there:
Attachments
-
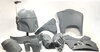 Photo Feb 23, 6 35 27 PM.jpg1,017.5 KB · Views: 542
 -
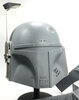 Photo Feb 23, 6 37 56 PM.jpg865 KB · Views: 547
 -
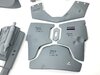 Photo Feb 23, 6 39 25 PM.jpg1.1 MB · Views: 509
 -
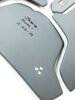 Photo Feb 23, 6 40 11 PM.jpg444 KB · Views: 506
 -
 Photo Feb 23, 6 40 21 PM.jpg544 KB · Views: 549
 -
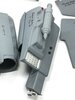 Photo Feb 23, 6 40 36 PM.jpg536.7 KB · Views: 467
 -
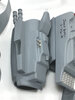 Photo Feb 23, 6 41 09 PM.jpg722.6 KB · Views: 457
 -
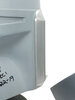 Photo Feb 23, 6 41 36 PM.jpg681.6 KB · Views: 501
 -
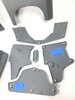 Photo Feb 23, 7 29 08 PM.jpg1.2 MB · Views: 504
 -
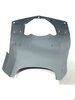 Photo Feb 23, 7 34 47 PM.jpg539.2 KB · Views: 481
 -
 Photo Feb 23, 7 39 40 PM.jpg682.6 KB · Views: 494
 -
 Photo Feb 23, 7 41 24 PM.jpg418.3 KB · Views: 451
 -
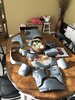 Photo Mar 20, 5 29 56 PM.jpg1.6 MB · Views: 533
 -
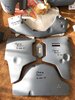 Photo Mar 20, 5 33 04 PM.jpg1.5 MB · Views: 501
 -
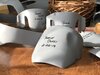 Photo Mar 20, 5 33 16 PM.jpg5.4 MB · Views: 540
 -
 Photo Mar 20, 5 34 11 PM.jpg2.3 MB · Views: 525
 -
 Photo Mar 20, 6 24 16 PM.jpg2.1 MB · Views: 530


")


")
